VMware App Volumes is a great technology that facilitates application delivery to virtual desktops. It simplifies application management and updates. IT personnel truly understand how important it is to make certain applications always available to users.
After users are set up with a virtual desktop, IT needs to make sure that they can recover from hardware or software problems. And, along those lines, IT must also consider how to back up AppStacks and writable volumes, the application containers in App Volumes.
AppStacks and writable volumes are virtual machine disk files (VMDKs) that you attach to virtual machines. AppStacks are shareable, one-to-many, read-only volumes. Writable volumes are user-specific and read-write all of the time, that is, as soon as they are attached after the user logs in.
But those VMDK files cannot be backed up by most backup solutions. Most virtual-machine backup solutions on the market allow backups only of the virtual machine and any VMDK files attached to that virtual machine. A major benefit of AppStacks is that they can be attached to many virtual machines.
If your storage vendor can back up your VMDK files at the datastore level, you can try that, but not all storage vendors allow that kind of backup.
To solve this problem, VMware recently released the App Volumes Backup Utility, a Fling that will help you back up both AppStacks and writable volumes. For the announcement of this tool, see VMware App Volumes Backup Utility Fling: Introduction.
Note: This Fling is for experienced administrators of App Volumes who have wondered how they can back up their AppStacks and writable volumes.
This blog post gives you detailed instructions on how to use the Fling to back up App Volumes AppStacks and writable volumes.
Overview of the Process of Backing Up with the App Volumes Backup Utility
The App Volumes Backup Utility
- Uses a simulated virtual machine (VM) for attaching AppStacks or writable volumes during backup. This is a simulated VM because it has no operating system and is never booted up.
- Integrates with standard backup solutions.
- Supports both App Volumes 2.x and 3.0.
The steps for using the App Volumes Backup Utility are the following:
- From the App Volumes Backup Utility, connect to App Volumes Manager to populate the tool with a list of your AppStacks and writable volumes.
- From App Volumes Backup Utility, connect to vCenter Server to see the list of your configured vSphere hosts.
- From the vCenter Server section of the App Volumes Backup Utility, create the simulated virtual machine (the Backup VM).
- In the App Volumes Backup Utility, attach to the simulated VM any AppStacks and writable volumes that you want to back up.
- If you are going to back up any writable volumes, customize the supplied pre-backup and post-backup files to reflect your App Volumes environment. Give the paths to these files within your backup software.
- Use your standard backup software to back up the simulated VM and its attached AppStacks and writable volumes.
- Restore AppStacks and writable volumes to the datastore, and import them to the App Volumes environment.
The requirements for setting up the App Volumes Backup Utility, as well as details on these steps, follow.
Requirements for Running the App Volumes Backup Utility
You need to run the App Volumes Backup Utility from a Windows virtual machine with the following required software installed:
- Windows 7 SP1, Windows 8.1, Windows 10, or Windows Server 2008 R2 or
2012 R2 - vSphere PowerCLI 6.0 or later
- Microsoft PowerShell 3.0 or later
- VMware Remote Console Plug-In 5.1 or later
- .NET Framework 4.5
- Windows Management Framework 3.0 or later
Important: Download and install Microsoft PowerShell and the VMware Remote Console Plug-In before installing PowerCLI.
Important: Microsoft PowerShell execution policy must be set to RemoteSigned. Learn how to set this from the Microsoft articles Set-ExecutionPolicy and about_Execution_Policies.
Install the App Volumes Backup Utility. After it is installed, open the application. The utility has an upper section for App Volumes Manager and a lower section for vCenter Server.
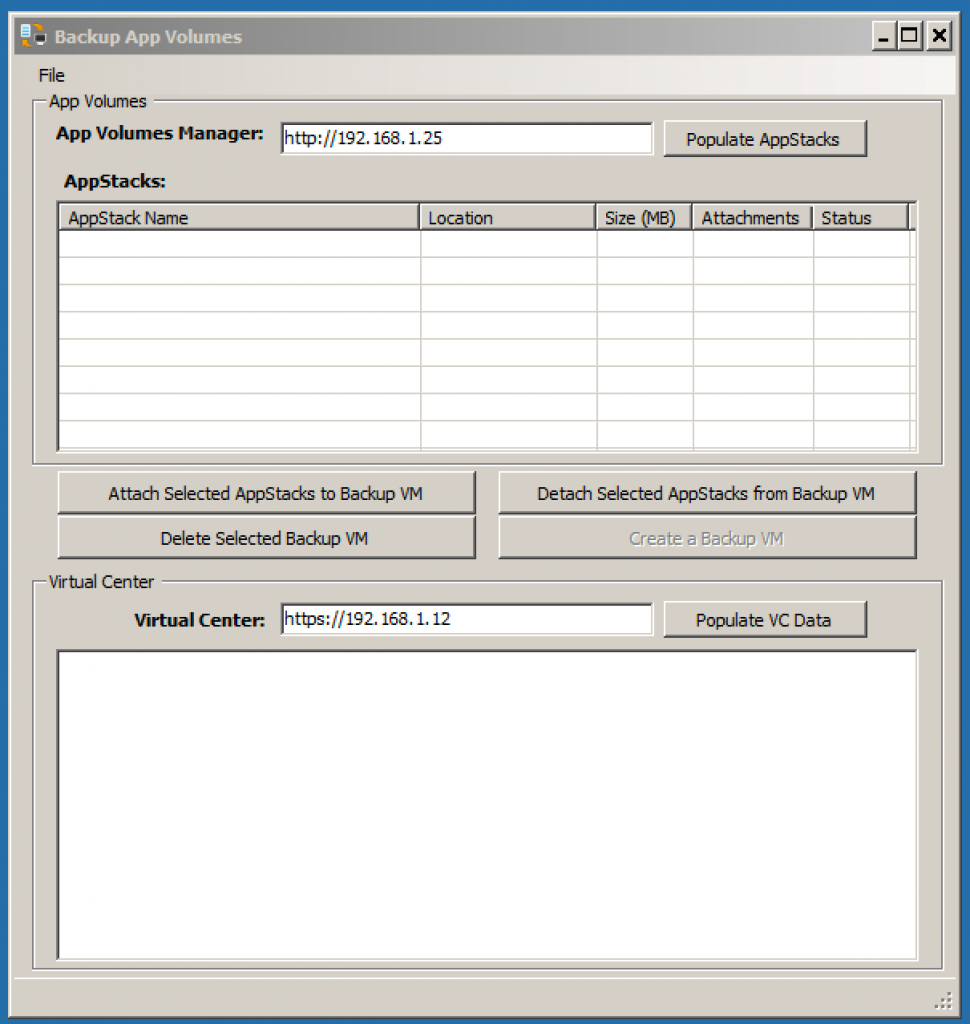
To use this application, you need two different sets of credentials:
- Administrator access to the App Volumes Manager server
- Administrator access to vCenter Server
You need administrative access to App Volumes Manager to be able to read from the App Volumes database and retrieve all of the existing AppStacks and writable volumes from the environment.
Now you are ready to use the tool.
Populating the Tool with Your List of AppStacks and Writable Volumes
First, populate the App Volumes Backup Utility with the list of your AppStacks and writable volumes.
- From the upper section of the main window of the App Volumes Backup Utility, enter the IP address or fully qualified domain name of your App Volumes Manager server.
- Click Populate AppStacks. The credentials pop-up window appears, as seen in Figure 1.
- Enter your App Volumes Manager administrator credentials.
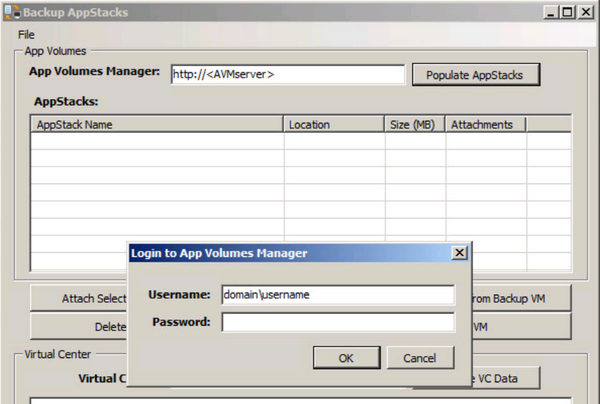
Figure 1: Login to App Volumes Manager Pop-Up Window
Be sure to use the domain\username nomenclature. For example, if your domain name is test1.local, use the NetBIOS domain name of test1, then the username, for example: test1\AVAdmin.
After you enter the App Volumes Manager administrator credentials, you get the list of all AppStacks and writable volumes currently deployed in the environment (attached or not). See Figure 2.

Figure 2: List of AppStacks and Writable Volumes Currently Deployed
Listing Your vSphere Hosts in vCenter
Next, in the lower section of the App Volumes Backup Utility window, connect to vCenter Server with administrative-level credentials.

Figure 3: Connecting to vCenter Server
After you are connected, you see all the configured vSphere hosts for vCenter Server.

Figure 4: Configured vSphere Hosts for vCenter Server
After these two configuration steps are complete, you are ready to proceed.
Creating the Simulated Virtual Machine
Next, create a backup virtual machine. In the lower section of the App Volumes Backup Utility window, select a host and, from the center area of the window, click Create a Backup VM.

Figure 5: Create a Backup VM Pop-Up Window
You need to confirm the vSphere host and the datastore where you want the backup to take place. In the Create Backup VM dialog box, enter the vSphere Host name and Datastore (Figure 6).
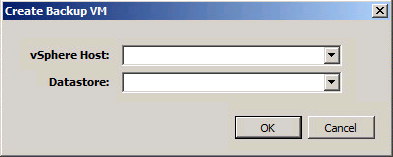
Figure 6: Create Backup VM Dialog Box
In the Backup VM Created pop-up window, respond to the prompt about your newly created backup VM by clicking OK.
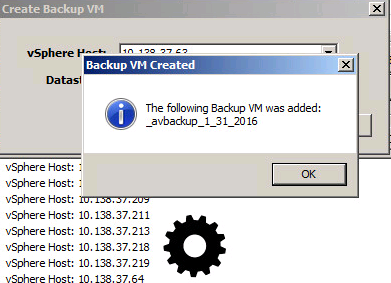
Figure 7: Confirming Backup VM Was Created
In vCenter, you can review your Recent Tasks window to confirm that the VM creation has a Status of Completed.
![]()
Figure 8: vCenter Recent Tasks Window
The VM creation is quick. The simulated virtual machine is only 1 MB, so it usually takes a few seconds to create that VM. (This simulated virtual machine can be used only from within the tool.)
A benefit of this tool is that if any of your vSphere hosts are in maintenance mode, the tool sees this and will not permit you to create a backup VM on it, as shown in Figure 9, which is in the lower section of the App Volumes Backup Utility window.
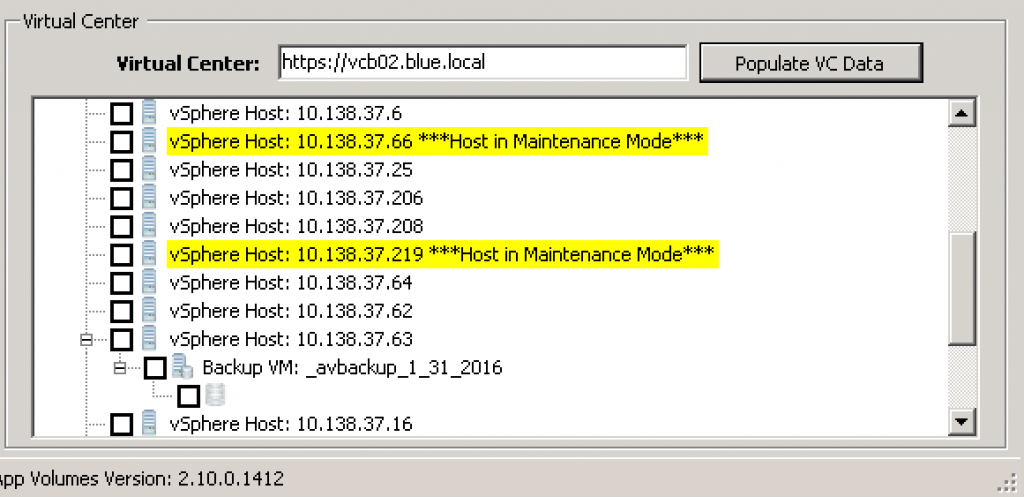
Figure 9: Warnings About vSphere Hosts in Maintenance Mode
After the backup VM is created, you are ready to attach the AppStacks and writable volumes to this simulated VM.
Attaching AppStacks and Writable Volumes to the Simulated VM
Now that the backup virtual machine is created, from the upper section of the App Volumes Backup Utility window, as shown in Figure 10, select the AppStacks and writable volumes you want to back up.
Tip: From within this window, you can right-click an AppStack to find out which applications are on that AppStack.
Click Attach Selected AppStacks to Backup VM.
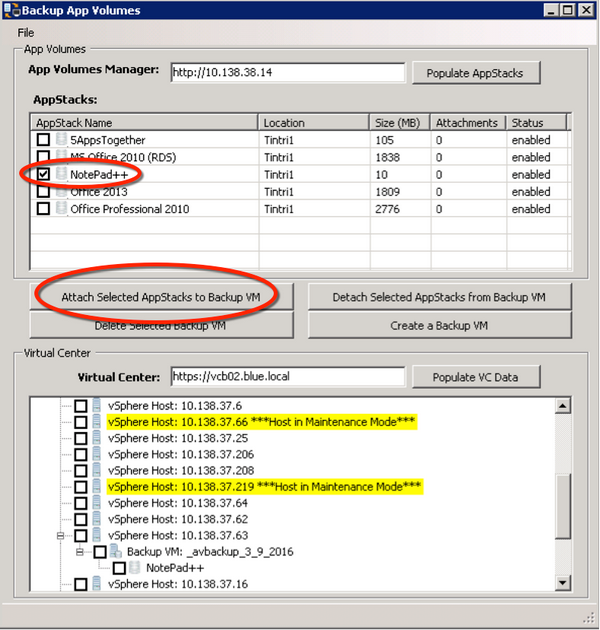
Figure 10: Select AppStacks and Writable Volumes to Back Up
After you get the notice that the selected AppStacks and writable volumes are attached to the backup VM, in vCenter, go to the Virtual Machine Properties window for the backup VM (_avbackup_3_9_2016, in this example) to confirm attachment. In this example, in Figure 11, you can see that the selected AppStack (Hard disk 2 with a Disk File value indicating NotePad++)is attached to the VM.

Figure 11: Virtual Machine Properties Window for Backup VM
Special Instructions for Backing Up Writable Volumes
This section is applicable only if you are backing up writable volumes. You must follow these instructions before you back up writable volumes with the backup software. If you are backing up only AppStacks, skip this section.
Along with your download of the App Volumes Backup Utility Fling, you receive the following files necessary for properly backing up writable volumes:
- av_backup_prep.exe
- pre-backup
- post-backup
The pre- and post-backup files are wrappers for av_backup_prep.exe and have different flags for running the command. You will customize and then run the pre- and post-backup files from within your chosen backup software. In almost all cases, within the backup software, you have a place to enter locations for pre- and post-backup scripts so the software can run them, as shown in Figure 12.

Figure 12: Entering the Locations for pre- and post-backup Scripts
Your backup software will run the av_backup_prep.exe command before and after the backup, according to the specifications in your pre- and post-backup files. By entering the paths to these files within your backup software, you allow the software to run these files at the appropriate times. Before the backup software backs up writable volumes, it runs the pre-backup file, and after the backup of writable volumes, the backup software runs the post-backup file.
What the pre-backup File Does
The pre-backup file looks for any writable volumes in the App Volumes Manager environment which are currently attached to users’ virtual machines. If any writable volumes are attached, they are detached, and the data gets written to a temporary XML file. The pre-backup file also disables writable volumes during the backup process. This prevents App Volumes Agent from trying to re-attach a writable volume if a user logs in. If an attempt to re-attach were to happen, it could cause the writable volume to fail and corrupt the entire virtual disk that the writable volume is on.
Preparing the pre-backup File

Figure 13: The pre-backup File
Enter the following data into the pre-backup file:
- URL of the App Volumes Manager server (avmanager)
- Administrative user name for App Volumes Manager (in the format domain\user)
- Password for that user (Password)
- URL for vCenter Server (vCenter_Address)
- Name of your backup VM (Backup_VM_Name)
In the pre-backup file, the PRE flag at the end directs av_backup_prep.exe to run its pre-backup routine.
What the post-backup File Does
The post-backup batch file reads the XML file and re-attaches the writable volumes that were detached for backup, and re-enables the writable volumes so that users can start attaching them in App Volumes again.
Preparing the post-backup File
Configure the post-backup batch file with the same values that you entered in the pre-backup batch file. The POST flag at the end of the command directs av_backup_prep.exe to run its post-backup routine. (See Figure 14.)

Figure 14: post-backup Batch File
Be sure you have entered the paths for the pre- and post-backup files into your backup software.
Backing Up the Simulated VM and Its Attached VMDKs
Now that you have attached the AppStacks and writable volumes, and you have prepared the necessary scripts for handling the writable volumes, you can run the backup of the simulated VM and its attached VMDKs. You can use any backup software that supports virtual machine backups. In this example, we chose Veeam Backup & Replication, part of the Veeam Availability Suite v9.0.
Figure 15 is an example of a backup job that we ran in Veeam. The job is still running and almost complete.
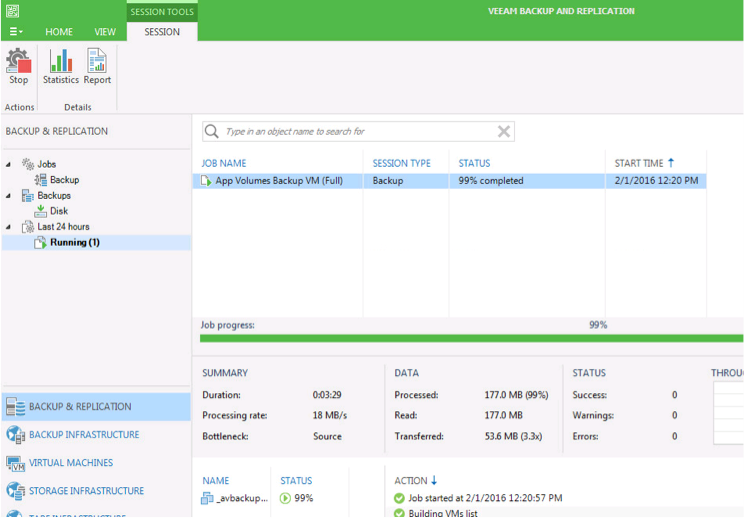
Figure 15: Example of Job Running in Backup Software
Restoring AppStacks and Writable Volumes to the App Volumes Environment
Backing up is only half of the equation. You also need to restore, which is a two-step process. First, go to the backup solution that you used to back up the AppStacks and writable volumes, and restore the AppStacks and writable volumes to the App Volumes datastore.
Second, after the restore is complete, go to App Volumes Manager and click the AppStacks tab. You see the AppStacks in your environment. In our example, the NotePad++ AppStack was removed from the App Volumes environment for the backup:

Figure 16: Current AppStacks in the App Volumes Environment
Click Import AppStacks to import the missing AppStack from your datastore, and the AppStack is re-established in your App Volumes environment.

Figure 17: Importing an AppStack
As you can see, the App Volumes Backup Utility makes it possible to make backups of your AppStacks and writable volumes, and this blog post provides clear instructions for restoring them to the App Volumes environment. Let us know on the Fling site what you think of the utility. We are always happy to receive feedback and hear about your deployments. For more information, see the App Volumes documentation.
By Stéphane Asselin and Chris Halstead, VMware End-User Computing (EUC) architect for the VMware EUC Technical Marketing Center of Excellence


