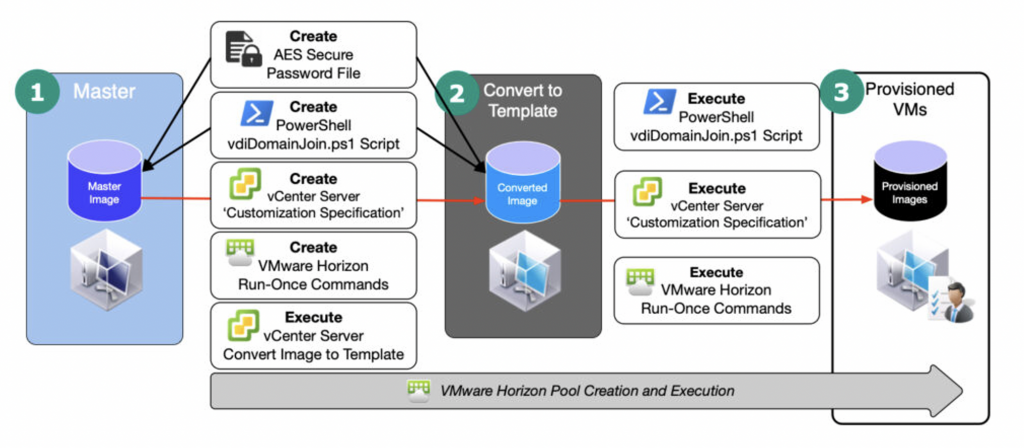
Recently, a customer asked me to help them with VMware Horizon® automated full clone provisioning. They had a requirement to run Full Virtual Machines (Automated, Dedicated) for their developers. They wanted these Full Clone Virtual Machines to auto-join the domain, place the VM under a specific OU, and then remove the script from the local VM upon completion.
To achieve this, I walked the customer through these six steps in order:
- Create and prepare the Gold Image
- Create a secure password file
- Create vdiDomainJoin.ps1 PowerShell script and place it in the Gold Image
- Create vCenter Server Customization Specification profile
- Add Horizon Run-Once commands
- Create the Horizon Pool
Check out this detailed how-to that’ll walk you through the six steps of Horizon automated full clone provisioning:

1. Prepare the Gold Image
- Build the clean Gold Image under the vCenter that manages your VDI Resource Cluster
- Install VMware Tools into your image
- Install Horizon Agent into your image
- Reboot the Gold Image when prompted
- Ensure you have a local Administrator account on the image
- Run VMware Optimization Tool on the Gold Image
- Ensure ‘Microsoft OneDrive’ is unselected (optional)
- Ensure ’Remove 3rd Party Apps’ is unselected (optional)
- Create a folder on the Gold Image (C:\Temp)
Please note: If you need to join the Gold Image to the domain to propagate user privileges, it’s recommended that you place the Gold Image in an isolated OU, so you don’t have the local Administrator account stripped from the image.
2. Create a secure password file
When using a Key/SecureKey, the Advanced Encryption Standard (AES – wiki link) encryption algorithm is used. You can use the stored credential from any machine with any user as long as you know the AES Key used.
This blog post from PDQ has some great tips for encrypting credentials and securing passwords:
Here are some examples:
Creating AES key with random data and export to file:

Creating SecureString object:

Creating PSCredential object:

3. Create the script
- Create a file called vdiDomainJoin.ps1 and place it under C:\Temp
- Copy the code contents from here, into the vdiDomainJoin.ps1 file and save
This script should reside on the Gold Image Template. Modify the sections in yellow to match your environment.
Script breakdown:

- On the Gold Image, open PowerShell and execute the following syntax:
set-executionpolicy unrestricted - We are now finished with the Gold Image
- Shut down the image
- Within vCenter, right-click on the Gold Image
- Select “Clone”
- Select “Clone to Template”
4. Prepare the ‘VM Customization Specification Profile’
Open the vCenter Management Page for the VDI Resource Cluster.
- Create VM Customization Specifications profile.
- Under the section “Commands to run once,” enter the following syntax:
- PowerShell.exe -ExecutionPolicy Bypass -file “C:\Temp\vdiDomainJoin.ps1”
- cmd.exe /c rmdir “C:\Temp” /s /q
- cmd.exe /c shutdown /r /t 00
3. Under the section “Workgroup or domain,” leave Workgroup selected.
5. Provisioning Horizon ‘Commands to run once’ section

The below lines of code are what we placed in the Run Once section:

6. Horizon View Pool Setup Steps

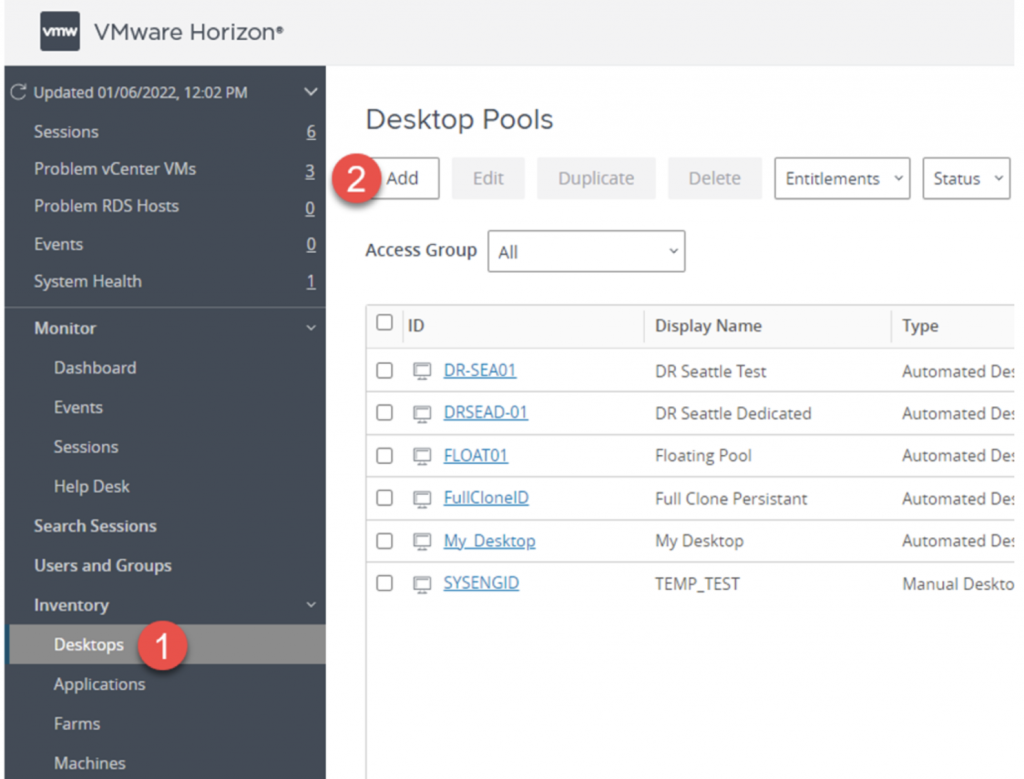
- Open the Horizon View Admin page and select “Desktops” under the inventory section
- Select “Add” under Desktop Pools

- Select “Automated Desktop Pool”

- Select “Full Virtual Machine”
- Select your vCenter Server
- Select “Next”

- Select “Dedicated”
- Select “Enable Automatic Assignment”
- Select “Next”

- Select “Next”

- Enter a Pool ID name
- Enter a Display Name
- Select “Next

- Enter a naming pattern
- Set max machines for the pool
- Set the value of spare powered on VMs
- Select “Next”

- Select the template you created for the image
- Set the VM folder location
- Set the vSphere cluster in which the pool of VMs will reside
- Provide a resource pool location
- Select the datastore to which the VMs (in this pool) should be provisioned
- Select “Next”

- Set your session type (Desktops or Apps)
- Set your remote machine policy. I recommend “Always Powered On” for full VMs
- I recommend allowing users to reset their VMs. Also, I set “Log Off After Disconnect” to “Never.”
- Select “Next”

- Set your default protocol
- Set if you want your users to be able to change the protocol when connecting to their VM
- Typically, I recommend setting 3D Rending to “Automatic”
- I recommend a VRAM Size of “128” when dealing with full virtual machines
- It depends on your environment, but I leave the maximum number of monitors at 2
- Select “Next”

- I recommend changing this value to “Desktop Pool”

- Under guest customization, select the “Use the customization specification” option followed by the vCenter Customization Specification profile you created earlier
- Select “Next”

- Select “Submit” to finalize your settings and create the pool
That’s it! The full VMs should provision and auto-join to the domain under the specific OU you need.
If you need a hand with VMware Horizon or any other of your digital workspace initiatives, VMware Professional Services can help! Reach out to your VMware sales representative to learn more.


