

Edge computing demands speed and precision. Bringing up a new VMware Cloud Foundation (VCF) Edge site traditionally required manual, onsite configuration, a process that does not scale across dozens or hundreds of remote locations. With VCF Edge 9.1, Broadcom delivers Zero Touch Provisioning (ZTP) or vSphere Elastic Provisioning, a capability that automates bare-metal host boot, ESX installation, and cluster registration over the network, eliminating the need for local expertise at the edge.
This blog walks through the complete workflow: creating a ZTP-enabled cluster in vCenter, configuring Auto Deploy and Deploy Rules, booting an edge host via UEFI HTTPS, and then using the open-source VcfEdgeAtScale PowerShell module to configure the fully-registered host into a production-ready edge site cluster, all without anyone touching a keyboard at the remote site.
What Is Zero Touch Provisioning?

Zero Touch Provisioning is the capability within VMware Cloud Foundation that orchestrates fully unattended ESX host deployment at remote sites. A bare-metal server arrives at the edge site directly from the OEM vendor. Once connected to the network and powered on, the host broadcasts a DHCP request. In response, a configured DHCP server at the primary data center responds with the address of a UEFI HTTPS Boot URL, served by the vCenter Auto Deploy service. The host downloads the ESX installer image over HTTPS, auto-provisions, and then registers itself with vCenter, placing itself into the designated cluster as specified by the matching Deploy Rule.
The result is a host that goes from bare metal to a fully registered vCenter cluster member with zero on-site human interaction. Paired with the VcfEdgeAtScale PowerShell module, subsequent configuration of the vSphere Supervisor, networking, storage, and Supervisor Services (Harbor and Argo CD) is equally automated.
Prerequisites
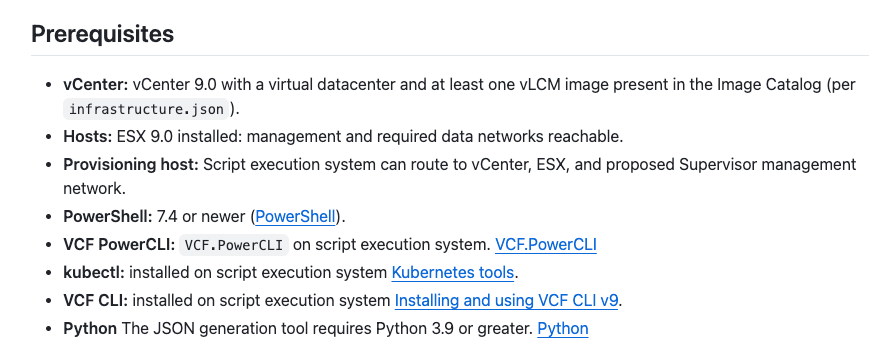
The following components must be in place before starting the ZTP workflow:
| Component | Requirement | Notes |
|---|---|---|
| vCenter | vCenter 9.1+ | Virtual data center created; at least one vLCM image in the Image Catalog |
| Edge Host | ESX 8.0u3+ compatible | Management and required data networks reachable; UEFI boot capable |
| DHCP | DHCP on management network | Must support UEFI HTTP Boot options (Option 60 / vendor class) |
| Network | IP routing to vCenter | Edge management network must reach vCenter |
| PowerShell | 7.4 or newer | Required for VcfEdgeAtScale module; pwsh on macOS/Linux |
| kubectl | Latest stable | Required for Supervisor service interactions |
| VCF CLI | Latest stable | Required for Supervisor interaction |
| Provisioning Host | Any networked system | Must route to vCenter, ESX hosts, and the Supervisor management network |
Phase 1: vCenter Cluster Setup and ZTP Configuration
Create the Target Cluster in vCenter
The first action is to create a cluster that will serve as the landing zone for ZTP-provisioned edge hosts. In vCenter, right-click the target datacenter and select New Cluster.
- Open the New Cluster wizard
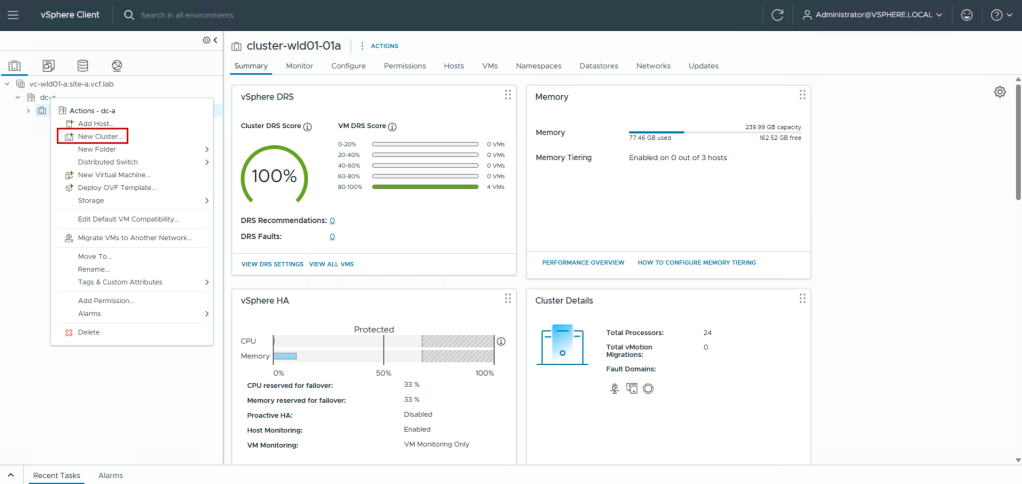
Navigate to your vCenter inventory, right-click on the datacenter object, and choose New Cluster. This opens the cluster creation wizard.
- Name the cluster in the Basics step
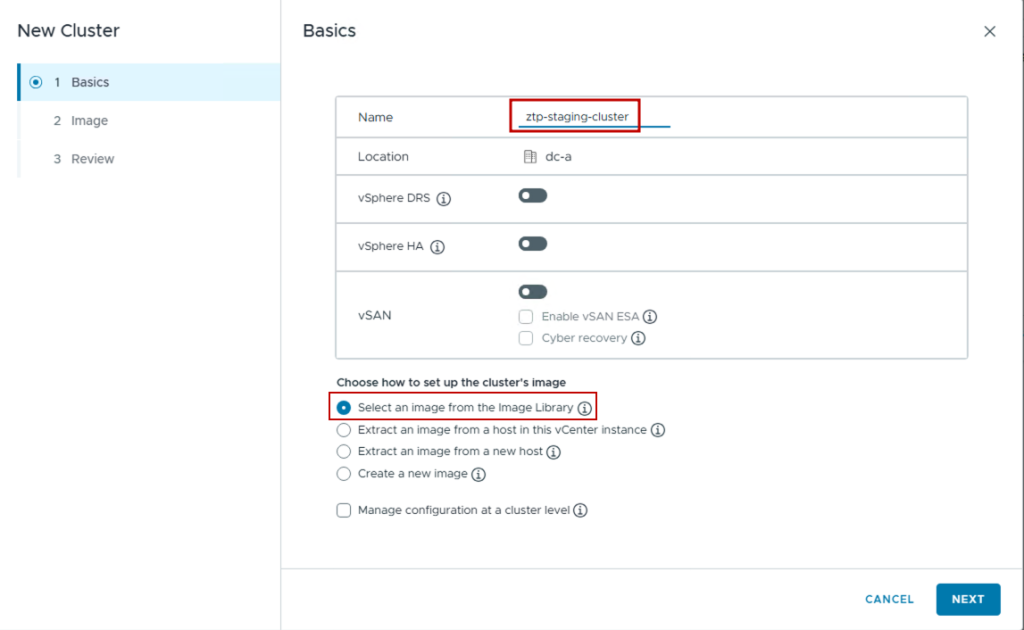
Enter a meaningful cluster name. In this walkthrough, the cluster is named “ztp-staging-cluster”. This name will be referenced by Deploy Rules later, so keep it consistent.
- Select vLCM Image
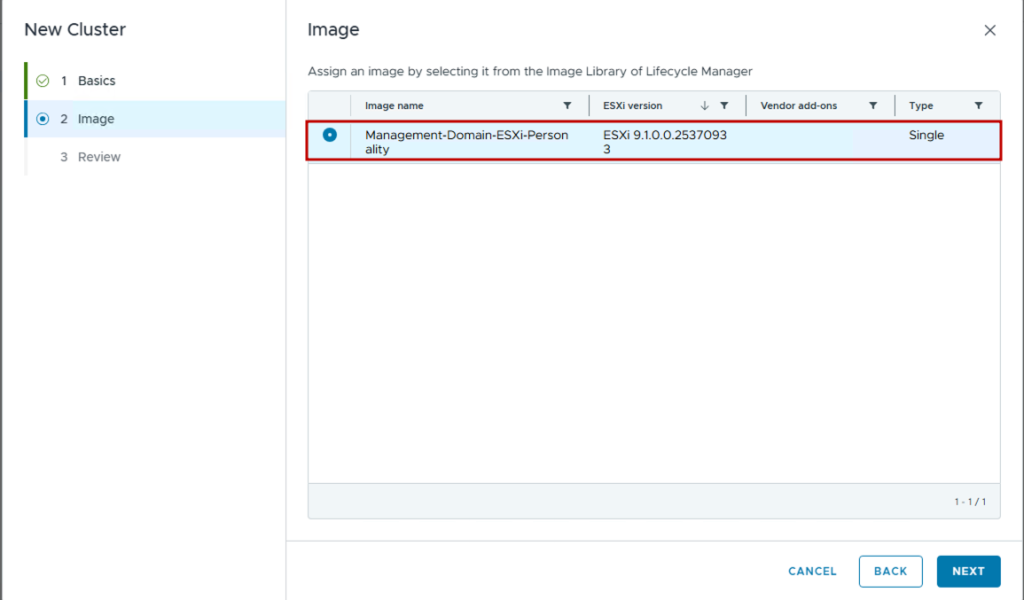
Enable vSphere Lifecycle Manager (vLCM) image-based management. This helps ensure the correct ESX image version is deployed automatically to ZTP-provisioned hosts.
- Review and finish cluster creation
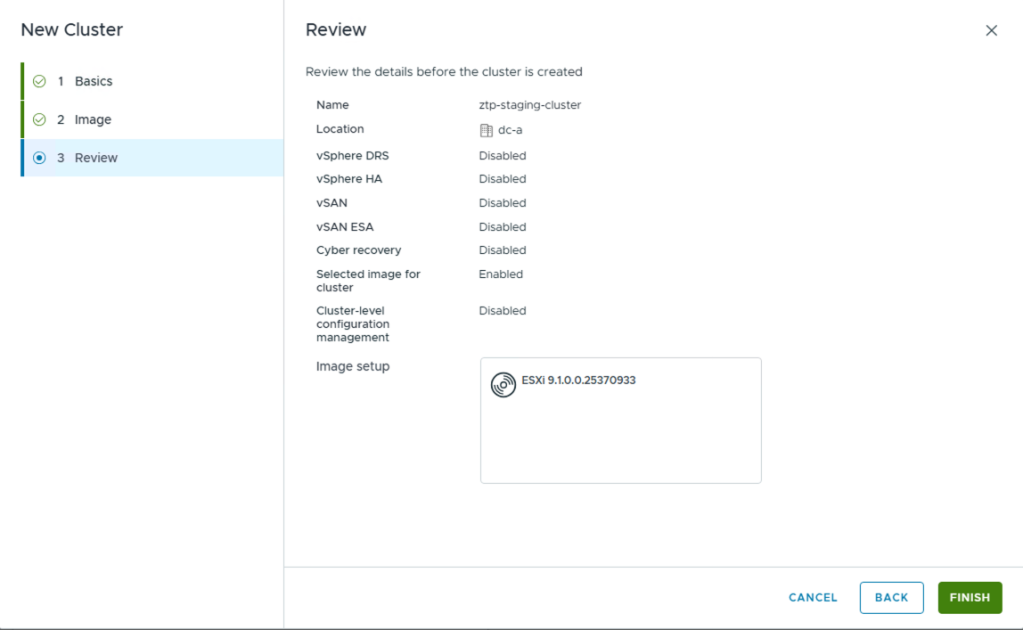
Review the cluster configuration summary and click Finish. The cluster object appears immediately in your vCenter inventory.
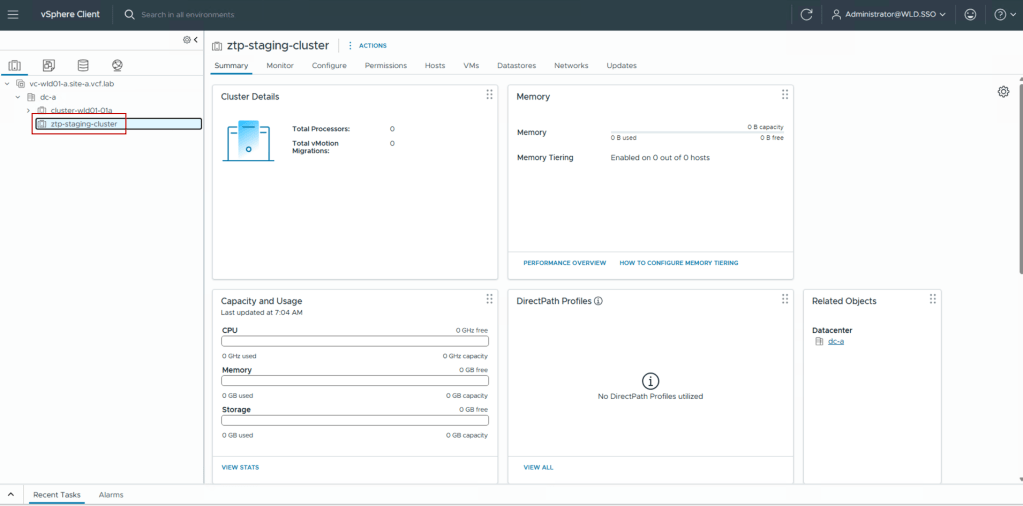
Enable Auto Deploy and Image Builder
Auto Deploy is the vCenter service that hosts the UEFI HTTPS Boot endpoint. It serves the ESX installer image to booting hosts and applies the matching Deploy Rule. Before enabling ZTP on the cluster, you must activate Auto Deploy at the vCenter level.
- Navigate to Auto Deploy in vCenter
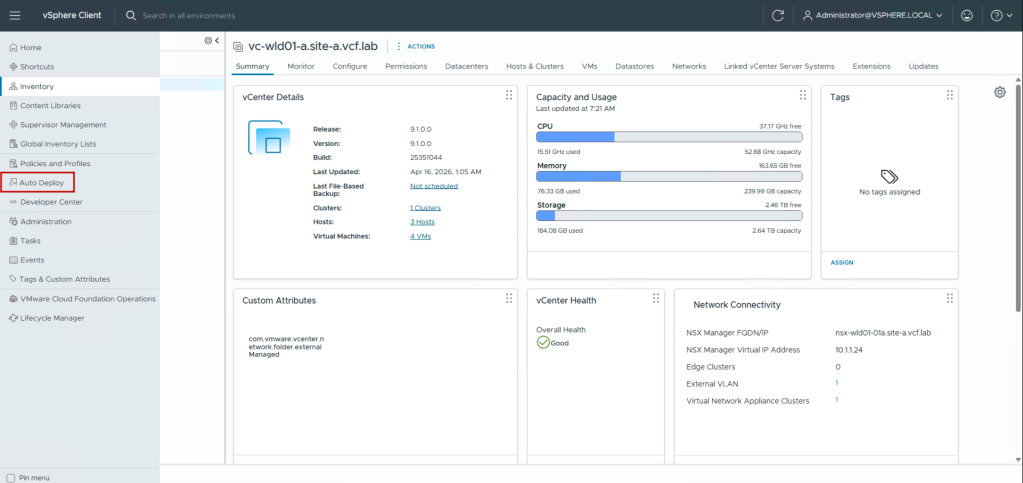
In the vCenter navigation, go to Menu → Lifecycle Manager. The Auto Deploy section shows the current service state and hosted images.
- Enable Auto Deploy and Image Builder services
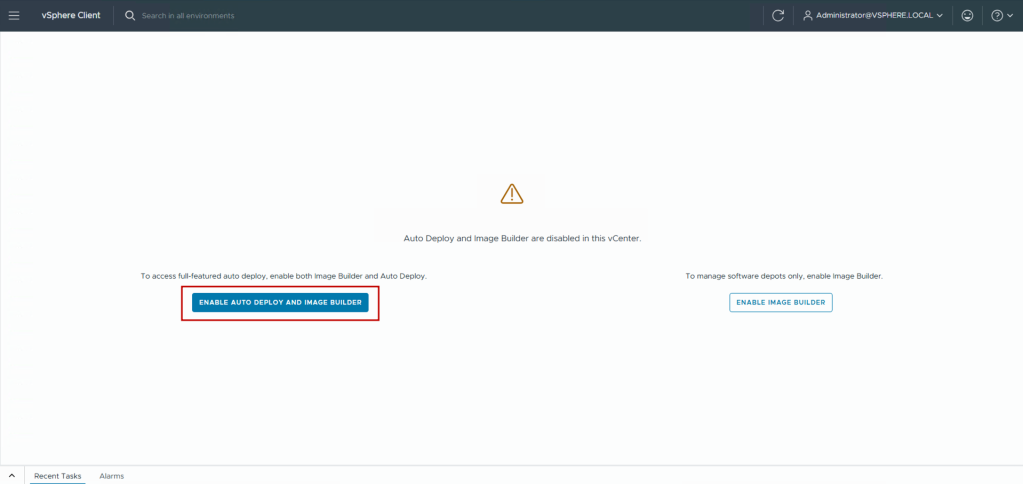
Click Enable on both the Auto Deploy and Image Builder services. Auto Deploy requires Image Builder to create and manage the software depot images it serves to booting hosts.
Enable Zero Touch Provisioning on the Cluster
With Auto Deploy active, you can now enable ZTP directly on the ztp-staging-cluster. This setting tells vCenter that hosts joining this cluster should be managed through the Auto Deploy workflow.
- Open the cluster’s Configure tab and enable ZTP
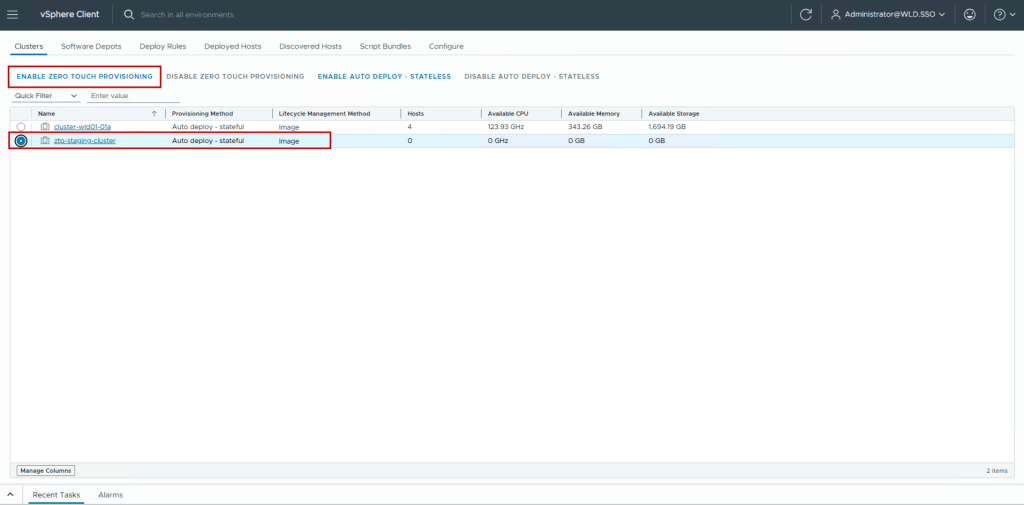
Select ztp-staging-cluster in the inventory and click on Enable Zero Touch Provisioning. This associates the cluster with the Auto Deploy service and prepares it to accept ZTP-provisioned hosts.
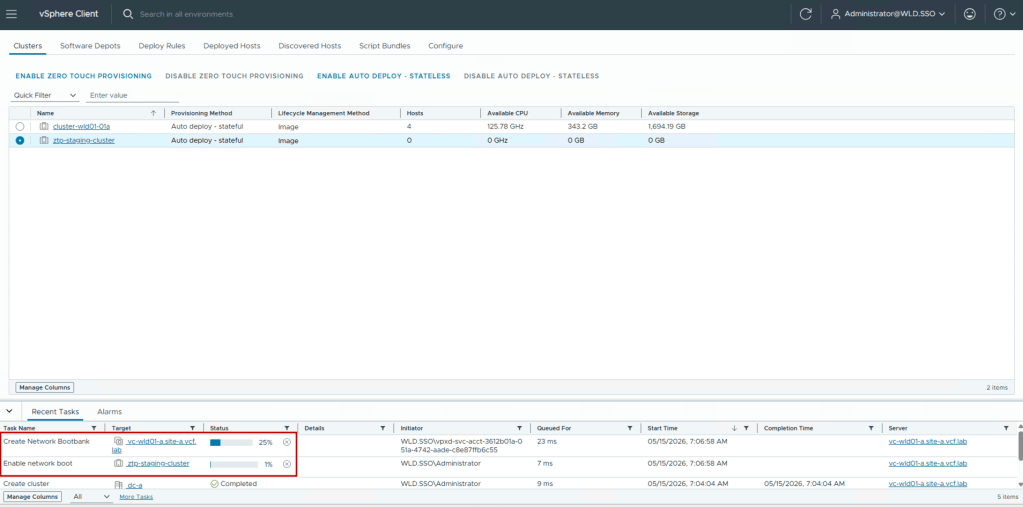
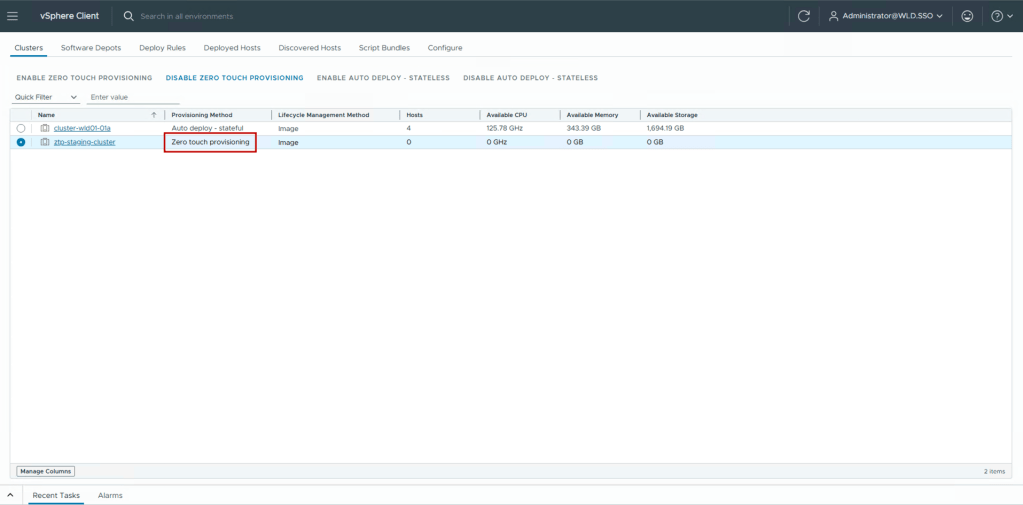
Phase 2: Deploy Rules – Matching Hosts to Clusters
Create a Deploy Rule
A Deploy Rule is the core of the ZTP logic. When a host boots via Auto Deploy, vCenter evaluates all active Deploy Rules in priority order. The first rule whose match criteria fits the host determines which ESX image Auto Deploy applies and which cluster the host joins.
- Open the New Deploy Rule wizard from Auto Deploy
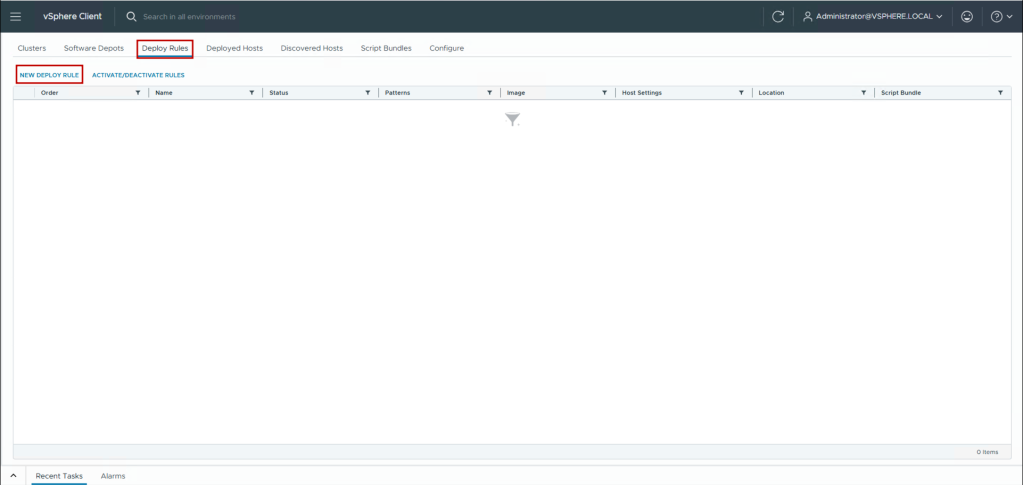
In the Auto Deploy section, navigate to the Deploy Rules tab and click New Deploy Rule. This launches the rule creation wizard.
- Map hosts to deploy Rule
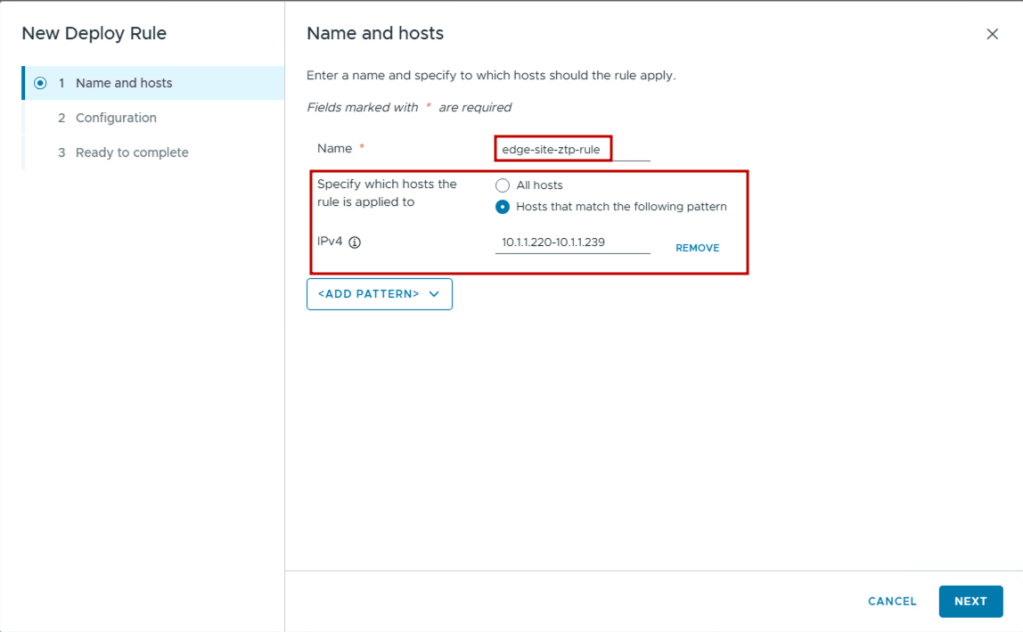
Provide a name for the Deploy Rule and provide a pattern to select the hosts that should use this deploy rule and be added to our cluster.
- Configure the Host Location
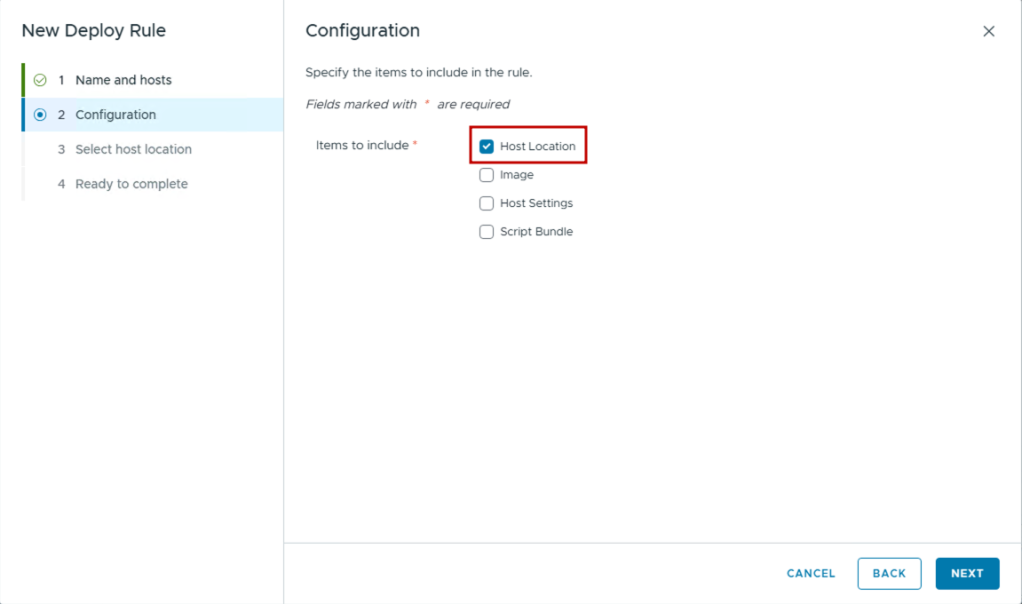
The Host Location step specifies where in the vCenter inventory matched hosts will be placed. Select the ztp-staging-cluster. Hosts that match this rule will be automatically added to this cluster upon boot.
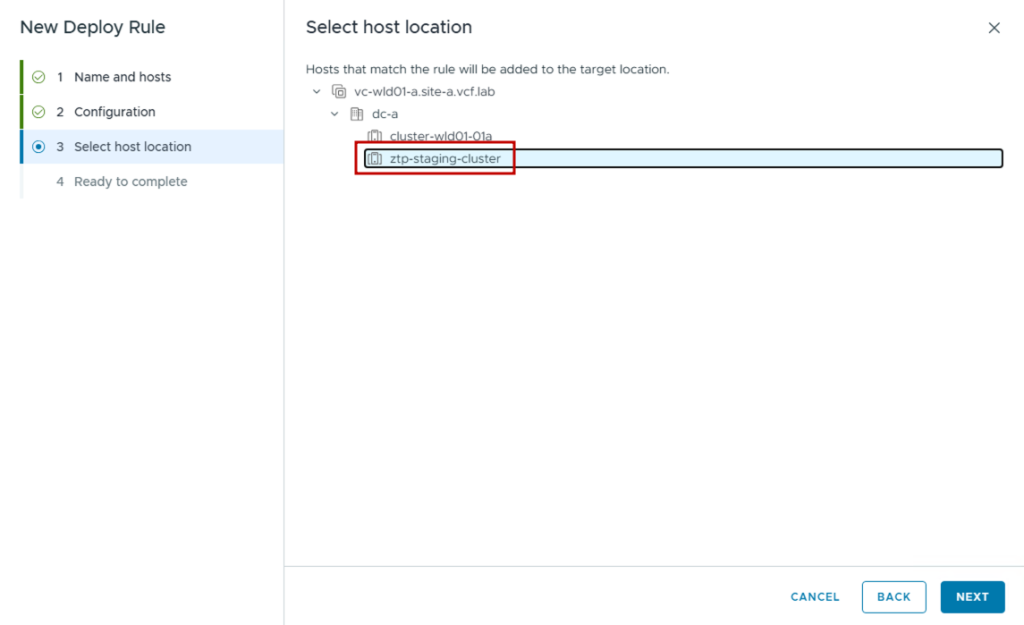
- Review the Deploy Rule and Apply
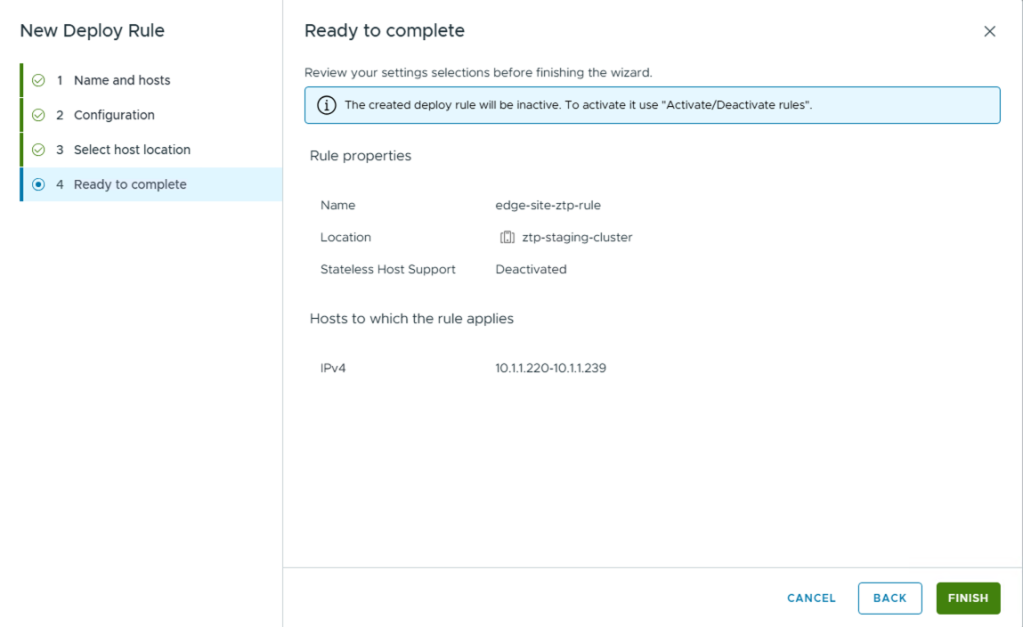
Complete the wizard to create the rule.
Activate the Deploy Rule
A newly created Deploy Rule is in Inactive state by default. Auto Deploy evaluates inactive rules but does not apply them to booting hosts. You must explicitly activate the rule and order it correctly relative to other rules before it takes effect.
- Review the Deploy Rule summary
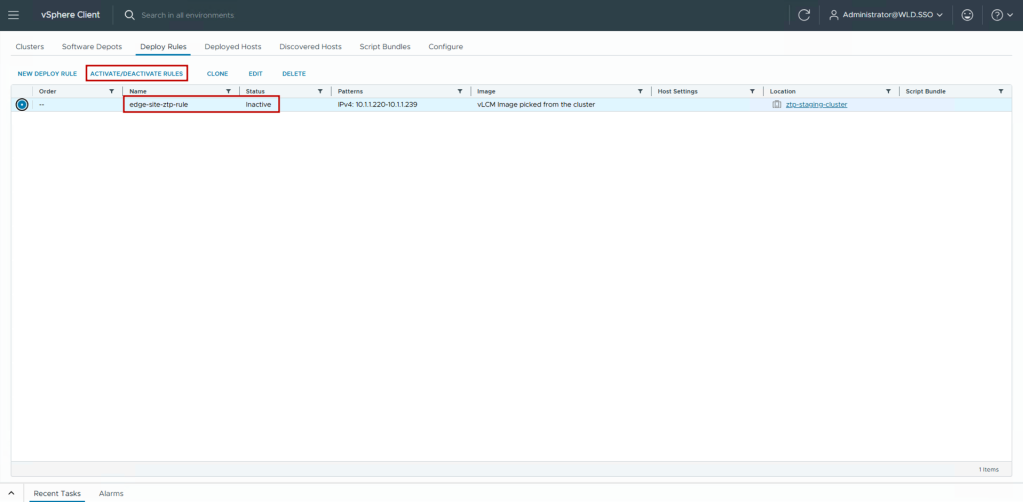
The rule now appears in the Deploy Rules list. Confirm the rule details: name, match criteria, target cluster, and assigned image before activation.
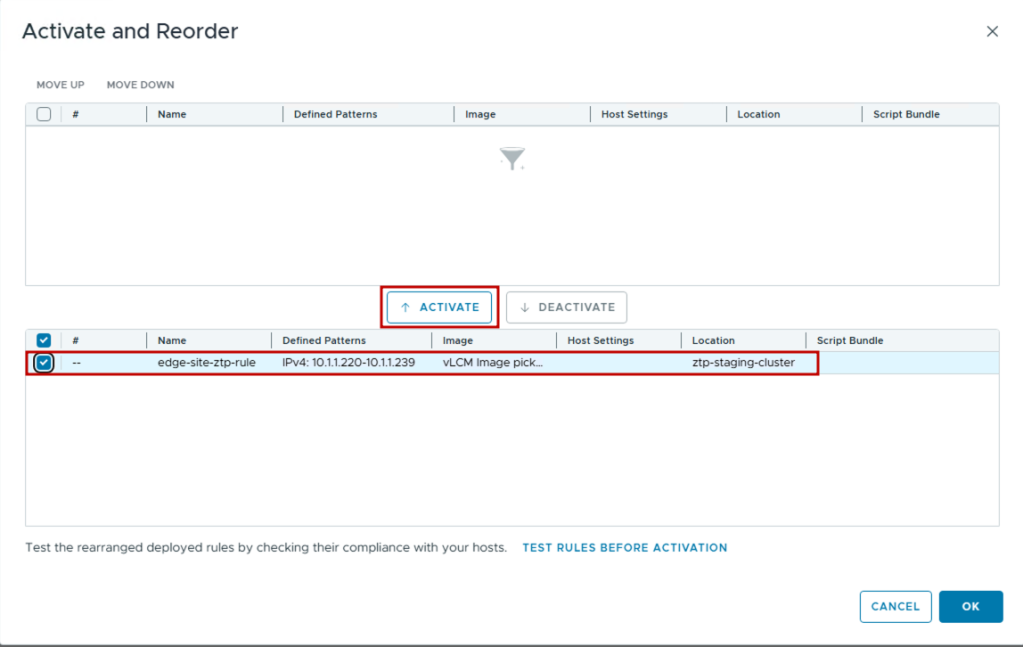
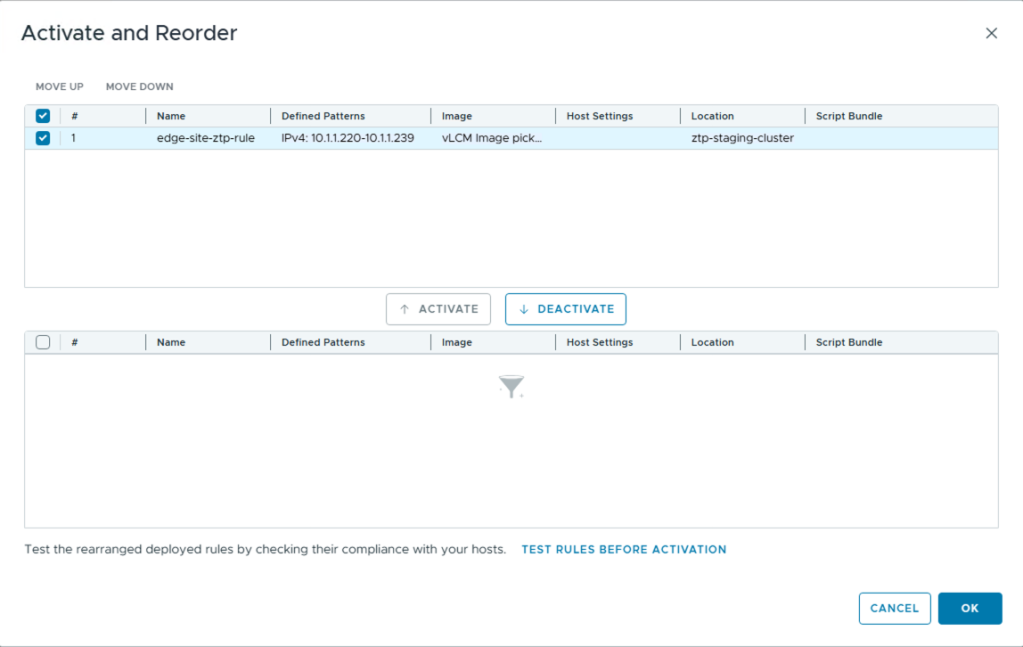
- Activate and order the rule
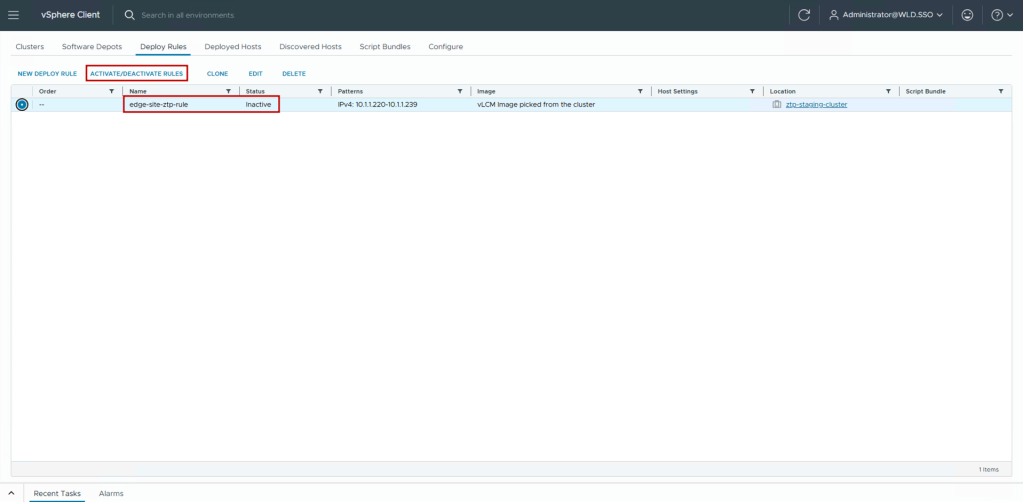
Select the rule and click Activate / Deactivate. The Activate and Reorder dialog appears. Move the rule to the Active Rules list and set its priority order. More specific rules should be placed higher in the order.
- Confirm the rule is Active
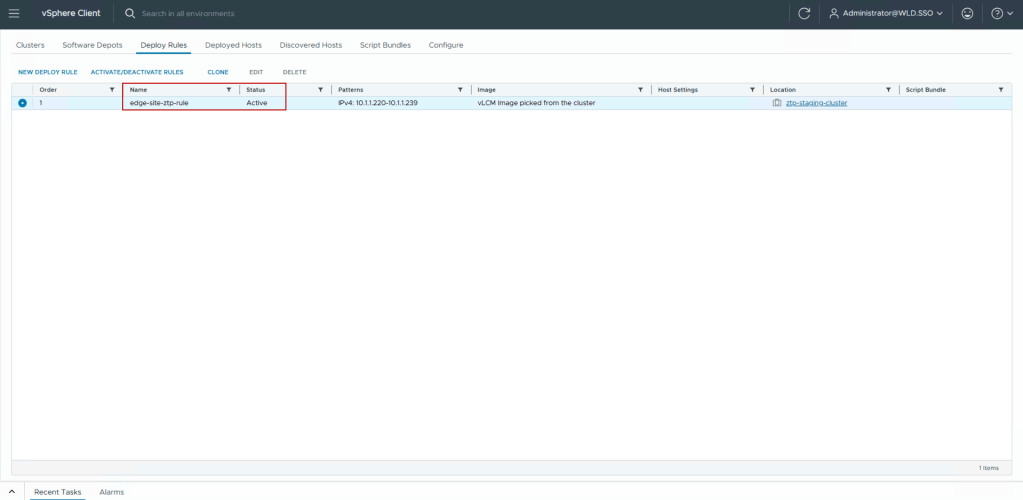
After clicking OK, return to the Deploy Rules list. The rule status updates to Active. Any hosts that boot and match the rule criteria will now receive the assigned ESX image and be placed in ztp-staging-cluster automatically.
- Retrieve the ZTP UEFI HTTPS Boot URL
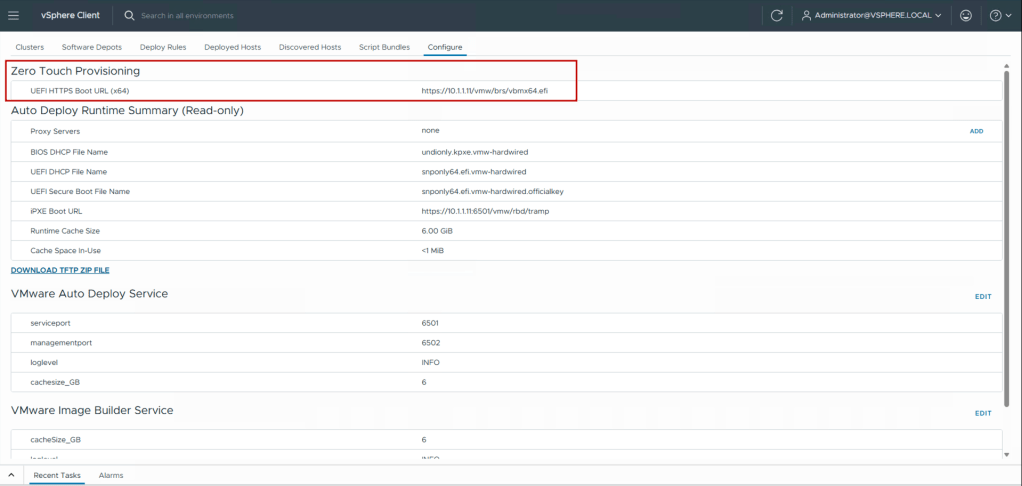
With the rule active, the Auto Deploy’s Configure tab displays the ZTP UEFI HTTPS Boot URL (e.g., https://<vCenter-IP>/vmw/nbs/…). Copy this URL. It is required to configure the DHCP server in the next step.
Phase 3: Network Configuration and Host Boot
Configure DHCP for UEFI HTTP Boot
DHCP is the trigger for ZTP. When a host UEFI boots, it issues a DHCP discover request. Your DHCP server must respond with both the standard IP lease and the UEFI HTTP Boot URL. Note that the exact DHCP option used depends on your DHCP server software and client architecture.
Note: Architecture matters: UEFI clients (x86-64) use Option 93 (Client System Architecture) value 0x0007 to identify themselves. Ensure your DHCP scope delivers the boot URL only to UEFI clients, not legacy BIOS hosts, to prevent conflicts.
- Configure the DHCP boot option with the ZTP URL
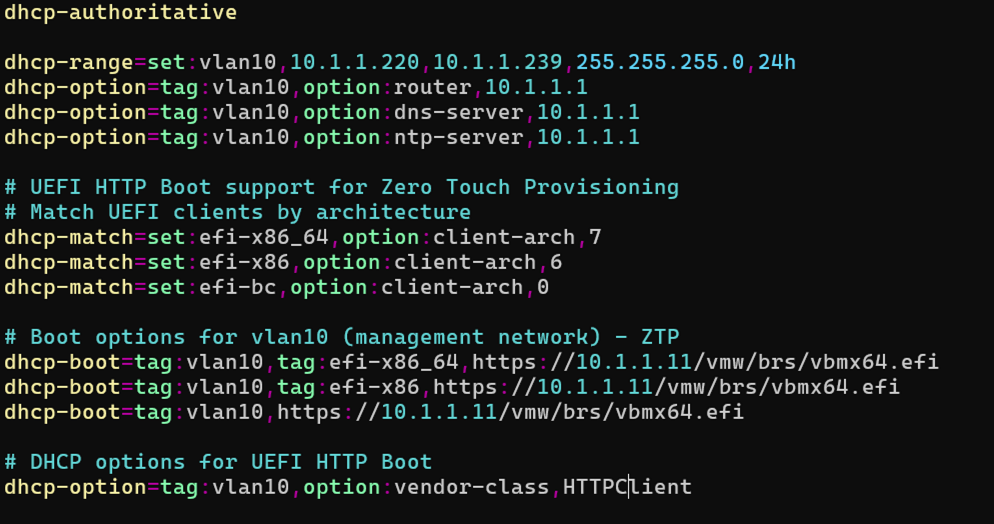
The above is an example of configuring dnsmasq. On your DHCP server, set the Boot File URL option (Option 67 for UEFI clients) to the ZTP UEFI HTTPS Boot URL retrieved from the cluster Configure tab.
- Extract the vCenter CA certificate thumbprint
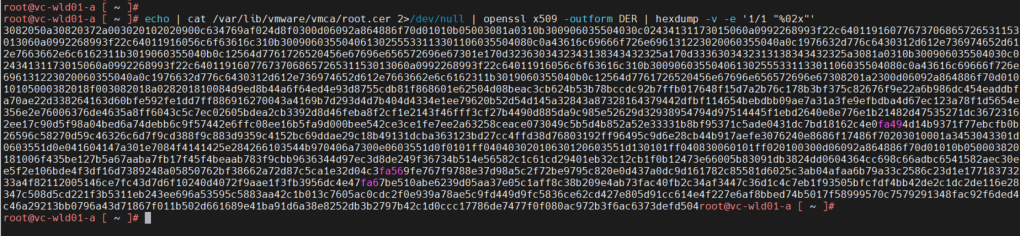
Using a Commercial Public CA (DigiCert, GlobalSign, etc.)
If your environment uses a certificate signed by a major public Certificate Authority, the Root CA is almost certainly already factory-loaded into the UEFI firmware of modern enterprise servers. The server will natively trust the https:// URI provided by DHCP, and the boot file will download seamlessly without any extra configuration.
Using an Internal Enterprise CA (e.g., Microsoft AD CS)
If your environment uses its own internal Enterprise PKI (which is very common for vCenter), it is technically “not self-signed,” but the physical server’s motherboard still won’t know who that internal CA is. In this scenario, the trust must be established.
How to handle trust on Physical Servers
For physical servers using Internal CAs or VMCA, you must push the Root CA certificate into the physical server’s UEFI TLS Trust Store prior to the ZTP boot. Log in to vCenter and extract the certificate:
For UEFI HTTPS boot to succeed, the booting host must validate the vCenter SSL/TLS certificate. Hence, extract the vCenter CA certificate thumbprint and make it available to the edge site server.
Boot the Edge Host: ZTP in Action
With the cluster prepared, Deploy Rule active, and DHCP configured, the edge host is ready for boot. Power on the host and observe the fully automated ZTP process unfold.
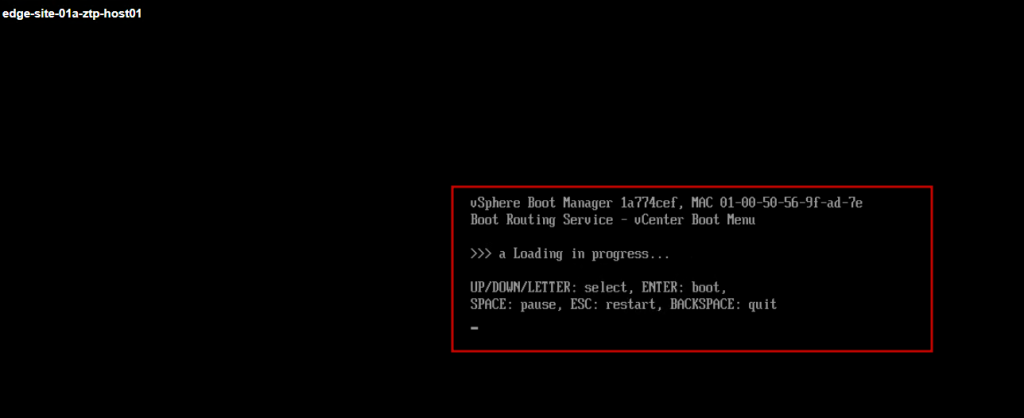
- Power on the host: UEFI network boot begins
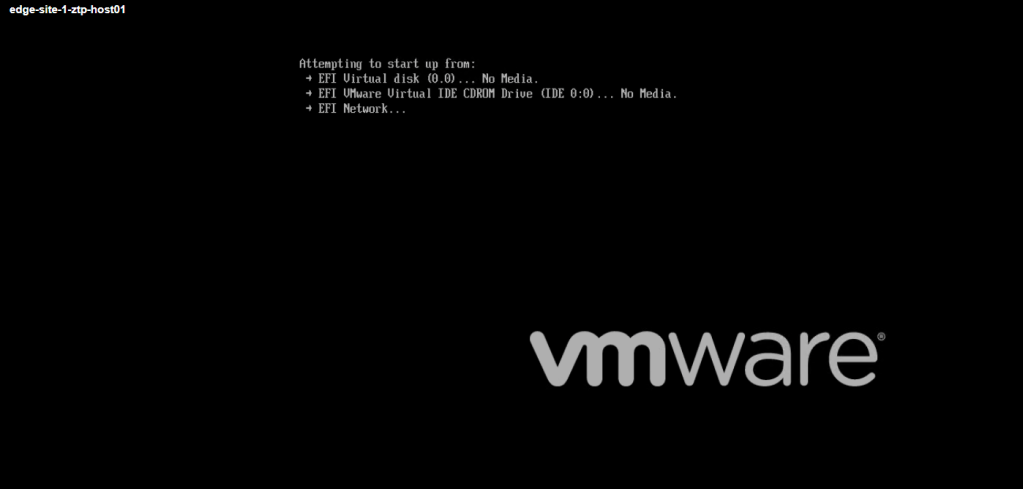
On power-on, the host firmware initiates a UEFI network boot. First, It broadcasts a DHCP discover. Next, it receives the UEFI HTTPS Boot URL in response and initiates an HTTPS connection to the Auto Deploy service on vCenter.
- ESX installer loads via UEFI HTTPS
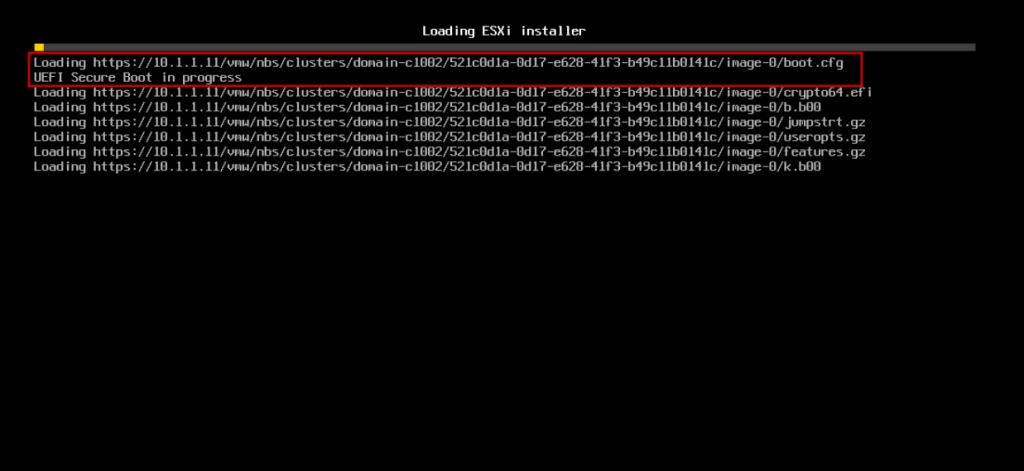
The host downloads the ESX installer image directly from the Auto Deploy HTTPS endpoint (https://10.1.1.11/vmw/nbs/…). No local media and no manual interaction are required.
- ESX boots and obtains an IP address
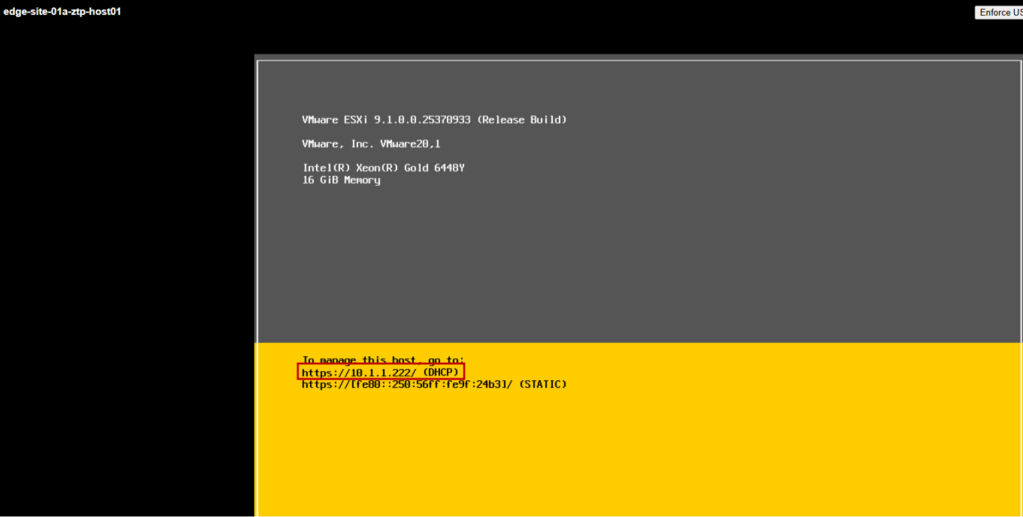
ESX installs and boots. The DCUI confirms the host is running ESX 9.1 and has received a DHCP-assigned IP address (10.1.1.222). The host is now operational and registered with vCenter.
Verify Host Registration in vCenter
Auto Deploy automatically registers the newly provisioned host with vCenter and places it in the correct cluster, as specified by the active Deploy Rule. As a result, no manual add-host workflow is needed.
- Confirm the host appears in ztp-staging-cluster
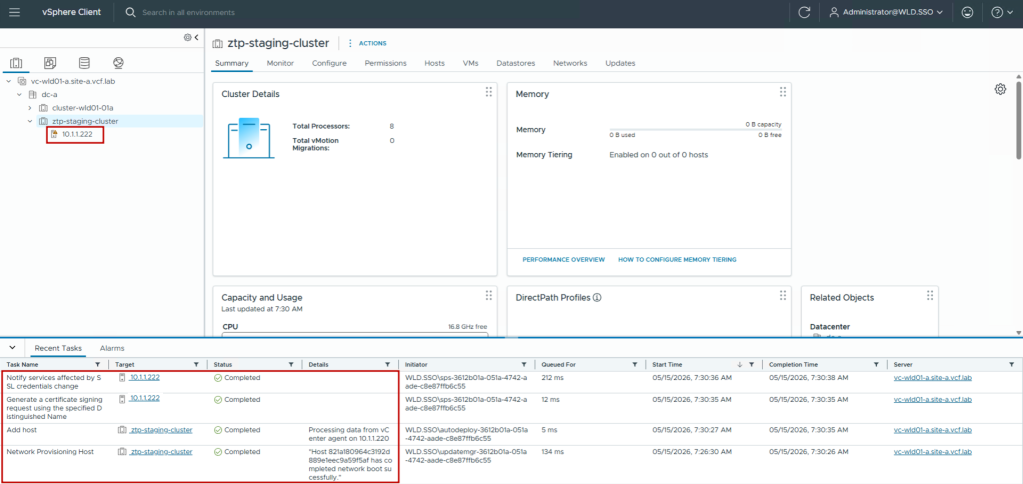
In the vCenter inventory, navigate to ztp-staging-cluster. The newly booted host (10.1.1.222) now appears as a cluster member: auto-matched, image-deployed, and registered entirely without human intervention at the edge site.
TIP: ZTP complete. The edge host is now a registered member of ztp-staging-cluster in vCenter. The next phase uses the VcfEdgeAtScale PowerShell module to fully configure the vSphere Supervisor, storage, networking, and Supervisor Services on this host.
Phase 4: Automated Edge Site Configuration with VcfEdgeAtScale
Automating Edge Site Configuration with VcfEdgeAtScale
Once the host is registered in vCenter, the infrastructure team would traditionally face a manual configuration process: Supervisor enablement, networking, storage, Harbor, Argo CD, and more. Instead, the open-source VcfEdgeAtScale PowerShell module compresses all of that into a single, parameterized workflow driven by two JSON configuration files.
Review Prerequisites
Install the Module

Install the module directly from the PowerShell Gallery. This is the fastest method and ensures you get the latest stable release.
Initialize the Module
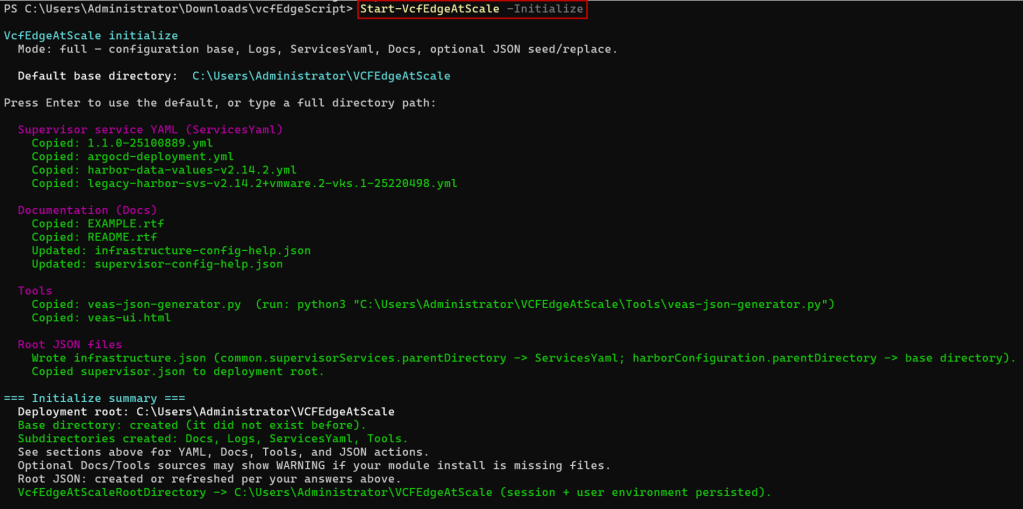

Run the initialization command to create the working directory structure and default configuration templates. This sets $env:VcfEdgeAtScaleRootDirectory pointing to the location where your JSON files will live.
Generate Configuration with the JSON Generator UI
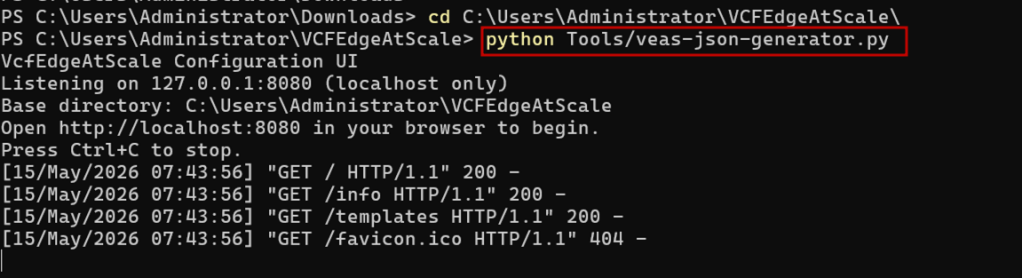
After initialization, the module offers two ways to create the JSON configuration files: direct editing or using the built-in Python-based browser UI at localhost:8080: a guided, form-based interface that generates correct, validated JSON for both infrastructure.json and supervisor.json.
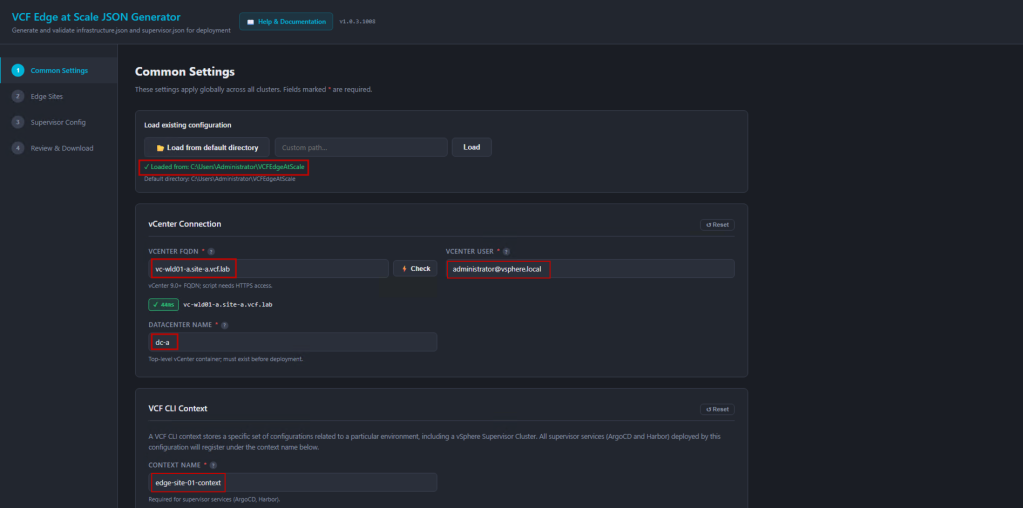
Configure Common Settings (infrastructure.json)
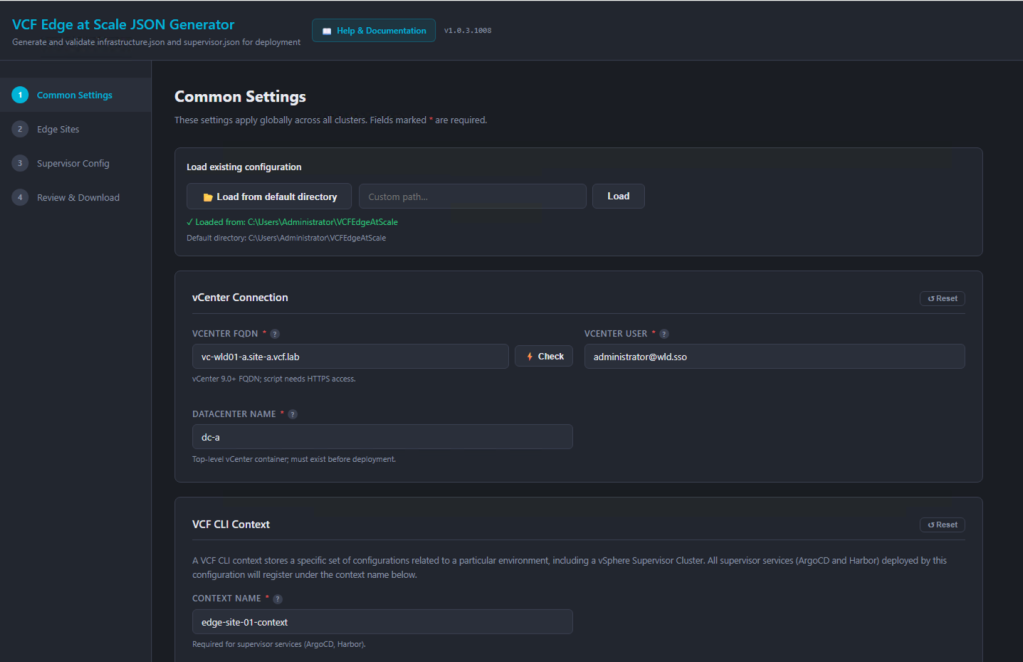
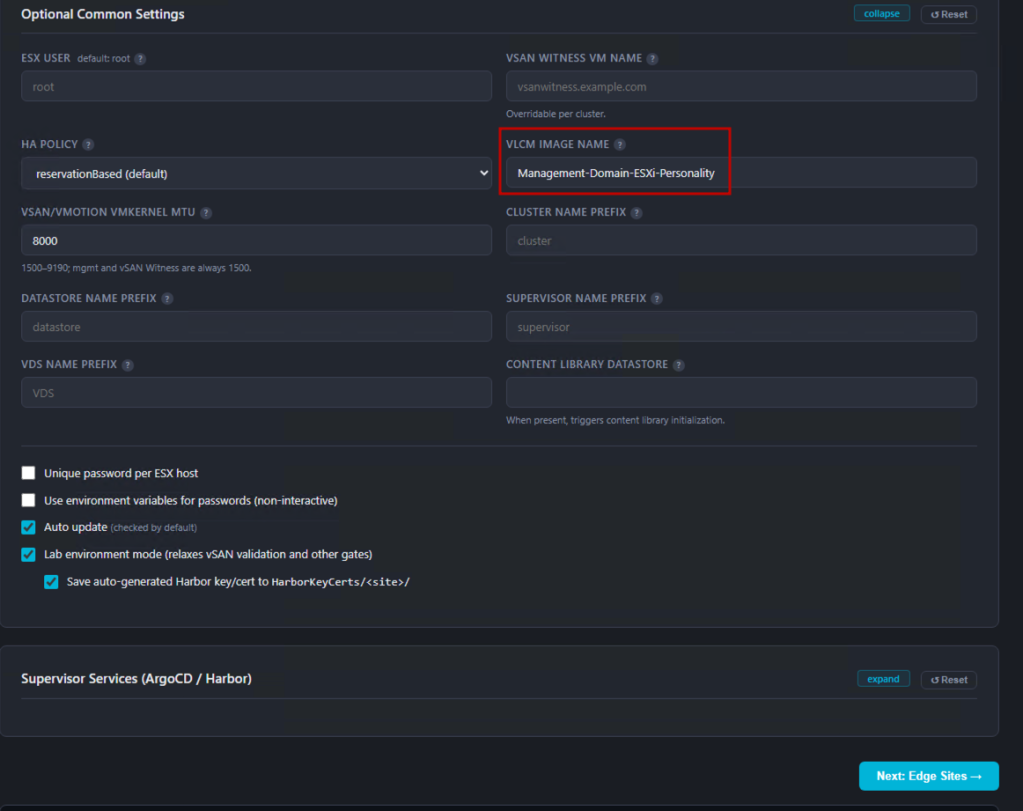
The Common Settings section captures the shared vCenter context FQDN, datacenter name, and deployment context that applies across all edge sites in this configuration batch.
Configure Edge Sites
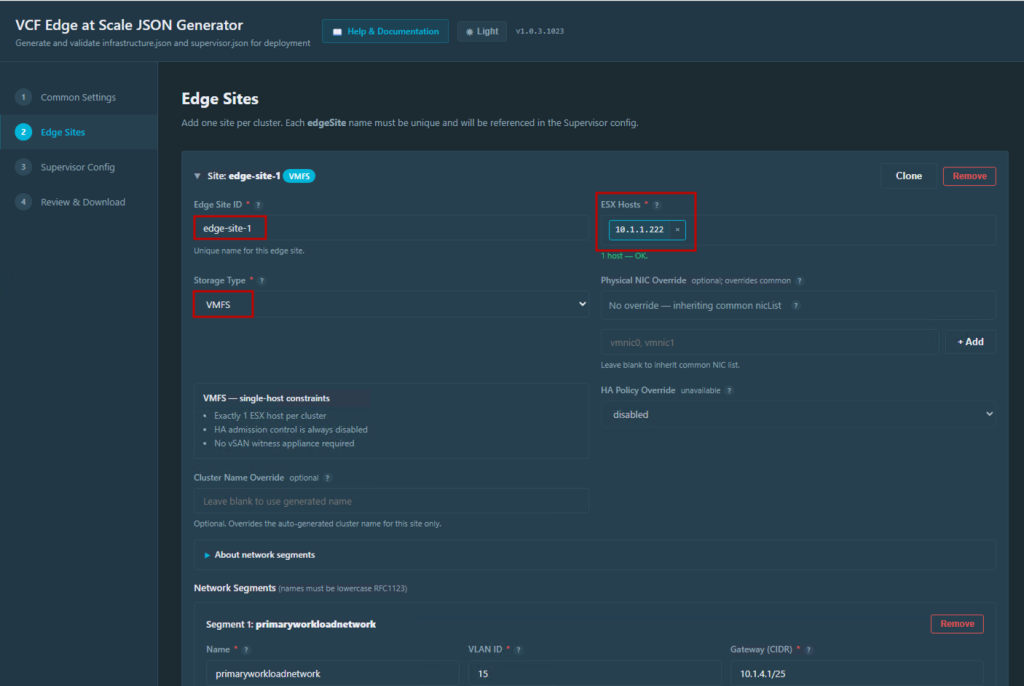
Each edge site is defined with its ESX host IP address, datastore configuration, and site name. In this example, edge-site-1 references the ZTP-provisioned host at 10.1.1.222 with a VMFS datastore.
Configure Network Segments
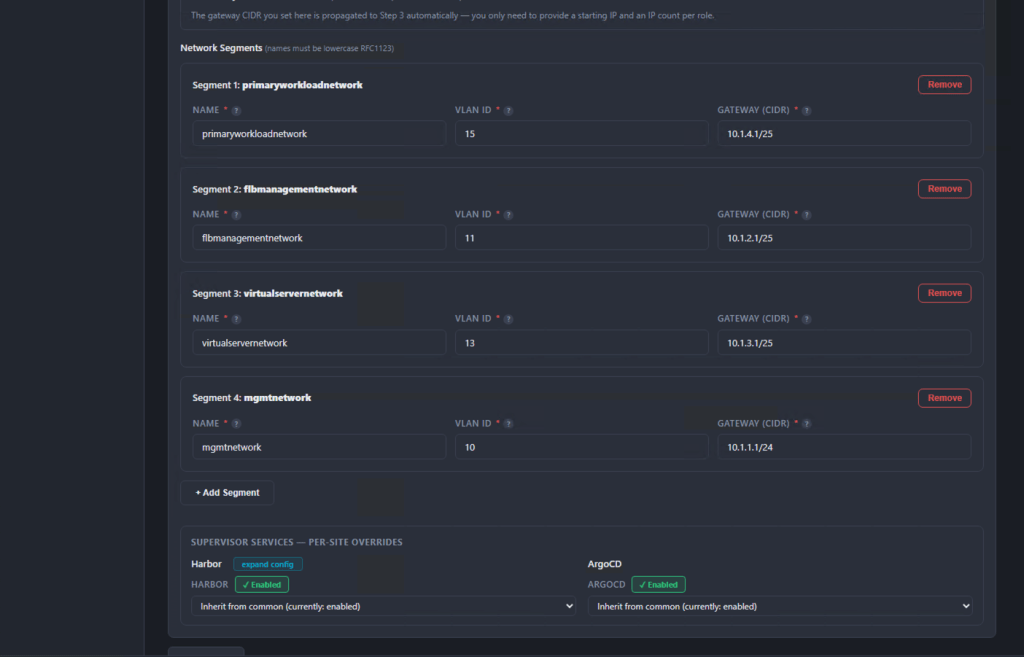
Each edge site requires network segment configuration: Management, vMotion, vSAN, and Uplink VLANs. Assign the correct VLAN IDs and IP ranges for your edge networking topology.
Configure Harbor, Argo CD TLS, and Secrets
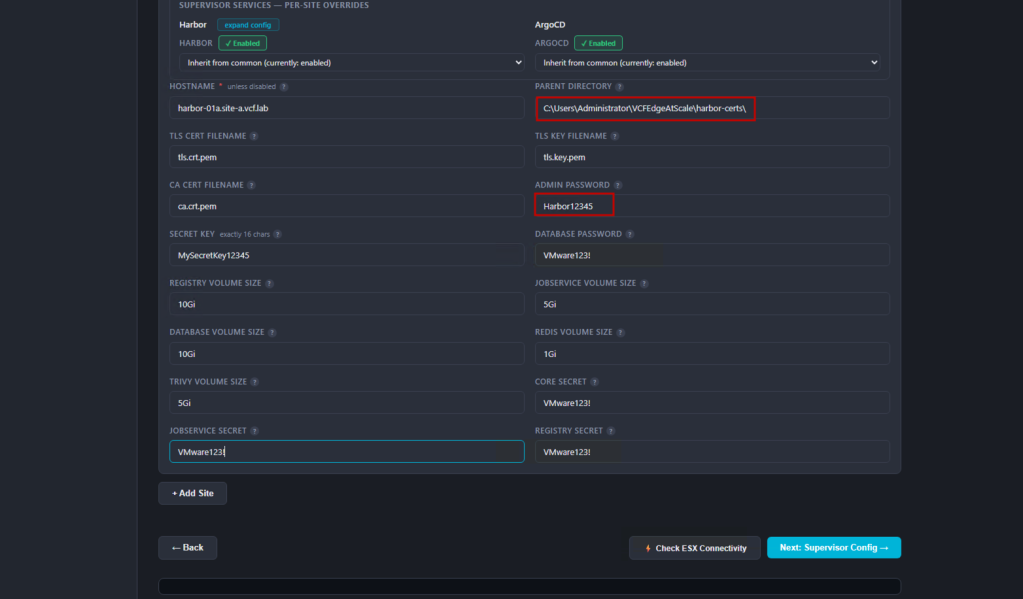
The Supervisor Services Harbor (registry) and Argo CD (GitOps) require TLS certificates and credentials. The generator captures all secrets, environment-specific TLS settings, and deployment parameters. Note that certificates for Harbor need to be provided by the end-user.
Configure the Supervisor (supervisor.json)
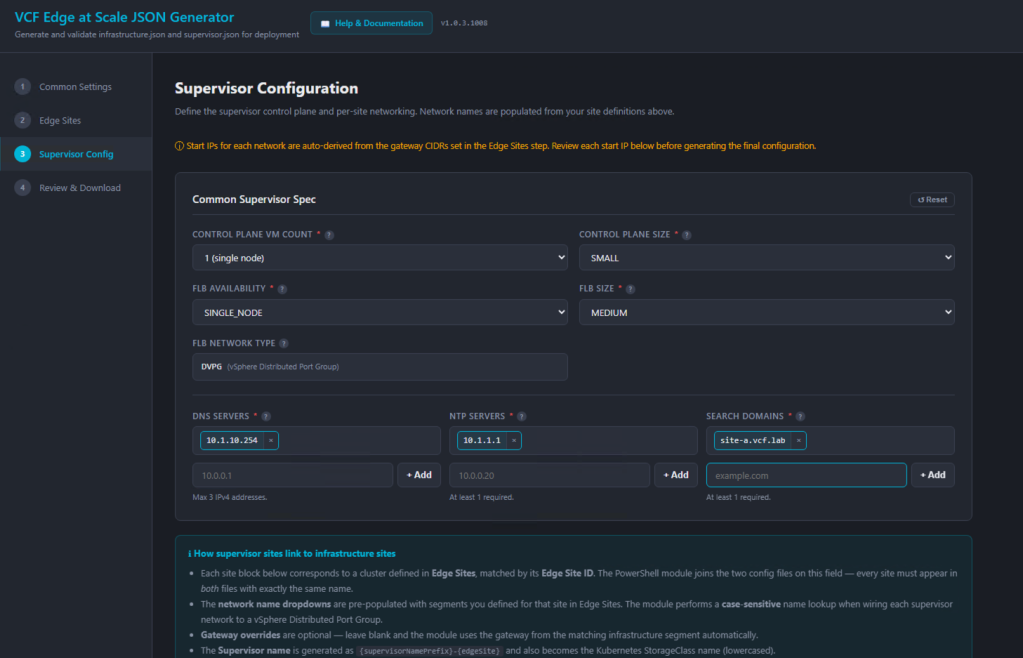
The Supervisor configuration defines the vSphere Supervisor topology: single-node or multi-node, DNS servers, NTP servers, and the Supervisor management network parameters. For edge sites, a single-node Supervisor is typical.
Review and Download the JSON Config Files
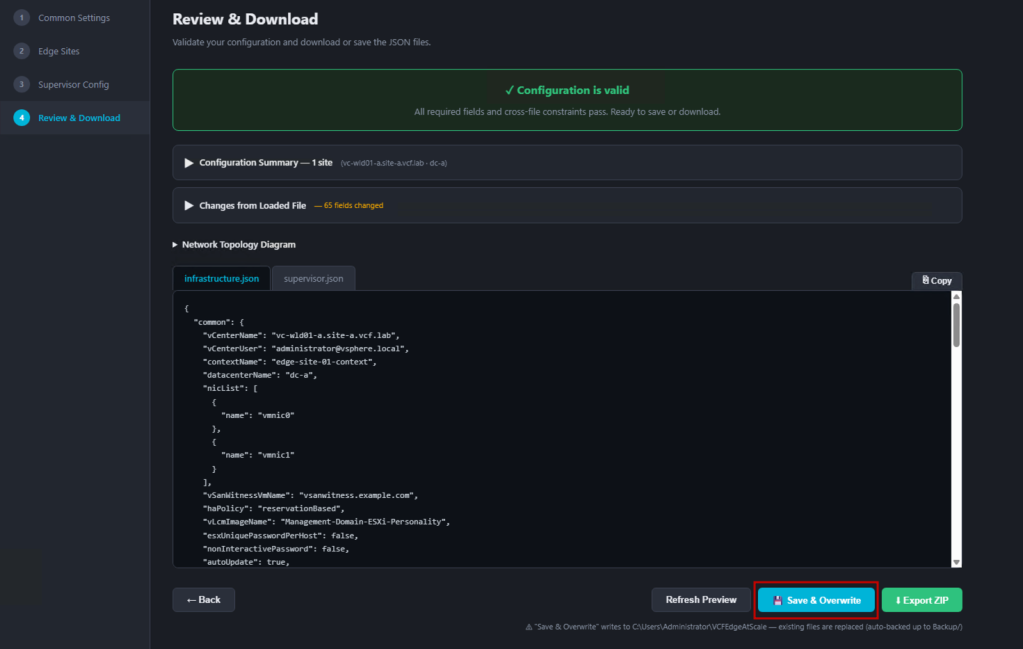
Once all sections are complete, the generator validates the configuration. A Valid indicator confirms the infrastructure.json is ready. Click Download to save both JSON files to the module’s working directory.
Run the Deployment
With both JSON files in place, execute the main deployment command. Start-VcfEdgeAtScale reads the configuration, authenticates to vCenter, and orchestrates the complete edge site build: cluster creation, Supervisor enablement, namespace provisioning, and Supervisor Services deployment.
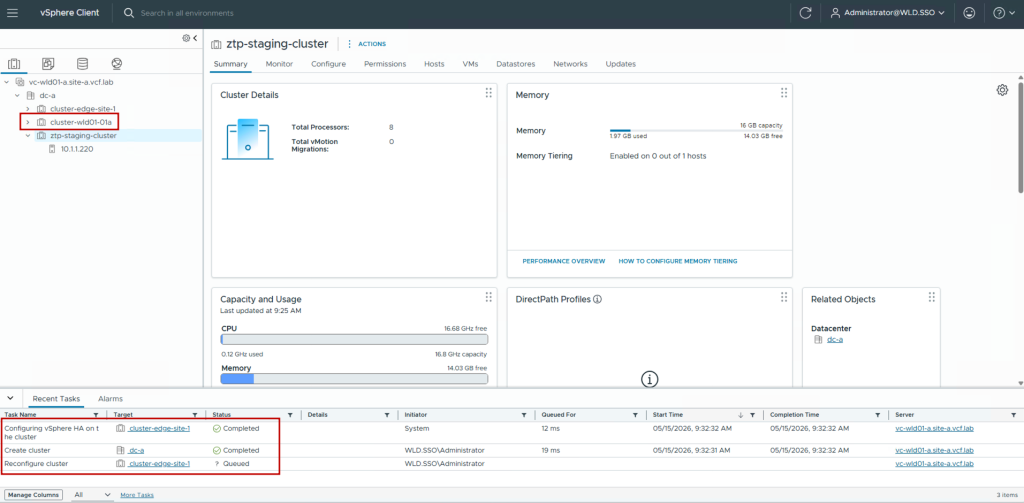
The script asks permission to move the ZTP host from the staging cluster to the new edge cluster it creates:
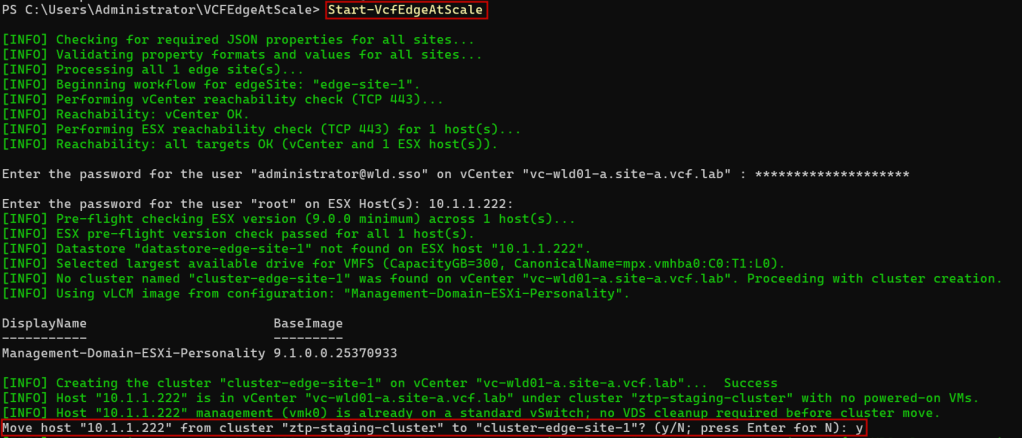
The new edge site cluster is created:
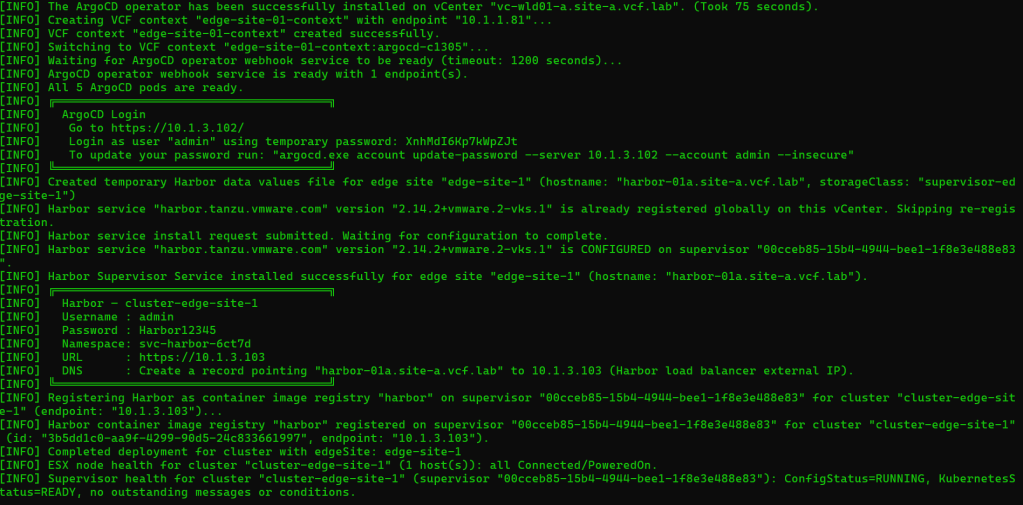
The script completes successfully:
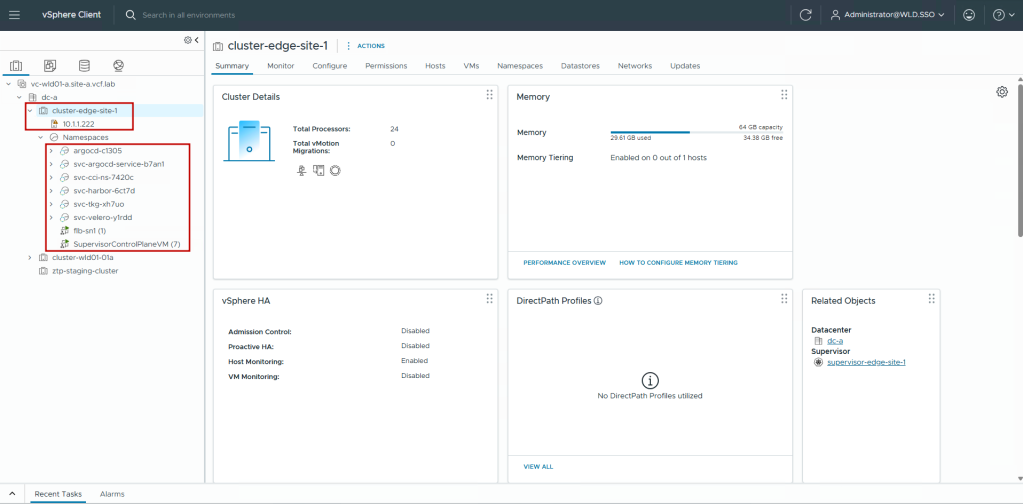
The single host edge site is fully configured with supervisor and supervisor services such as Harbor and Argo CD:
We can access the URL of Harbor and Argo CD from the script logs:


TIP: Edge site active. The VcfEdgeAtScale module has deployed the complete edge site cluster: vSphere Supervisor enabled, networking configured, storage ready, and Supervisor Services (Harbor and Argo CD) deployed. The site is production-ready without a single manual step at the remote location.
Conclusion
Zero Touch Provisioning in VMware Cloud Foundation Edge 9.1 fundamentally changes the economics of edge site deployment. The combination of Auto Deploy, Deploy Rules, and UEFI HTTPS Boot eliminates the need for onsite IT expertise to stand up an ESX host. Once the host is registered in vCenter, the VcfEdgeAtScale PowerShell module completes the configuration journey: from bare cluster to a fully operational vSphere Supervisor with production Supervisor Services.
Moreover, the workflow described in this blog scales directly. The same infrastructure.json and supervisor.json structure supports multiple edge sites in a single run. Add more entries to the Sites array, and the module provisions each one idempotently. For organizations managing dozens or hundreds of edge locations, this is the approach that makes operational sense at scale.
Discover more from VMware Cloud Foundation (VCF) Blog
Subscribe to get the latest posts sent to your email.