

This article introduces the new Multi-Instance GPU (MIG) software functionality that can be used with the NVIDIA Ampere A-series GPUs. It describes how we used MIG in virtual machines on VMware vSphere 7 in the lab in technical preview. The MIG functionality optimizes the sharing of a physical GPU by a set of VMs on vSphere in new ways – specifically for compute-intensive workloads. MIG is not for graphics-intensive workloads. Part 2 in this series goes into the technical steps to set up MIG on vSphere 7. MIG functionality is provided as part of the NVIDIA GPU drivers starting with the CUDA 11 / R450 release.
Multi-instance GPUs is a new feature in the vGPU drivers that further enhances the vGPU approach to sharing physical GPUs – by providing more physical isolation of the share of the GPU’s compute power and memory assigned to one VM from others. MIG isolates the internal hardware paths (such as the L2 cache, the memory controllers, the address bus, the control and data cross-bars) that lead to any one VM’s share of the GPU’s memory and compute power. This separation provides a more predictable level of performance for that vGPU-enabled VM and also allows us to pack more independent workloads onto the GPU. These are qualities that are valuable to cloud providers, whether internal or external. The architecture for MIG is shown in Figure 1.
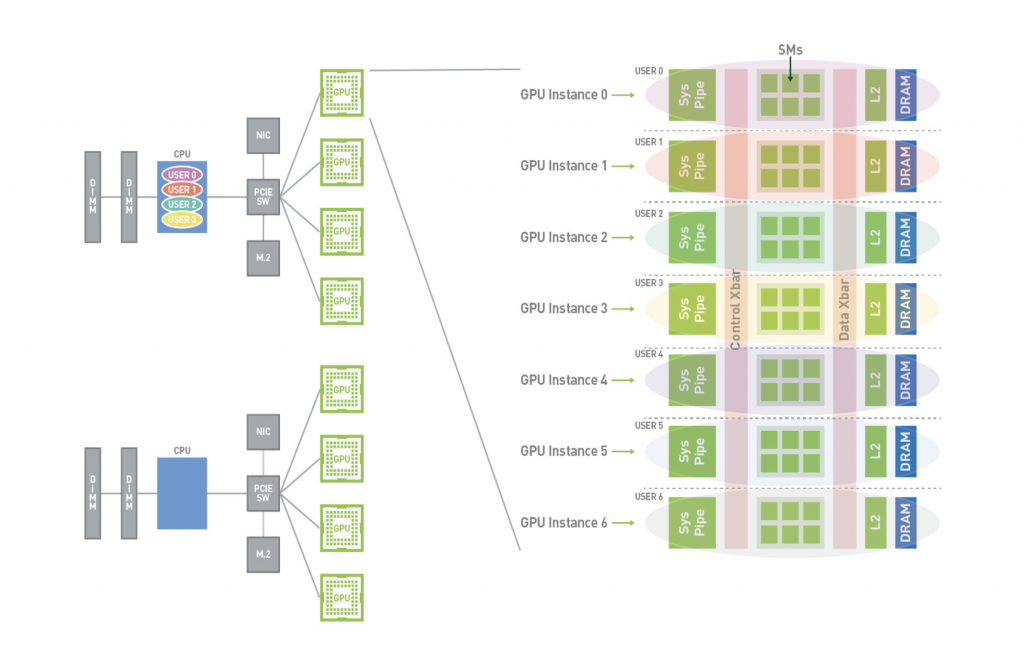
Figure 1: Outline Architecture for MIG showing multiple GPU Instances on one physical GPU device Source: The NVIDIA MIG User Guide
The hardware components within the GPU architecture, seen on the right above, are now isolated to the VM that owns them from other VMs on the host. That isolation is done through separate ownership of one or more of the GPU Instances (really slices of the hardware) shown. A VM’s “ownership” of part of the physical GPU is expressed, as before, through the vGPU profile assigned to the VM at setup time. The vGPU profile is chosen and assigned to a VM in the vSphere Client UI, as we will see.
You can think of a GPU Instance as a set of one or more physical “slices” of the GPU hardware – memory, cores and the access paths to each of those. The thousands of cores in the GPU architecture are grouped into units called streaming multiprocessors (SMs). There are varying numbers of SMs available in a hardware slice allocated to a GPU Instance, from 14 up to 98 SMs.
In the pre-MIG vGPU setup, we were able to isolate a portion of the GPU’s frame buffer memory that is allocated to the VM, but all the pathways to that memory and the paths to the full set of SMs in the GPU were still shared with other vGPU clients. So in that way, the pre-MIG vGPU can be thought of as executing serially with its companion vGPUs on the same physical device.
The Value Proposition of MIG
With MIG enabled, that sharing mechanism changes. The vGPUs now experience true parallel operation on the GPU hardware, giving more predictable performance. The MIG features apply specifically to the Ampere family of GPUs (the “A” series) that are used on servers with VMware vSphere 7. We enabled and tested this set of features for technical preview in the VMware labs using the A100 GPU and vSphere 7.
MIG allows us to exert much more fine-grained control of the vGPU mechanism for sharing a physical GPU across multiple VMs, than the earlier pre-MIG vGPU method did. This fine-grained control allows us to tune the GPU setup to get the best performance for our application, while also being good citizens in sharing the physical GPU with other users and VMs.
Many vSphere customers are already familiar with the NVIDIA vGPU concept for sharing physical GPUs on vSphere. The guest operating system vGPU driver and the associated host-level vGPU Manager (the ESXi Host Driver) software together allow sharing of a physical GPU across multiple VMs on one host server. If you are new to the vGPU technology, then you should take a look at this earlier blog article on that subject. Up to now, vGPUs ran serially, timesharing the whole GPU as far as compute execution on its cores/SMs is concerned.
When setting up a VM with a vGPU profile for MIG in the vSphere Client, the administrator or architect chooses a vGPU profile from a set of supplied profiles, as before. With MIG enabled on the GPU, the vGPU profile chosen determines the number of “GPU Instances”, seen in Figure 1, to be associated with a particular VM. Different combinations of these GPU Instances are allowed in different vGPU profiles, so that we can share the GPU in different ways. We will see more detail on that below.
GPU Instances are independent slices of the physical GPU that will be dedicated to that VM. As you can see in Figure 1, from one up to seven GPU Instance slices may be assigned in a single vGPU profile and so, to a VM. Once MIG is enabled on an ESXi host for a GPU, then any vGPU that is assigned to a VM must be associated with a GPU Instance, via a vGPU profile. Any one GPU Instance may be used in just one vGPU profile allocation.
Enabling MIG – a Quick Snapshot
Before we enable MIG at the vSphere host server/GPU level, we first need to enable the “Global SR-IOV” feature at the BIOS level through the server management console. The method of doing this is unique to your server manufacturer – in the Dell case, it is done through the server console or iDRAC. Details of that are given in Part 2.
Enabling MIG is done at the host level on a per-GPU basis and it is a one-time operation. MIG enablement persists across server reboots. Here we give a quick snapshot of the commands required. Please ensure that you consult part 2 for the exact sequence to follow, as some of the enablement involves taking your host to maintenance mode and rebooting it.
We can enable MIG by logging in to the ESXi host and using the command
nvidia-smi -i 0 -mig 1
where -i refers to the physical GPU ID, since there may be more than one physical GPU on a machine. If no GPU ID is specified, then MIG mode is applied to all the GPUs on the system.
We follow this with a second command as follows:
nvidia-smi –gpu-reset
That second command resets the GPU only if there are no processes running that currently use the GPU. The “gpu-reset” option has two minus signs in front of it. If an error message appears from the nvidia-smi –gpu-reset command indicating that there are running processes using the GPU, then the easiest way to deal with this is to reboot the server. We would check with any owners of running processes or VMs first before doing that.
To see the current state of MIG on GPU ID 0, use
nvidia-smi
or in a more detailed way
nvidia-smi -i 0 –query-gpu=pci.bus_id,mig.mode.current –format=csv
NOTE: Use two minus signs before the “query” and “format” options above.
These commands will show “Enabled” if the MIG setting has taken for the GPU. Once we are enabled with MIG for a GPU on a host server, we can then proceed to create GPU Instances, using specific profiles.
GPU Instance Profiles
Once MIG is enabled, then up to seven “GPU Instances”, or subsets of the physical GPU, can be assigned to one VM, via a vGPU profile. The GPU Instance profile chosen identifies not just the size in GB of the GPU frame-buffer memory allocated, but also the compute power that is contained within the allocated set of SMs as well. An SM (streaming multiprocessor) is a set of GPU cores that are grouped together into one unit. There are 98 SMs available on the A100, which are divided into 7 “fractions” of the total SM population, giving 14 SMs per fraction.
A GPU Instance provides both memory and scheduling isolation from other GPU Instances on the same GPU hardware. When a systems administrator creates a GPU Instance, there is a set of allowed GPU Instance profiles to choose from. These are given in Table 1. The systems administrator picks one of these GPU Instance profiles to create a GPU Instance, before using a corresponding vGPU profile to configure a VM.
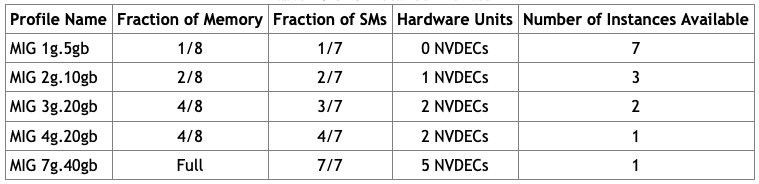
Table 1: The MIG GPU Instance Profiles and their Associated Fractions of the Physical GPU’s Memory and SMs
As one example from Table 1, if a systems administrator were to create a GPU Instance by choosing the first GPU Instance profile from the set, the “MIG 1g.5gb” one, then they would be allocating a slice representing one-eighth of the total 40GB (or 80GB for those models that have it) of memory that is on the physical GPU to that new GPU Instance. This would also allocate just one fraction (14 SMs) of the total SMs to that GPU Instance, from the 7 SM fractions available. For the A100 GPU, there are 14 SMs in one fraction. The newly-created GPU Instance will itself be used later on where it is mapped to a suitable vGPU Profile.
In a second example, if we chose to use the “MIG 7g.40gb” profile, then we are creating a GPU Instance that allocates all of the on-GPU memory and all 7 fractions of the total SMs available on a physical GPU to that one GPU Instance. In this second example, the entire GPU is dedicated to the VM that gets that GPU Instance – and the GPU is not shared. Some user/workload cases demand this kind of dedication.
There are rules in the MIG software for how you can combine some, though not all, of these GPU Instance profiles on one GPU. Consult the detailed description in the NVIDIA MIG User Guide for these rules.
This new method of sharing a physical GPU across VMs using MIG features gives the systems administrator or cloud operator a significant advantage over the older pre-MIG form of vGPU profile. Now, the administrator can know with certainty that one consumer using one GPU Instance is isolated at the GPU hardware level from another using a separate GPU Instance from the same physical GPU. Fault occurrences are also isolated at the GPU Instance level. This allows the administrator to act as a cloud service provider and carve up their GPU power in new ways – for multi-tenancy reasons.
Choosing the vGPU Profile Associated with a GPU Instance
A GPU Instance is the object in MIG that is mapped to a vGPU profile, through their similar names. You can see that the names of the GPU Instance profiles from Table 1 map onto the longer-named vGPU Profiles in the set shown below from the vSphere Client “Edit Settings” dialog. In the vSphere Client, the user works only with vGPU Profiles – not with GPU Instances or GPU Instance Profiles.
We will set aside the non-MIG vGPU profiles (i.e. those with just three components in their names) for this discussion as those are for cases where MIG is not enabled on the server/GPU ID, which is the default. The “grid_a100-8c”, “grid_a100-5c”, “grid_a100-20c” profiles in the list shown below are examples of the non-MIG ones.
We use a MIG GPU Instance by assigning the associated vGPU profile to a VM. We choose the vGPU profile in the vSphere Client using the “Edit Settings” menu item on our target VM, as shown.
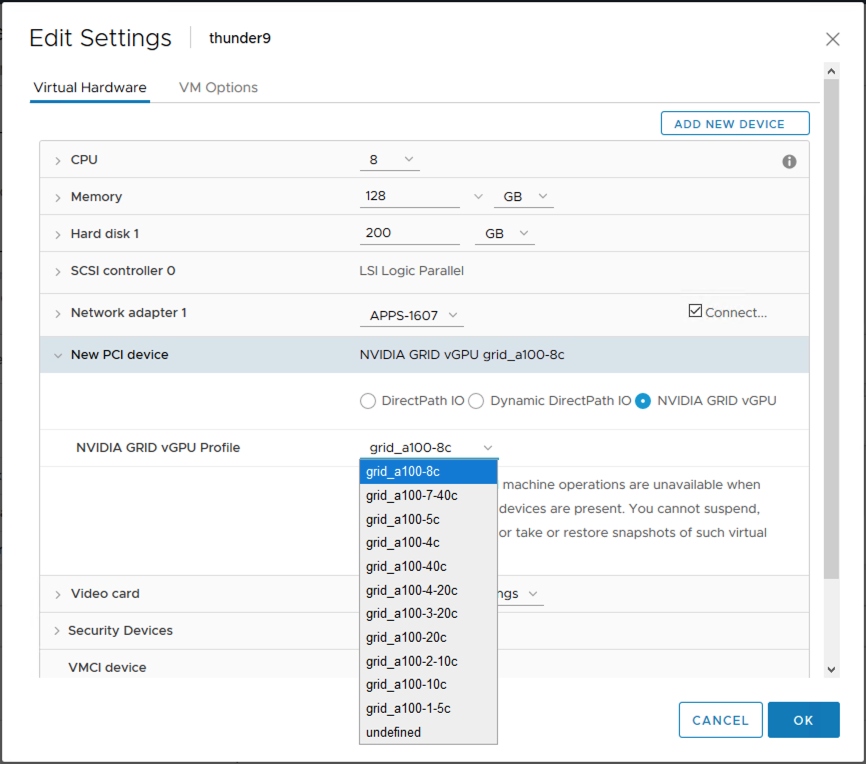
Figure 2: Choosing a vGPU profile for a VM in the vSphere Client interface
Once a systems administrator has created a GPU Instance with the profile “MIG 3g.20gb” on the server/GPU, we can choose the corresponding vGPU profile named “grid_a100-3-20c” for our VM from the selection above. We will explore more about creation of GPU Instances in Part 2.
The vGPU profiles seen in Figure 2 are all A100-specific ones. The final section of the vGPU profile name, such as “5c”, “8c”, “10c”, “20c” refers to the Compute-intensive or “c” profile type. This is the only profile type that applies to this discussion. The number preceding the “c” gives the amount in gigabytes of GPU frame-buffer memory that those profiles would allocate to the VM. This is familiar to us from the earlier forms vGPU profiles, before MIG appeared.
You will notice that the MIG-specific vGPU profiles have an extra digit surrounded by dashes before that final section of the name, e.g. “-1-”, “-2-”, “-3-”, “-4-” and “-7-”. These numbers map to the “Fraction of SMs” column in Table 1 above. That column specifies the number of SM fractions assigned for that vGPU profile, where each fraction comprises 14 physical SMs.
We also now know from the “Number of Instances Available” column in Table 1, that with a vGPU profile of “grid_a100-3-20c”, for example, there can be two virtual machines with that profile on a MIG-enabled host/GPU. We are not allowed to have more than one MIG-specific vGPU profile assigned to one VM. This means that two MIG-enabled physical GPUs may not be allocated to a VM.
We are also not allowed to mix MIG vGPU profiles (those with 4 components in their name) with non-MIG vGPU profiles (3 components in their name) for VMs on the same GPU ID on a host server.
Creating a GPU Instance
We create a GPU Instance for a particular GPU ID at the host level, or within a VM, using the well known nvidia-smi command with a GPU Instance Profile ID. This can also be done using the NVML APIs. We will get into this step in Part 2 of this series. For now, you can see all available GPU Instance Profiles by using
nvidia-smi mig –list-gpu-instance-profiles
or
nvidia-smi mig -lgip
In the output, the “Instances Total” number corresponds to the “Number of Instances Available” entry in Table 1 above, along with the amount of GPU memory, where a single unit of memory is roughly 5Gb.
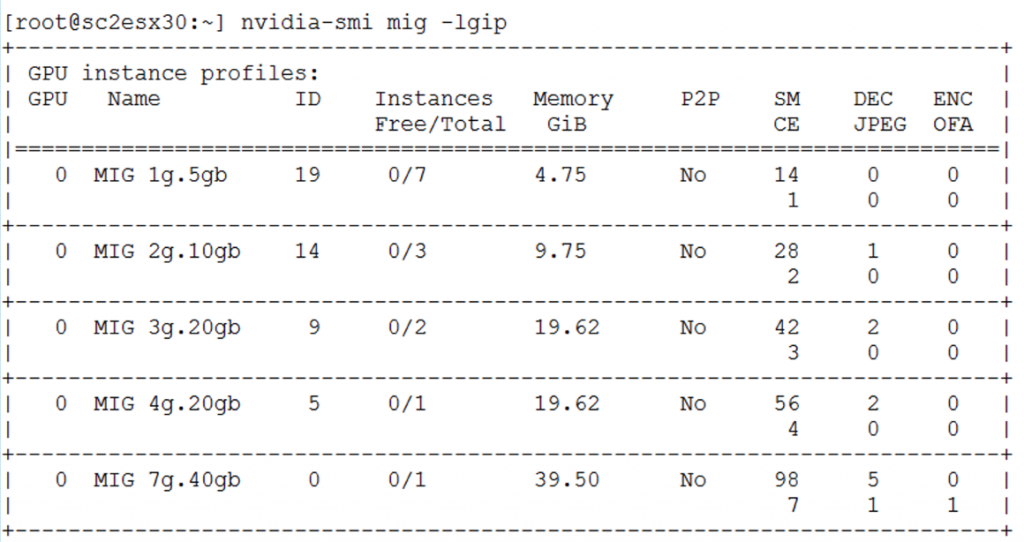
Figure 3: Output table from the “nividia-smi mig -lgip” command showing the GPU Instance Profiles
Compute Instances
As a further refinement, within a MIG “GPU Instance”, we can decide that there will be one or more “Compute Instances” (CI). A Compute Instance is a set of SMs that are ganged together and front-ended by a compute function. Within a GPU Instance, a Compute Instance gives you execution isolation of parts of your application on the GPU cores themselves. Compute Instances are for use within a single operating system or container. A Compute Instance shares the memory of the GPU Instance with other CIs that belong to that GPU Instance. There is a default Compute Instance associated with the GPU Instance, that spans the full GPU Instance, and we can use that if we need no further refinement within the GPU Instance.
However, within a VM’s guest operating system, if there is MIG awareness, then the VM can re-configure the Compute Instances within a GPU Instance that is associated with that VM. There may be four containers within a VM, for example, that each require a Compute Instance of their own. So with suitable privileges, the VM can create Compute Instances for itself. You can delve further into this subject and how to program for this feature in the NVIDIA MIG User Guide.
We see clearly now that we have much finer-grained control over the sharing of the GPU than we had with the pre-MIG (pre CUDA 11) vGPU drivers. We will see the creation of Compute Instances using their own profiles in part 2.
Summary
In this first technical preview article on Multi-instance GPUs, or MIG, on vSphere 7, we explore the concepts behind this new, more advanced approach to sharing a physical GPU among sets of VMs. We see that sharing the GPU is done in a familiar way, using vGPU profiles, but with new names for the new MIG profiles. The big advantage with using MIG is the more strict isolation of that part of the GPU’s hardware that is allocated to one VM from that of another. The access paths to memory and to cores/SMs are now dedicated to that “owning” VM, which was not the case in the pre-MIG form of vGPUs. This enables more predictable performance when a GPU is being split across different worker VMs on a vSphere server. It also allows the vSphere administrator, acting as a service provider, to carve out parts of a physical GPU to allocate to different user/developer communities, taking advantage of the hardware isolation that MIG brings. In part 2 of this series, we delve into the various profiles and their setup for MIG in more detail.
Discover more from VMware Cloud Foundation (VCF) Blog
Subscribe to get the latest posts sent to your email.


