Welcome back to the vSphere Upgrade Blog for the next piece of our Upgrade Journey. We began in Part 1 of this blog series by reviewing our prerequisites & compatibility, gathering our data. In Part 2 we upgraded vCenter Server & migrated VUM from vSphere 6.0 Update3 to 6.7. Part 3 guided us through preparing vSphere Update Manager (VUM) by creating an Upgrade Baseline and using that baseline to remediate our vSphere 6.0 Update 3 ESXi hosts to vSphere 6.7.
In part 4 of the vSphere Upgrade Series we will cover Upgrading VMware Tools and VM Compatibility.

VMware Tools and Virtual Machine Compatibility comes in at Step 4 when upgrading a vSphere environment. Although both of these components hold much value for virtual machines (VM) when upgraded, caution should always be at the forefront of upgrading the VM Compatibility version. I mention caution because upgrading the VM Compatibility version may not always be necessary to perform unless specific features are needed.
Upgrading VMware Tools
Let’s start with VMware Tools. VMware Tools is a set of services and modules that enable several features in VMware products for better management of, and seamless user interactions with, guests operating systems. Although a guest operating system can run without VMware Tools, we suggest to always run the latest version of VMware Tools in your guest operating systems to access the latest features and updates.
VMware Tools can be upgraded manually, via vSphere Update Manager, PowerCLI, or by configuring virtual machines to check and install newer versions of VMware Tools when they reboot. The guest OS checks the version of VMware Tools when you power on a Virtual Machine (VM). The status bar of the VM displays a message when a new version is available.
In my vSphere 6.7 lab environment I will be upgrading VMware Tools on a Windows 2012 server VM via the vSphere Client (HTML5) which is considered a manual upgrade. I will begin by logging into the vSphere Client and check the current version of VMware Tools running on my VM.
Step1: Click on the VM to be upgraded and then from the Summary tab review the version of VMware Tools.

Step 2: Click More info to reveal additional information (optional), then click Upgrade VMware Tools to begin the process

Step 3: Once you click Upgrade VMware Tools, you will be presented with 2 types of upgrades. Choose an upgrade type, click Upgrade to continue. (In my scenario, I have selected an Automatic Upgrade)
- An Interactive Upgrade allows the disk image for VMware Tools to be mounted to the guest OS. This allows the admin doing the work to console into the VM to run the install wizard.
- An Automatic Upgrade does what it implies by automatically upgrading VMware Tools without interacting with the guest OS. It also allows the guest OS to reboot automatically if needed.

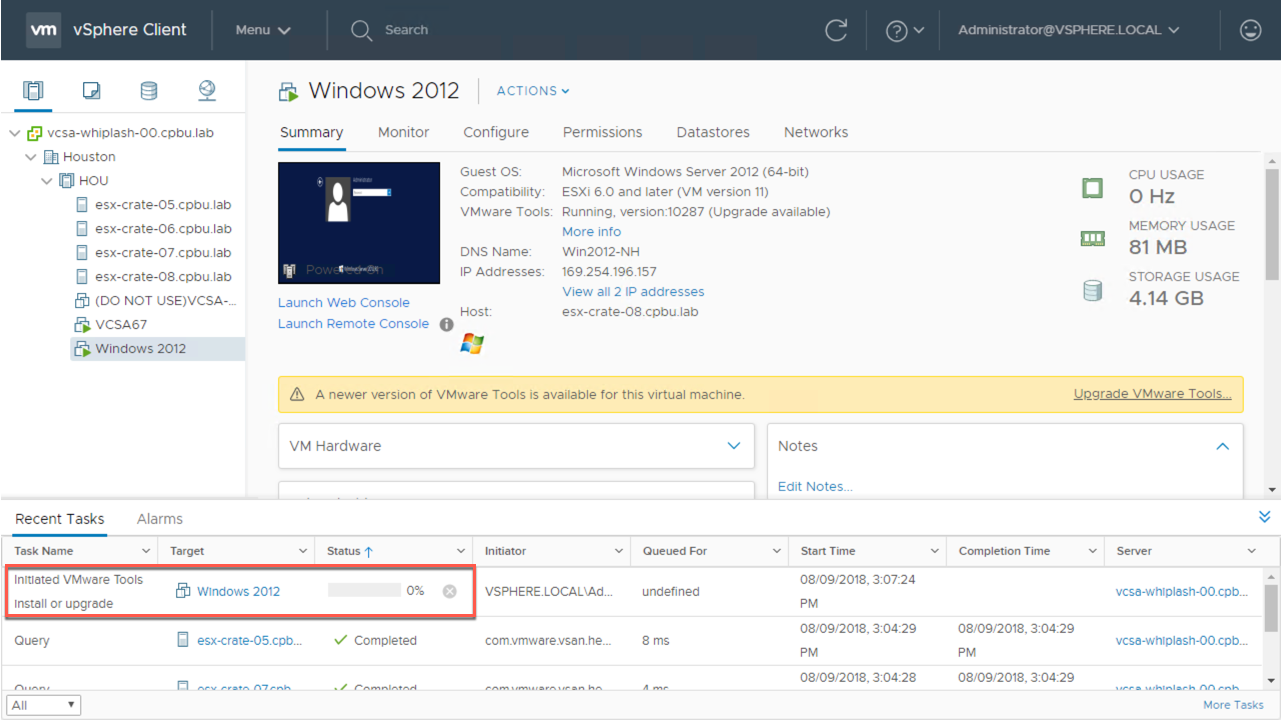
Step 4: Review the Recent Tasks pane to monitor the VMware Tools upgrade progress

Step 5: Once the upgrade is complete, we verify the upgrade by clicking More info to display VMware Tools’ version & status.

Upgrading VMware Tools with PowerCLI
VMware Tools updates can also be performed via PowerCLI. The cmdlet “Update-Tools” can be used to upgrade the VMware Tools on the specified virtual machine guest OS. VMware Tools must be installed prior to updating it. After VMware Tools is updated, the virtual machine is restarted unless the NoReboot parameter is specified.
An example usage is shown below that can update VMware Tools on a virtual machine specified by its guest operating system.
|
1 |
Get-VMGuest VM | Update-Tools |
Example scripts for VMware Tools Management can also be found on our VMware GitHub pages.
Upgrading Virtual Machine Compatibility
Now we will review Virtual Machine Compatibility. Virtual machine compatibility determines the virtual hardware available to the VM, which corresponds to the physical hardware available on the vSphere host. Upgrading the compatibility level will allow the VM to take advantage of additional hardware features available to the virtual machine.
In vSphere 6.7, Virtual Machine Compatibility (Virtual Hardware Version) 14 was introduced. VM Compatibility version 14 includes support for features such as; Per-VM EVC, Virtual TPM 2.0, and Microsoft Virtualization Based Security (VBS). Note that when upgrading VM Compatibility some applications or the OS to may have issues working properly. I suggest only upgrading VM Compatibility if you require a feature that comes with the newer hardware version.
In my lab example I will upgrade VM Compatibility from version 11 (ESXi 6.0 and later) to version 14 (ESXi 6.7 and later) via vSphere Client (HTML5).
Step 1: Right click on the VM to be upgraded (or use the Actions menu once the VM is highlighted), choose Compatibility and then click Schedule VM Compatibility Upgrade.

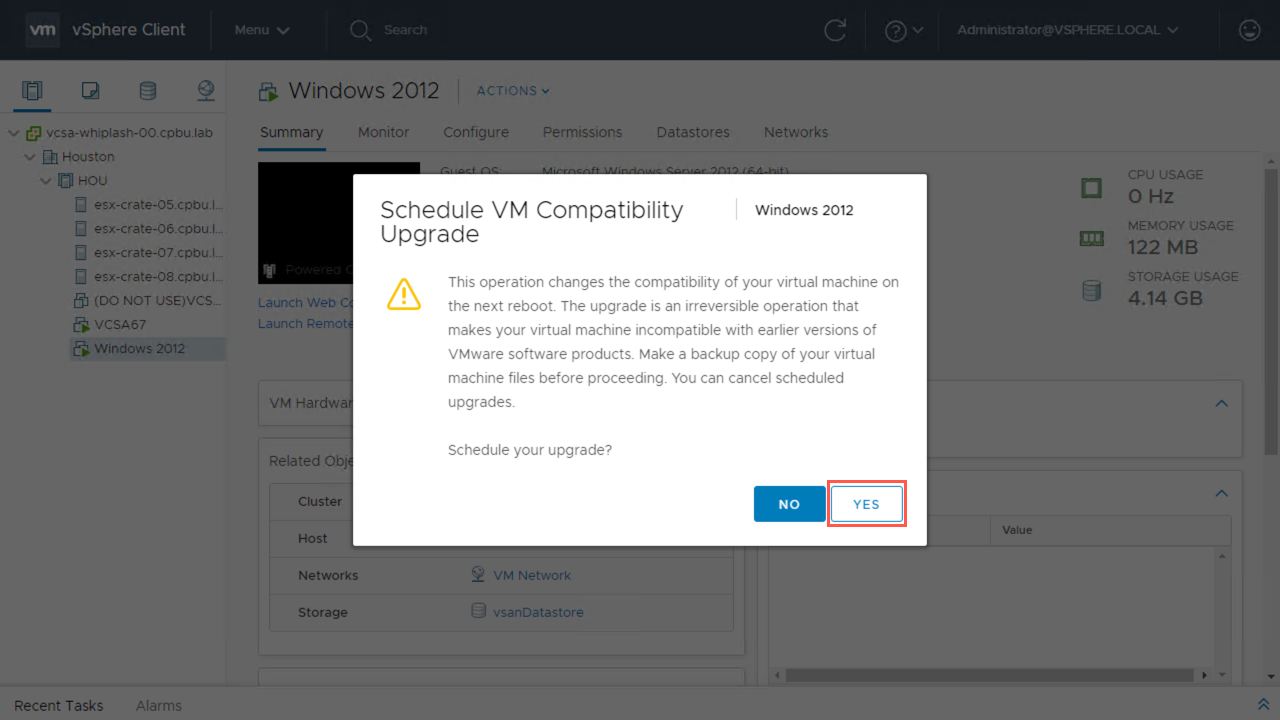
Step 2: Read the next window to understand what a VM Compatibility Upgrade will do. When ready, click Yes to continue.

Step 3: Choose the VM Compatibility version desired (example: ESXi 6.5 and later or ESXi 6.7 and later). You may also choose to only upgrade after a normal OS shutdown versus when an OS crashes then reboots.

Step 4: Next we can review the status of the upgrade. When VM Compatibility is scheduled to be upgraded, you will notice the status of the upgrade is viewable under the VM Hardware section of the virtual machine.

Step 5: Once a VM Compatibility upgrade has completed, it can be verified by checking the status under the VM Hardware section of the virtual machine.

Conclusion
As you have witnessed updating VMware Tools or Virtual Machine Compatibility are not complex tasks, but absolutely include steps that will require consideration prior to execution. It is always best to consult VMware Documentation pages for further details on VMware Tools as well as Virtual Machine Compatibility prior to upgrading. Also be sure to review the vSphere Upgrade Guide.
In the next vSphere Upgrade Series post, we will focus on upgrading Upgrading VMFS Storage in a vSphere 6.7 environment. Please do not hesitate to post questions in the comments section of this blog or reach out to me directly via Twitter @vCenterNerd.


