
Note: This blog has been updated to reflect changes in vRealize Automation 8.3 and January release of vRealize Automation Cloud.
The ability to create and manage infrastructure and services for your organization just became more flexible and powerful with the introduction of Custom Resources and Resource Actions in vRealize Automation. Taking advantage of the out-of-the-box integration with vRealize Orchestrator (vRO) you can now create Resources and Day-2 actions using vRO workflows in your Cloud Templates and deployments! This functionality presents a powerful method for vRealize Automation admins to further customize deployments and provide more options when creating infrastructure resources.
Let’s look at both Custom Resources and Resource Actions in more detail.
What are Custom Resources?
When creating blueprints in vRealize Automation Cloud Assembly, there are a number of Resource Types to choose from. Examples of Resource Types include a variety of cloud native objects and machine types, such as S3 Buckets, Cloud Agnostics Machines, NSX networks, vSphere Machines, Azure Resource Groups and much more. However there may be situations where the existing Resource Types may not be adequate for your use case, so in order to fill those gaps we have introduced Custom Resources. Each Custom Resource is based on a vRO workflow. The Custom Resource then becomes an object that can be dragged onto the Cloud Template canvas and then is consumed as part of the deployment and are then Lifecycle Managed.
Besides Lifecyle Management option for Custom Resources, admins can also create optional custom Day-2 actions based on vRO Workflows as well. Lets dive into this feature a bit more.
Building Custom Resources
In order to build Custom Resources we will first need to build or identify a vRealize Orchestrator workflow for our use case. You will need to have at least two vRO Workflows identified, one for the creation of the resource and one to destroy the resource when the deployment is deleted. In this blog we will build out a simple use case of creating a vCenter Folder along with the machine deployment.
The vRO Workflow we will use in this example is called “Create Virtual Machine Folder” and the workflow to destroy the folder when the deployment is deleted is called “Delete Virtual Machine Folder”. Both of these are built in vRO Workflows.


Notice that the “Create Virtual Machine Folder” has an Output for type VC:VmFolder, and the delete workflow has an Input for VC:VmFolder. This is needed in the event of a delete action.
Once we have identified the vRO workflow, we can then use that workflow in our Custom Resource object within vRealize Automation Cloud Assembly. Within Cloud Assembly you will see a Design tab at the top, this is where you will configure blueprints and custom resources. Click on Custom Resources and then New Custom Resource. Fill out the form with the following information:
Name – provide a name of the resource
Description – optional description
Resource Type – enter a name you want to give the resource, this will show up in the YAML code property – type. For example I entered Custom.CreateFolder.
Activate – choose this if you want the resource to be available now
Scope – define which projects can consume this resource, if you want all projects to see this resource then just leave it to the default.
After configuring the items above, you can then add the workflows you want to use under the LifeCycle Actions section. There are three types of actions you can configure – Create, Update and Destroy. The only two that are required are Create and Destroy. Notice that when you choose the “Create” workflow the system will auto-populate the External Type for you, in this case it found VC:VmFolder. This is an update we recently made to the product. This External Type is important in order for Update and Delete workflows to know what to do when they are triggered.
Note: For vRealize Automation 8.0 and 8.1 customers, you will need to type or enter in the External Type manually. Make sure you choose the appropriate external type from the vRO Workflow. There should be a corresponding output and input between Create and Destroy workflows.

Another change that was recently made was putting the schema properties onto a Properties page. The schema elements are what get translated onto the Cloud Template for configuration once the Custom Resource is dragged onto the Cloud Template canvas.

Once you create the Custom Resource it will show up in the Cloud Template as a Resource Type on the left hand side. (Note: If you modified the scope of the Custom Resource to a certain Project, then the Custom Resource will only show up if this blueprint is also tied to the same Project).

Once you drag the Custom Resource onto the canvas then the blueprint YAML code will reflect the object. In this example I have already filled out the needed input bindings and path to the proper vRO inventory section for VC:Folders. With this workflow we have both an Input for the folder name (type: string) and an object to query the parent folder (type: object). When you want to query via type:object then you will need to list out the relevant vRO inventory path, in this case it is $data: ‘vro/data/inventory/VC:VmFolder’.

You can now deploy the blueprint from Cloud Assembly or Service Broker.. Once deployed you can see some information about the Custom Resource in the deployment screen.

You can also add Day-2 Action workflows to the Custom Resource. From the Custom Resource page go to the bottom of the page and you will see Additional Actions section.

These actions will present themselves in the Action dropdown when you select the custom resource from the Deployment Topology.

What are Resource Actions?
In addition to the Day-2 actions that are already available for Resource Types within vRealize Automation, you can now configure custom Day-2 actions that make changes to your deployed resources. These custom day-2 actions are referred to in vRealize Automation as Resource Actions.
Building Resource Actions
In order to build a Resource Action you will need to first identify the workflow you want to use as the Day-2 Action.
Here is an example workflow that moves a VM to another folder within vCenter. Notice the two inputs – vms and folder. Those both point to the VC (vCenter) plugin so we can query VMs and Folder in the vCenter inventory. For this example there is also an associated action within vRealize Orchestrator that searches for all the VMs by name that is bound to Resource Action, we will see how the binding is done later.

In order to create the Resource Action just go to the Design section where we created the Custom Resource earlier. There you will see a link on the left side called Resource Actions. Fill out the form with the following information:
Display Name – provide a name for the action
Description – optional description
Activate – choose this if you want the resource to be available now
Scope – define which projects can consume this resource, if you want all projects to see this resource then just leave it to the default.
Resource Type – resource type that you want the action bound to, such as Cloud.vSphere.Machine
Workflow – choose the vRealize Orchestrator workflow that will run the action
Requires Condition – choose whether you want a condition tied to the action, such as osType = Linux
Property Binding – create and manage a binding action from vRealize Orchestrator. There are now three out-of-the-box bindings:
- in-request
- direct
- with binding action
I will go over these in more detail later.
Edit Request Parameters – choose this if you want to use the Custom Designer to create a Custom Form for the user to interact with when choosing the action from the deployment menu
Your Resource Action may look something like this.

Now lets discuss Property Bindings in more detail. The latest update provides a few different ways to do the binding to the resource you are taking the action on. For instance in previous versions of vRealize Automation 8.1 and 8.0, if you wanted to bind an action to VM you had to create a binding script and attach it to the Resource Action. A binding action may look like this:

Then just configure Return Type to VC:VirtualMachine and create an input called name and leave it as a string value..
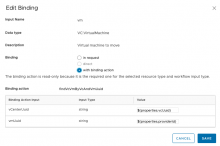
The below image shows how to bind the vRO action to the Resource Action in the UI. Basically choose the action then for the Value add ${properties.resourceName}, this is for vRealize Automation 8.1 and 8.0.

However in vRealize Automation Cloud (coming in vRealize Automation 8.2) we now have built in binding actions and other methods to do the bindings. Below is a screenshot of the options.
In-Request basically means the value will be set at request time. So the Cloud Template will find the value via a query that is defined in the YAML.
direct allows you to define the property (schema) of the resource to pass as a binding (e.g., address, name, etc.) Available for primitive types and passed to input when executing action.
with binding action allows you to choose a binding vRO action to run, we will only show actions that will bind to the Data Type (e.g. – VC:VirtualMachine can use action findVcVmByVcAndVmUuid)
After this has been setup you are ready to deploy a blueprint that has a vSphere Machine so we can then see the action to move it to a folder within the Actions menu (it could be the folder you created ealier). Remember the machine that is being deployed is a Resource Type: Cloud.vSphere.Machine, I used that Resource Type here because I want to be able to move it to another vCenter folder. After it is deployed we now see the option to “Move to a Folder” from the Actions dropdown list when you click on the vSphere machine on the canvas. Once that action is chosen the user will be prompted for the destination folder.

Custom Resources and Resource Actions promises to be a powerful way for customers to expand and customize how they will deliver services to the business and quickly provide value in their automation journey. Being able to use highly flexible workflows to create resources and actions opens up a world of possibilities!
vRealize Automation 8.3 and vRealize Cloud Updates
We recently made some updates to Custom Resource and Resource Actions by allowing additional binding actions in the Edit Request Parameters section. I will showcase this being done in Resource Actions however this could also be done for Custom Resources.
Basically I will show a simple example where I want to create a custom name for snapshots based on deployment criteria. First create a resource action and then click Edit Request Parameter at the bottom of the Resource Action page.
Once in there look for a field that would create a name (in my example I used a vRO Workflow called “Create a Snapshot” and one of the fields is the Snapshot name).
Now we can modify the Properties of that name field.
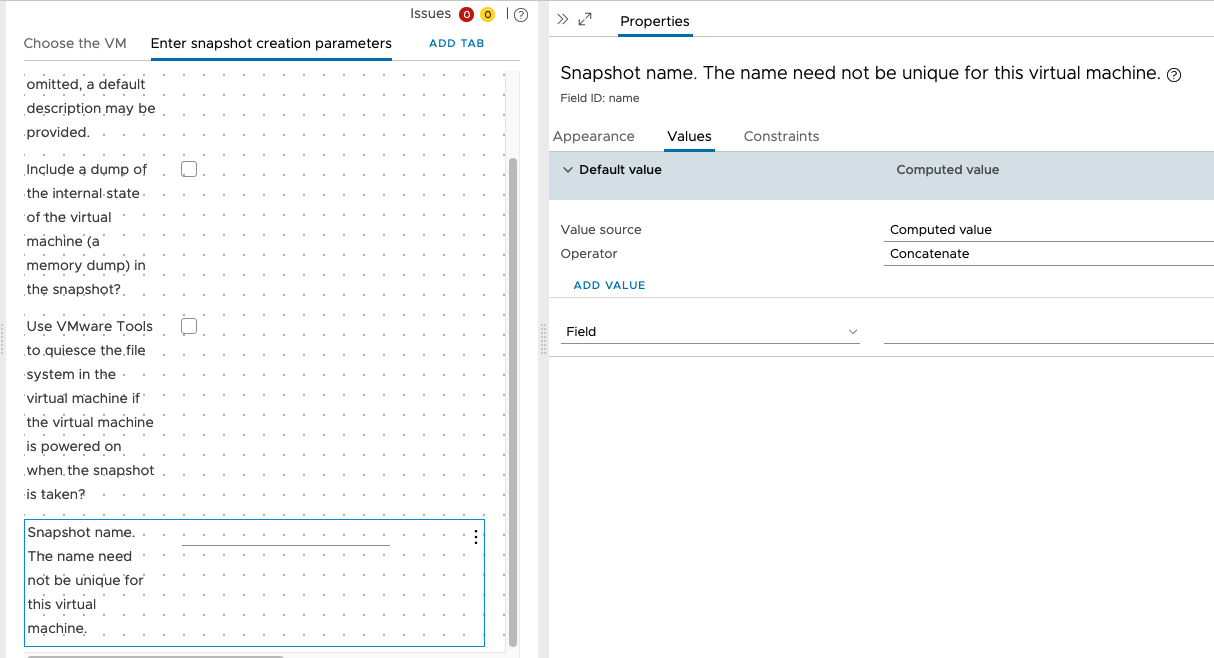
By using the Value Source = Computed Value and Operator = Concatenate, additional fields and be put together to ultimately create the name we want.

Now that the two fields have been concatenated we should see a naming pattern that matches the values in our Day 2 action. Lets see how it look when the createsnap action is initiated by the user on a vsphere machine that has been deployed.
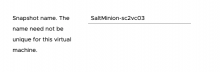
The snapshot name combined the two values to create the desired name.
For more information on vRealize Automation, check out these recent blogs:
vRealize Automation Action Based Extensibility (ABX) now supports PowerShell
New Resource Limits in Cloud Assembly
Yes! Code Stream Pipelines as Catalog Item


