
With the release of VMware Aria Automation 8.16.1 and the new Avi Load Balancer resources let’s look at how to integrate these new resources into your templates. To get familiar with the new resources see the following documentation, Setting up plug-in based VMware Avi Load Balancer resource.
The new VMware Aria Automation and Avi Load Balancer integration provides the ability for the Aria Automation administrator to design templates that take advantage of the extensive L4-L7 load balancing scenarios Avi supports. Additionally, we have exposed all of the Avi resources in the Template canvas to provide complete flexibility in your template designs. All of this together will enable the administrator to provide your users with a self-service catalog to provision Avi resources either as a service or with clustered resources as shown below. For additional examples see our extensive documentation here.
Table of contents
Automation Assembler Template Example
In this example, I will show how to create a cluster of web servers in a Security Group, backed by an Avi Virtual Service IP (VS VIP), Virtual Service (VS), and a Pool with the web servers as members. Also, we will create an Application Profile and Health Monitor. With multiple Avi controllers added to the environment we use a cloud zone allocation helper for provisioning based on cloud account type and constraint tags.
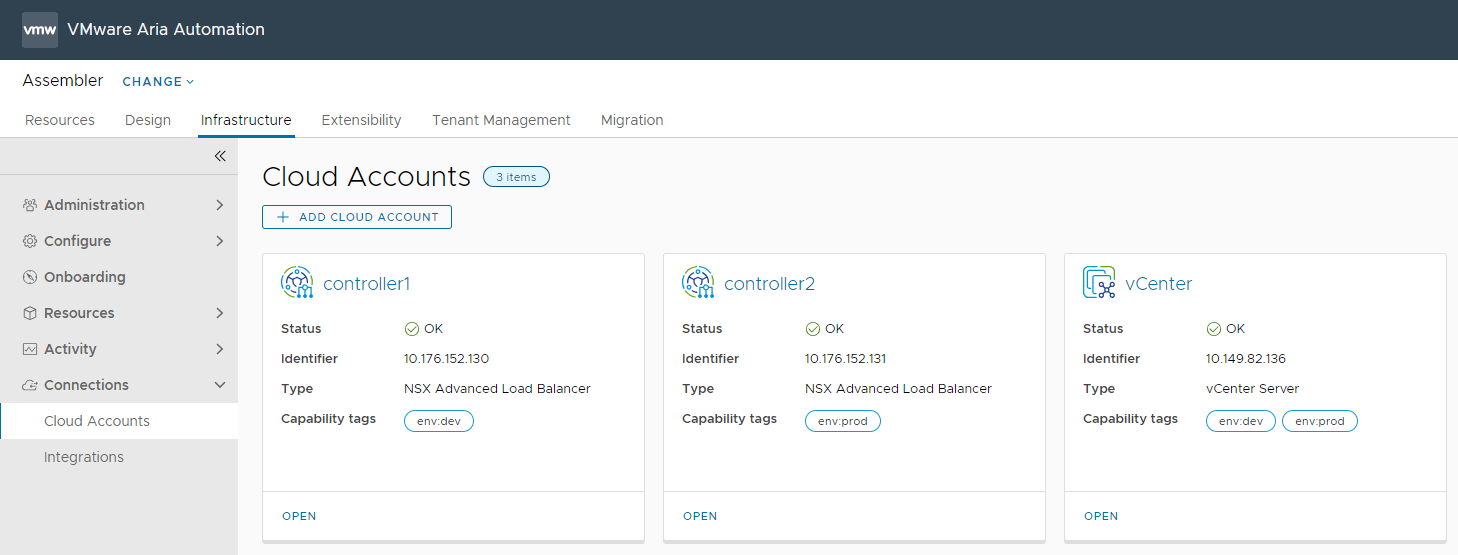
The demo environment has two Avi Controllers named ‘controller1’ and ‘controller2’ with capability tags ‘env:dev’ and ‘env:prod’ respectively. Additionally, there is a vCenter added with both capability tags.
2 Node Web Server
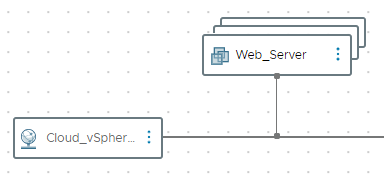
To begin let’s review an aria automation template with two web servers connected to an existing network called ‘VMNetwork-PortGroup’.
|
1 2 3 4 5 6 7 8 9 10 11 12 13 14 15 16 17 18 19 20 21 22 23 24 25 26 27 28 29 30 31 32 33 34 |
formatVersion: 1 name: ALB - Web Servers version: 1 resources: Web_Server: type: Cloud.vSphere.Machine properties: name: web count: 2 flavor: small imageRef: https://cloud-images.ubuntu.com/releases/18.04/release/ubuntu-18.04-server-cloudimg-amd64.ova cloudConfig: | packages: - apache2 - open-vm-tools runcmd: ### update the top of the web page to the web servers resource name - sed -i 's/Apache2 Ubuntu Default Page/${self.resourceName}/g' /var/www/html/index.html ### Restart services - systemctl reload apache2 - systemctl restart apache2 ### Log completion - echo 'Cloud-init is done!' >> /tmp/finished.txt networks: - network: ${resource.Cloud_vSphere_Network_1.id} Cloud_vSphere_Network_1: type: Cloud.vSphere.Network properties: networkType: existing name: VMNetwork-PortGroup |
2 Node Web Server added to an Avi Load Balancer
To expand on the 2-node web server template let’s add the web servers to a Pool, create a Virtual Service, and VIP referencing the existing vSphere network.

VIP
To begin we assign a dynamic name leveraging the uuid function, set a description, and define the Cloud Account to create the VS_VIP resource to. Next, we start by defining a VIP with an id of 0. Set auto_allocate_ip to true, so the Avi controller will Auto-allocate a VIP from the provided subnet. Since the auto_allocate_ip property requires a subnet name, we pass the name of the network resource we are provisioning the web servers on to reference on the Avi controller.
|
1 2 3 4 5 6 7 8 9 10 11 |
VIP: type: Idem.AVILB.APPLICATIONS.VS_VIP properties: name: web-vip-${uuid()} description: Managed by Aria Automation account: controller1 vip: - vip_id: 0 auto_allocate_ip: true ipam_network_subnet: network_ref: ${resource.Cloud_vSphere_Network_1.resourceName} |
Virtual Service
To create the virtual service, set the dynamic name, description, cloud account, and Avi Cloud type. Then we set the Virtual Service’s port number to 80 for the HTTP web server. Finally, we reference the VS VIP and Pool by their respective resource id’s.
|
1 2 3 4 5 6 7 8 9 10 11 |
VirtualService: type: Idem.AVILB.APPLICATIONS.VIRTUAL_SERVICE properties: name: web-vs-${uuid()} description: Managed by Aria Automation account: controller1 cloud_type: CLOUD_VCENTER services: - port: '80' pool_ref: ${resource.Pool.name} vsvip_ref: ${resource.VIP.name} |
Pool
Create the pool by defining the dynamic name, description, and cloud account. Then set the default server port to define the destination server port the traffic will be sent to.
|
1 2 3 4 5 6 7 8 9 10 11 |
Pool: type: Idem.AVILB.APPLICATIONS.POOL properties: name: web-pool-${uuid()} description: Managed by Aria Automation account: controller1 default_server_port: '80' health_monitor_refs: - System-Ping lb_algorithm: LB_ALGORITHM_LEAST_CONNECTIONS servers: '${map_by(resource.Web_Server[*].address, address => {"ip": {"addr": address, "type" : "V4"}})}' |
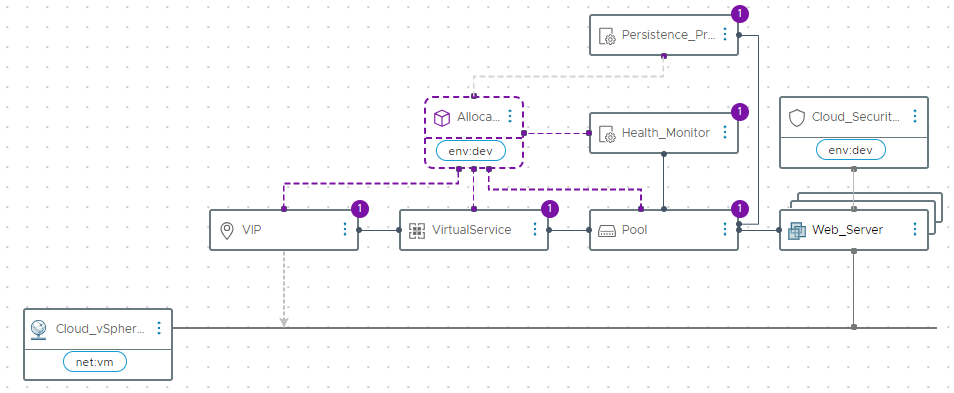
2 Node Web Server added to an Avi Load Balancer with Cloud Zone Allocation Helpers, Persistence Profiles, Health Monitors, and Security Groups
With the basics configured above, the next step is to consider more advanced environments and deployments.
In this template example, we use a Cloud Zone Allocation Helper and constraint tagging to dynamically provision the request. This is very useful in environments with multiple Avi Cloud Accounts. Next, we create Persistence Profiles and Health Monitors and reference them in our pool configuration. Finally, add the deployed web servers to the desired Security Group.
Cloud Zone Allocation Helper
With Allocation Helpers, we can leverage capability tags like ‘env:dev’ assigned to the ‘controller1’ Cloud Account. For example, you may have multiple VCF workload domains each with their own Avi controller. To ensure the load balancer is created on the Avi controller for the workload domain, we can use the cloud zone allocation helper with the workload domains tag.
|
1 2 3 4 5 6 |
Allocations_CloudZone: type: Allocations.CloudZone properties: accountType: avilb constraints: - tag: env:dev |
Persistence Profiles
Next, create a Persistence Profile to persist the clients to the same server based on their client IP address.
|
1 2 3 4 5 6 7 |
Persistence_Profile: type: Idem.AVILB.PROFILES.APPLICATION_PERSISTENCE_PROFILE properties: name: web-profile-${uuid()} description: Managed by Aria Automation account: ${resource.Allocations_CloudZone.selectedCloudAccount.name} persistence_type: PERSISTENCE_TYPE_CLIENT_IP_ADDRESS |
Health Monitors
For the health monitor create an HTTP monitor to monitor port 80 where the web server is running.
|
1 2 3 4 5 6 7 8 |
Health_Monitor: type: Idem.AVILB.PROFILES.HEALTH_MONITOR properties: name: web-monitor-${uuid()} description: Managed by Aria Automation type: HEALTH_MONITOR_HTTP account: ${resource.Allocations_CloudZone.selectedCloudAccount.name} monitor_port: 80 |
Security Group
Lastly, we add the deployed web servers to an existing security group by leveraging the ‘env:dev’ constraint tag.
|
1 2 3 4 5 6 |
Cloud_SecurityGroup: type: Cloud.SecurityGroup properties: constraints: - tag: env:dev securityGroupType: existing |
ALB – Web Servers Template
Now let’s put all of this together in a complete example.
Complete Example
|
1 2 3 4 5 6 7 8 9 10 11 12 13 14 15 16 17 18 19 20 21 22 23 24 25 26 27 28 29 30 31 32 33 34 35 36 37 38 39 40 41 42 43 44 45 46 47 48 49 50 51 52 53 54 55 56 57 58 59 60 61 62 63 64 65 66 67 68 69 70 71 72 73 74 75 76 77 78 79 80 81 82 83 84 85 86 87 88 89 90 91 92 93 94 95 96 97 |
formatVersion: 1 name: ALB - Web Servers version: 1 resources: Persistence_Profile: type: Idem.AVILB.PROFILES.APPLICATION_PERSISTENCE_PROFILE properties: name: web-profile-${uuid()} description: Managed by Aria Automation account: ${resource.Allocations_CloudZone.selectedCloudAccount.name} persistence_type: PERSISTENCE_TYPE_CLIENT_IP_ADDRESS Allocations_CloudZone: type: Allocations.CloudZone properties: accountType: nsx_alb constraints: - tag: env:dev Health_Monitor: type: Idem.AVILB.PROFILES.HEALTH_MONITOR properties: name: web-monitor-${uuid()} description: Managed by Aria Automation type: HEALTH_MONITOR_HTTP account: ${resource.Allocations_CloudZone.selectedCloudAccount.name} monitor_port: 80 Cloud_SecurityGroup: type: Cloud.SecurityGroup properties: constraints: - tag: env:dev securityGroupType: existing VIP: type: Idem.AVILB.APPLICATIONS.VS_VIP properties: name: web-vip-${uuid()} description: Managed by Aria Automation account: ${resource.Allocations_CloudZone.selectedCloudAccount.name} vip: - vip_id: 0 auto_allocate_ip: true ipam_network_subnet: network_ref: ${resource.Cloud_vSphere_Network_1.resourceName} VirtualService: type: Idem.AVILB.APPLICATIONS.VIRTUAL_SERVICE properties: name: web-vs-${uuid()} description: Managed by Aria Automation account: ${resource.Allocations_CloudZone.selectedCloudAccount.name} cloud_type: CLOUD_VCENTER services: - port: '80' pool_ref: ${resource.Pool.name} vsvip_ref: ${resource.VIP.name} Pool: type: Idem.AVILB.APPLICATIONS.POOL properties: name: web-pool-${uuid()} description: Managed by Aria Automation account: ${resource.Allocations_CloudZone.selectedCloudAccount.name} default_server_port: '80' application_persistence_profile_ref: /api/applicationpersistenceprofile/${resource.Persistence_Profile.resource_id} health_monitor_refs: /api/healthmonitor/${resource.Health_Monitor.resource_id} lb_algorithm: LB_ALGORITHM_LEAST_CONNECTIONS servers: '${map_by(resource.Web_Server[*].address, address => {"ip": {"addr": address, "type" : "V4"}})}' Web_Server: type: Cloud.vSphere.Machine properties: name: web count: 2 flavor: medium imageRef: https://cloud-images.ubuntu.com/releases/18.04/release/ubuntu-18.04-server-cloudimg-amd64.ova cloudConfig: | packages: - apache2 - open-vm-tools runcmd: ### update the top of the web page to the web servers resource name - sed -i 's/Apache2 Ubuntu Default Page/${self.resourceName}/g' /var/www/html/index.html ### Restart services - systemctl reload apache2 - systemctl restart apache2 ### Log completion - echo 'Cloud-init is done!' >> /tmp/finished.txt networks: - network: ${resource.Cloud_vSphere_Network_1.id} #securityGroups: # - ${resource.Cloud_SecurityGroup.id} Cloud_vSphere_Network_1: type: Cloud.vSphere.Network properties: networkType: existing constraints: - tag: net:vm |
For additional information see our YouTube playlist, Cloud Management blog, and TechZone for additional content.
- VMware Aria Automation Config – YouTube
- VMware Cloud Management – Blog
- VMware Aria Automation – Tech TechZone
Discover more from VMware Cloud Foundation (VCF) Blog
Subscribe to get the latest posts sent to your email.


