

As you probably know, VMware Tools™ is a set of services and modules that enable several features in VMware products for better management of guests’ operating systems and seamless user interactions with them.
As a VMware Technical Account Manager, I partner with my customers to provide guidance and recommendations for updates, upgrades, optimizations, and more. In this blog, I’ll explore how to update VMware Tools at scale and cover options using:
- VMware vSphere® Lifecycle Manager™
- VMware vSphere® PowerCLI™
- Third-party tools
I’ll also share different options and provide a description of how to set them up.
Understanding VMware Tools Updates
Compatibility
Unlike VM hardware, VMware recommends keeping VMware Tools up to date. Nevertheless, the compatibility is widely supported in both directions. See the following screenshot from the Product Interoperability Matrix for VMware Tools interoperability support.

For example, it is supported to run VMware Tools from 2016 in a VM running on ESXi 7 U3. Also, a VM on a VMware ESXi™ 5.5 can have current (12.1.5 at time of writing) VMware Tools installed.
Downloads
VMware Tools is a separate product and has its own download. You can download it along with your other VMware vSphere® components at https://customerconnect.vmware.com.
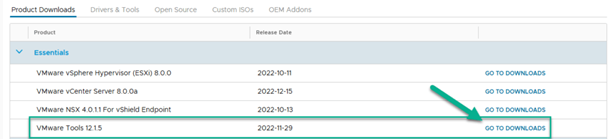
Basically, there are four different files for downloading:
- Bundle for shared Locker repository
- Example filename: VMware-Tools-windows-12.1.5-20735119.zip
- Used for: Create a shared repository for the VMware Tools version
- In-guest installer
- Example filename: VMware-tools-12.1.5-20735119-x86_64.exe.zip
- Used for: Update VMware Tools as separate software
- Packages for GuestStore
- Example filename: gueststore-vmtools-12.1.5-20735119-20735876.zip
- Used for: GuestStore. This is a rather new feature. It was introduced with vSphere 7.0 U2. GuestStore is not primarily for VMware Tools update, but it can be used for this. I’ll cover GuestStore in another post.
- Tools Offline VIB bundle
- Example filename: VMware-Tools-12.1.5-core-offline-depot-ESXi-all-20735119.zip
- Used for: Use Baseline to update VMware Tools on hosts
OS Support
Historically VMware Tools are made for Windows or Linux. There were and are also versions for FreeBSD, Solaris and MacOS. The list of supported operating systems has changed over time. Here are some recent updates:
- Tools version 10.3.5 freezes feature support for Linux. This does not mean that there is no longer an option to install a VMware support bundle for Linux operating systems. Instead of VMware Tools, you should install open-vm-tools.
- Starting with VMware Tools version 10.2.0, Perl script-based installation for FreeBSD has been discontinued. Use open-vm-tools here as well.
- VMware Tools 10.3.10 release freezes support for Solaris guests.
Tools version on VMware ESXi™ host
As we will see later, it is important to know which version of VMware Tools is located on the local ESXi host. This version may be used to check against VM’s version of Tools. A quick check is to run the following esxcli command in the host shell:
esxcli software component get | grep VMware-VM-Tools -B 1 -A 14

If you prefer vSphere PowerCLI, you can run the following code.
$Result = @()
foreach ($ViHost in (Get-VMhost)) {
$esxcli = $ViHost | Get-esxcli -V2
$ToolsVersion = ($esxcli.software.component.get.Invoke() | Where-Object {$_.name -eq "VMware-VM-Tools"}).Version
$Result += [PSCustomObject] @{
HostName = $ViHost.Name;
ToolsVersion = $ToolsVersion}
}
$Result
Note: The version shown above is the version of VMware Tools that was installed with the host. This version is not necessarily the same as the version VMs are compared with. Later, I’ll demonstrate when this is the case.
Update Options for VMware Tools
There are two different methods to update VMware Tools within the guest OS:
- Update VMware Tools as separate software
- Update VMware Tools by using vSphere features
Update VMware Tools as separate software
Because VMware Tools are available separately, it is possible to install and update them without leveraging vSphere features. You can use software distribution systems like Microsoft System Center to deploy the desired version of VMware Tools. Of course, you can also manually update VMware Tools on the systems or use any kind of scripting to do so. There are options for silent installation as well.
Update VMware Tools by using vSphere features
It is important to know that VMware Tools are deployed with the installation upgrade of each ESXi host. Check out the list of VMware Tools and ESXi versions they are rolled out on. This means you get a certain VMware Tools version with each ESXi version. This is located, by default, in a local repository on the host (/productLocker). This is a symbolic link, as we will see later. To decide if the VMware Tools version in the guest is current, vCenter compares the installed version with the version deployed in /productLocker on the host the VM is running. If the version in the guest is lower, you see a warning, which means VMware Tools are not current.

Using vSphere features for upgrading VMware Tools is a two-step procedure:
- Configure the ESXi host to use a certain VMware Tools version
- Automated update of VMware Tools in guest OS
Step 1: Configure the ESXi host to use a certain VMware Tools version
You have the following options to configure the ESXI host:
- Using vSphere Lifecycle Manager to update VMware Tools version deployed on the host.
- Create a shared repository for the VMware Tools version.
Note: It is not recommended to overwrite files in the default repository (/productLocker) manually. If you do so, you will get unwanted results when updating or upgrading hosts.
Also, you can choose a certain VMware Tools version for deployment. This can be the version you have already tested or the version that fixes a special issue your environment is experiencing.
Using vSphere Lifecycle Manager to update VMware Tools version deployed on the host
With this approach, VMware Tools files on the ESXi hosts are being updated. This happens in the local repository (/productLocker). The advantage with this approach is that vSphere Lifecycle Manager does the job for you. It offers two different approaches for updating hosts in a cluster:
If you update your cluster by using baselines, you can either create a custom image that includes your desired VMware Tools version, or you can deploy only VMware Tools with a custom baseline. Since the baseline approach is the legacy method, I will not go into detail about creating a custom image here. But using a baseline to update Locker on hosts is still a widely used method.
Use Baseline to update VMware Tools on hosts
The workflow is very straightforward. The steps are as follows:
- Download Tools Offline VIB bundle.
- Upload bundle to vSphere Lifecycle Manager. This step can be skipped, if VIB was downloaded automatically.
- Create a new baseline containing VMware Tools VIB only.
- Attach baseline to the hierarchy level that best meets your requirements and check compliance.
- Remediate hosts.

After the successful update, the local VMware Tools repository is updated.
Note: Although the host does not need to reboot after the update, maintenance mode must still be set. Otherwise, the update process may look successful without any changes on the host.
Update VMware Tools in Single Image approach
The more modern method of handling updates in a cluster is to use a Single Image. You will need to select the VMware Tools version of your choice as an additional component in the Image definition.
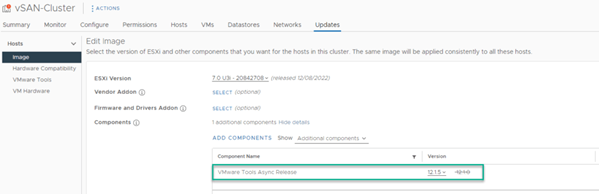
Of course, you can only adjust the desired VMware Tools version and leave the rest as it is.

Here, it also applies that the version of VMware Tools on the host is updated after vSphere Lifecycle Manager patches the host.
Create a shared repository for the VMware Tools version
This approach creates a central repository of VMware Tools for multiple hosts. The local repository will not be touched. Instead, you can create a new directory on a shared datastore. This directory will be defined as a new repository. The advantage of this approach is you just need to manage one centralized repository. On host systems, just an advanced parameter needs to be adjusted. But, first things first. I’ve provided the basic steps to set up the shared repository. For more detailed information read Installing and upgrading the latest version of VMware Tools on existing hosts (2129825).
- [only once at first setup] Create a directory on a shared VMFS volume and set permissions (replace cursive words accordingly)
cd /vmfs/volumes/datastore_of_your_choicemkdir vmtools-repository-namechmod 700 vmtools-repository-name
- Empty directory. This step needs to be done when you update VMware Tools in this repository.
rm -rf /vmfs/volumes/datastore_of_your_choice/vmtools-repository-name/*
- Upload files to directory
- Download the proper file from https://customerconnect.vmware.com and unpack it.
- Transfer files to
/vmfs/volumes/datastore_of_your_choice/vmtools-repository-name.You will get two sub-folders that should contain the right files. 
- Note: This screenshot shows files for Windows VMware Tools. If you wish to add legacy Tools for Linux, add these files to the vmtools directory.
- Set proper permissions
chmod -R 700 /vmfs/volumes/datastore_of_your_choice/vmtools-repository-name/*
- [only once at first setup] With this step we configure ESXi host to use our new directory instead of the default. This is done by changing the advanced parameter
UserVars.ProductLockerLocation. The default value for this parameter is/locker/packages/vmtoolsRepo/. The previously mentioned location of the default repository/productLockeris just a symbolic link to the value ofUserVars.ProductLockerLocation.

Because we are talking about updates at scale, I will show the vSphere PowerCLI method here. Next to that you can change advanced settings using the vCenter UI and running esxcli locally on each host.
To show configured Locker directory, run this code:
Get-VMHost | Get-AdvancedSetting -Name "UserVars.ProductLockerLocation" | Select-Object Entity, Value
To change to the new directory, run this code:
Get-VMHost | Get-AdvancedSetting -Name "UserVars.ProductLockerLocation" | Set-AdvancedSetting -Confirm:$false -Value
"/vmfs/volumes/datastore_of_your_choice/vmtools-repository-name/"
Attention: The second command is changing the parameter, so take care, the selection of your hosts is correct! For example, you can add Get-Cluster Cluster_of_your_choice | in the beginning of the command. It does not check the existence of the directory, nor does it check if the directory contains the correct VMware Tools files.
5. [only once at first setup] For updating the symbolic link /productLocker hosts need to be rebooted. This can be avoided by manual tasks. For more information about these steps see the mentioned post – about in the middle.
Step 2: Automated update of VMware Tools in guest OS
Now we are ready to automate update in guest OS. Because we are talking about large scale, I will not discuss the option to start the update by logging into the guest, mounting the ISO and executing the exe-file.
First, let’s see which versions are currently installed on VMs. Again, we use vSphere PowerCLI. Run this command to see all VMs and the installed Tools version:
Get-VM | Select-Object Name, @{N="ToolsVersion"; E={$_.ExtensionData.Config.Tools.ToolsVersion}}
Unfortunately, this is not the notation we would like to see. However, it corresponds to the version we see on the VM Summary page in the vCenter UI. For translation use the VMware version-mapping file.
There are four options to automate the update of VMware Tools in the guest OS.
Option 1 – Update VMware tools immediately or schedule using vCenter UI
It is not very common to work with a UI when working at scale. But in this case, we can leverage the vCenter UI because it is possible to easily filter lists and edit settings or trigger actions on many objects.
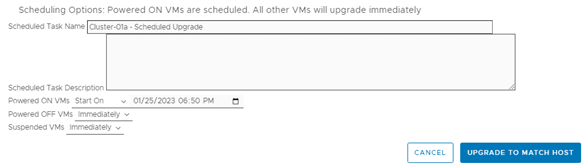
vCenter respectively vSphere Lifecycle Manager offers very powerful options here. You can schedule the update process depending on the power-state of the VM. It is also possible to trigger a snapshot upfront.
Select the cluster of choice and go to the Updates tab and select VMware Tools. Filter VMs of choice or simply select all VM and click Upgrade to match host. In the following windows you have a number of different options. For scheduling, you can set a different start date and time for powered on, off or suspended VMs.
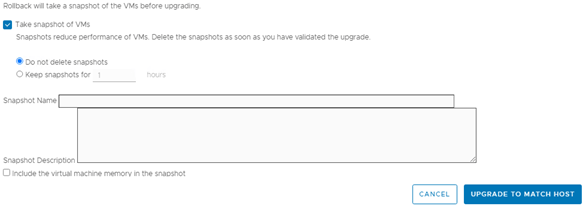
You also can configure it to take a snapshot before the update starts. Snapshots can be automatically deleted after a defined number of hours. Also, memory can be part of the snapshot.
Note: If you want to use these snapshots, you should pay close attention. Deleting many snapshots at the same time leads to a large additional load on the storage system! Use it just for a subset of VMs. Use snapshots for VMs where you expect issues or where the VM must be available again very quickly in case of problems.
The default values for these settings can be configured in Menu -> Lifecycle Manager -> Settings -> VMs

Option 2 – Update VMware Tools immediately using vSphere PowerCLI
There is an option to update VMware Tools at the push of a button, or rather when executing a command. Using vSphere PowerCLI we can leverage the cmdlet Update-Tools. It initiates the update process within the VM OS.
Note: By default, Update-Tools waits until VMware Tools are updated. Furthermore, an automatic reboot is initiated, if necessary, by default. To change these behaviors, use options NoReboot and RunAsync.
The following command will immediately start the update process in VM Win2019-01. The process is done by a task. As soon as the task is created, the command finishes, and the PowerShell shows the command prompt.
Get-VM Win2019-01 | Update-Tools –RunAsync
To show currently running tasks, run Get-Task.
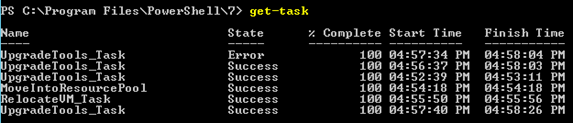
Note: Because this is just a PowerShell command, it can be scheduled as well.
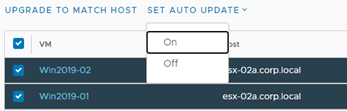
Option 3 – Update VMware Tools on next VM reboot using vCenter UI
Within a maintenance window, VMs are normally rebooted. Why not use this to update VMware Tools as well? You can do so by configuring the VMs to check the VMware Tools version at startup. If the installed version is older than the reference (/productLocker), an update is initiated.
For changing update policy, select the cluster of choice and go to the Updates tab and select VMware Tools. Here you can filter the VM list.

With the right selection, mark VMs and change the policy using set auto update dropdown.
Option 4 – Update VMware Tools on next VM reboot using vSphere PowerCLI
First, view the current VM configuration by using vSphere PowerCLI.
Get-VM | Select-Object Name, @{N="ToolsVersion"; E={$_.ExtensionData.Config.Tools.ToolsUpgradePolicy}}
Available policies are: manual and UpgradeAtPowerCycle, where manual means that nothing is automated. To prepare the policy configuration, a few variables must be defined.
$vmConfigSpec = New-Object VMware.Vim.VirtualMachineConfigSpec
$vmConfigSpec.Tools = New-Object VMware.Vim.ToolsConfigInfo
$vmConfigSpec.Tools.ToolsUpgradePolicy = "UpgradeAtPowerCycle"
To apply policy on your selection of VMs use the following code.
$VMs = Get-VM -Name "Win*"
$VMs.ExtensionData.ReconfigVM_Task($vmConfigSpec)
Take care which VMs are in $VMs, these will be changed.
A couple of things to note. No snapshot is taken automatically with this approach. Since it is not a big deal to turn auto-update on and off, one option is to turn it on during the update windows and off afterwards.
A general note about code in this blog post. Code lines are intended to be written without line breaks. When needed, consider “`” in PowerShell to split the code into multiple lines.
That’s it! Choose the update option that best meets your specific needs. If you have a VMware Technical Account Manager like me working with your team, they can help you determine which is the best option for your environment and more. If you don’t have a TAM, no problem. Just reach out to your VMware Account Manager to learn more about how a TAM can partner with you team on updates, upgrades, best practices, optimizations, planning future technology investments and more.