
In 9.1, the VCF Download Tool (VCFDT) needs an activation code tied to an entitled site. A username and password don’t work in 9.x. If you’re a Broadcom partner or an employee, your portal login can usually download individual files from the Broadcom Support Portal, but it often can’t generate an activation code. That leaves you with a freshly deployed VCF Installer and nothing to install from.
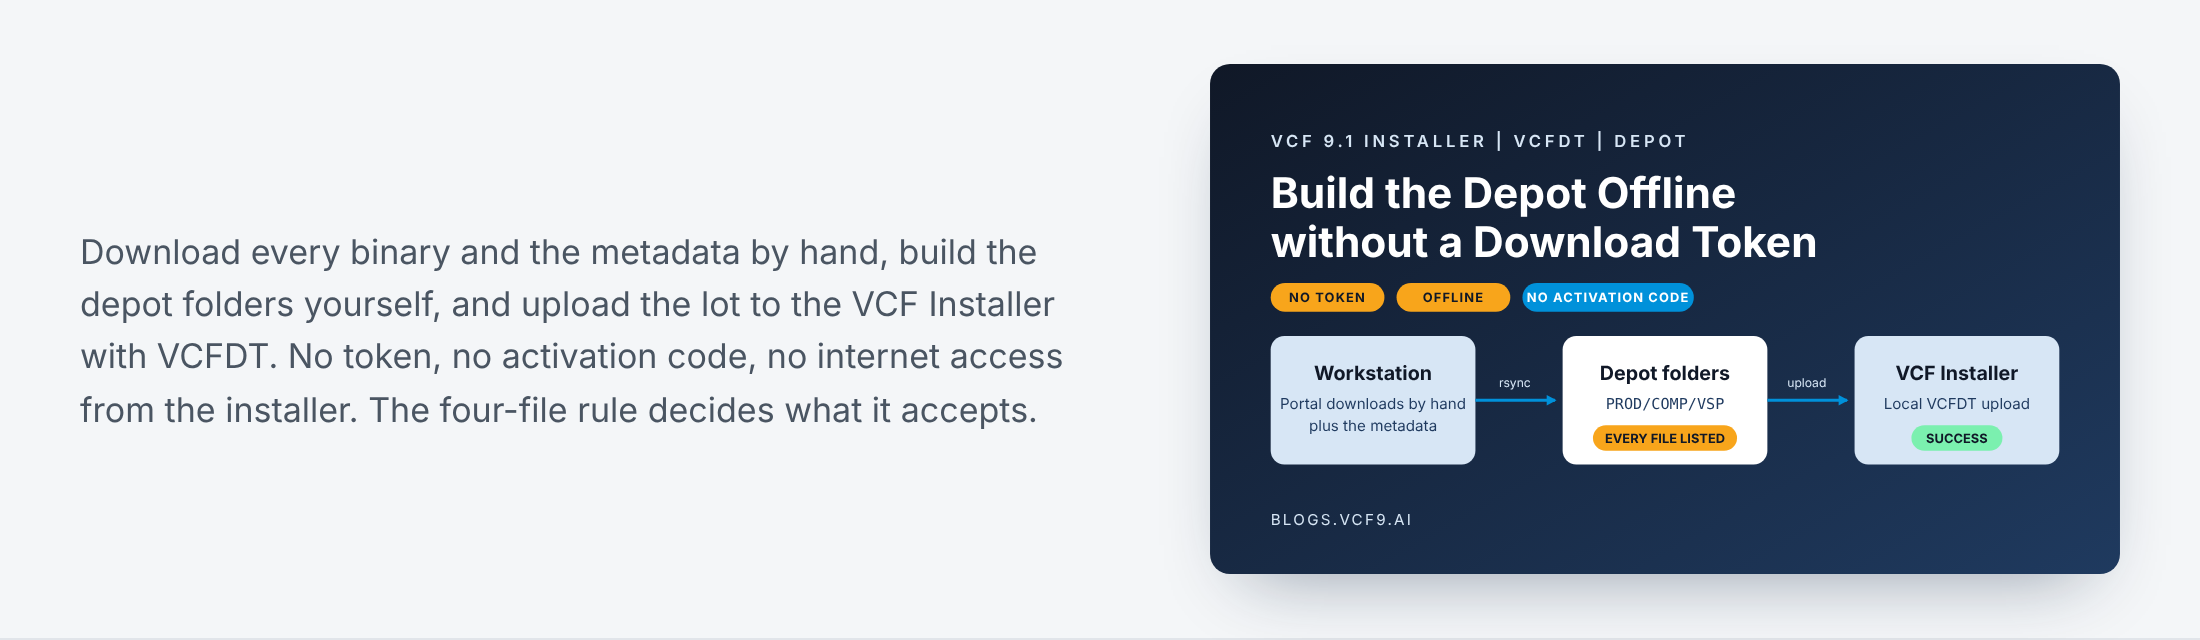
You can still fill it. Download every file and the metadata by hand, build the depot folder structure yourself, copy it to the installer, and let VCFDT upload it. This post walks through that run from start to finish, and explains the one rule that trips most people up: the installer only accepts a component when every file the product version catalog lists for that bundle is present, in the right folder, at the right size. A bundle with even one missing file is skipped without a word.
 Two Ways to Get Binaries In
If you’re a customer with entitlement, don’t do any of this. Follow the official VCFDT procedure in the Broadcom documentation. With a token or activation code, VCFDT pulls all files and the metadata for you, and every trap below goes away. If the installer has internet or proxy access, the online depot is simpler still.
If you’re a partner or building a lab without a token, you download everything by hand, build the depot layout, copy it over, and then follow steps 5 to 7 of the same article. The rest of this post is about that second path, because the article assumes VCFDT did the downloading and so says little about what the folders must look like.
 The Lab
- VCF Installer appliance: 9.1.1.0200.25801073, FQDN
vcf-installer.vcf9.ai - VCFDT:
vcf-download-tool-9.1.1.0200.25801073, a tar.gz extracted on the appliance - Workstation: Windows with WSL, where the Windows drive appears at
/mnt/host/c/... - SSH to the installer as
vcf. Root SSH is disabled by default, so usesu -for the root steps - Depot root on the appliance:
/nfs/vmware/vcf/nfs-mount/depot, which will containPROD
The binaries total roughly 65 GB. Check the space before you start:
|
1 |
df -h /nfs/vmware/vcf/nfs-mount |
 Where the Files Come From
Everything is on the Broadcom Support Portal under the VCF 9.1.1 release, on each component’s download page. That includes the metadata and every yaml and plugin file. Component pages you’ll visit include Fleet Lifecycle, SDDC Lifecycle, Software Depot, Telemetry and VCF services runtime.
The yaml and plugin files are tiny, under 35 KB and some under 1 KB, so they’re easy to miss in a file list. Download them anyway. You’ll see why in a moment.
Take the patch builds that match your installer, which here means the .0100 and .0200 builds, not the 9.1.1.0 GA builds. The catalog only links files from the same build.
You don’t need any of these for a fleet install:
- the ESX installer ISO (hosts are installed separately)
- vSphere Supervisor
- HCX
- Native Storage Service
- the optional VCF service entries
- vsan-service-vmsp-backend
 The Depot Layout
This is everything that ends up under /nfs/vmware/vcf/nfs-mount/depot/. Folder names are case-sensitive and come from the component names in productVersionCatalog.json. Don’t extract or rename any file.
Metadata first. It comes from the portal’s metadata download and must match the build level of the binaries:
|
1 2 3 4 5 6 7 8 9 10 11 12 13 |
PROD/metadata/manifest/v1/vcfManifest.json PROD/metadata/productVersionCatalog/v1/productVersionCatalog.json PROD/metadata/productVersionCatalog/v1/productVersionCatalog.sig PROD/metadata/Compatibility/v1/VmwareCompatibilityData.json PROD/metadata/Compatibility/v2/VmwareCompatibilityData.json PROD/metadata/vsan/hcl/all.json PROD/metadata/vsan/hcl/lastupdatedtime.json PROD/vsan/hcl/all.json (VCFDT reads this path) PROD/vsan/hcl/lastupdatedtime.json PROD/COMP/SDDC_MANAGER_VCF/Compatibility/VmwareCompatibilityData.json PROD/COMP/VCENTER/vmw/8d167796-34d5-4899-be0a-6daade4005a3/upgrade_info.xml PROD/COMP/VCENTER/vmw/8d167796-34d5-4899-be0a-6daade4005a3/upgrade_info.sig PROD/COMP/VCENTER/vmw/8d167796-34d5-4899-be0a-6daade4005a3/upgrade_info.xml.sha256 |
Appliances need one file each, in PROD/COMP/<FOLDER>/:
|
1 2 3 4 5 6 |
SDDC_MANAGER_VCF/ VCF-SDDC-Manager-Appliance-9.1.1.0200.25801071.ova (2.40 GB) VCENTER/ VMware-VCSA-all-9.1.1.0100.25784172.iso (9.69 GB) NSX_T_MANAGER/ nsx-unified-appliance-9.1.1.0100.25762948.ova (8.26 GB) VROPS/ Operations-Appliance-9.1.1.0100.25795063.ova (3.14 GB) VCF_OPS_CLOUD_PROXY/ Operations-Cloud-Proxy-9.1.1.0100.25795064.ova (3.22 GB) VCF_LICENSE_SERVER/ Vcf-License-Server-9.1.1.0100.25795080.ova (884 MB) |
The NSX bundle version in the catalog and the upload summary is 9.1.1.0100.25762940, while the OVA file name ends 25762948. That’s expected.
Service packages need four files each: the package, a plugin, a configuration-schema yaml and a depot-manifest yaml. Same location, PROD/COMP/<FOLDER>/:
|
1 2 3 4 5 6 7 8 9 10 11 12 13 14 15 16 17 18 19 20 21 22 23 24 25 26 27 28 29 30 31 32 33 34 35 36 37 38 39 40 41 42 43 44 45 |
VCF_FLEET_LCM/ (Fleet lifecycle) vcf-fleet-lcm-9.1.1.0200.25801070.tgz vcf-fleet-lcm-plugin-9.1.1.0200.25801070.tgz configuration-schema-vcf-fleet-lcm-9.1.1.0200.25801070.yaml depot-manifest-vcf-fleet-lcm-9.1.1.0200.25801070.yaml VCF_SDDC_LCM/ (SDDC lifecycle) vcf-sddc-lcm-9.1.1.0200.25801981.tgz vcf-sddc-lcm-plugin-9.1.1.0200.25801981.tgz configuration-schema-vcf-sddc-lcm-9.1.1.0200.25801981.yaml depot-manifest-vcf-sddc-lcm-9.1.1.0200.25801981.yaml DEPOT_SERVICE/ (Software depot) vcf-fleet-depot-9.1.1.0200.25801072.tgz vcf-fleet-depot-plugin-9.1.1.0200.25801072.tgz configuration-schema-vcf-fleet-depot-9.1.1.0200.25801072.yaml depot-manifest-vcf-fleet-depot-9.1.1.0200.25801072.yaml VCF_SALT/ (Salt master) salt-9.1.1.0100.25795075.tgz salt-plugin-9.1.1.0100.25795075.tgz configuration-schema-salt-9.1.1.0100.25795075.yaml depot-manifest-salt-9.1.1.0100.25795075.yaml VCF_SALT_RAAS/ (Salt RaaS) salt-raas-9.1.1.0100.25795075.tgz salt-raas-plugin-9.1.1.0100.25795075.tgz configuration-schema-salt-raas-9.1.1.0100.25795075.yaml depot-manifest-salt-raas-9.1.1.0100.25795075.yaml TELEMETRY_ACCEPTOR/ (Telemetry) telemetry-acceptor-9.1.1.0100.25741214.tgz telemetry-acceptor-plugin-9.1.1.0100.25741214.tgz configuration-schema-telemetry-acceptor-9.1.1.0100.25741214.yaml depot-manifest-telemetry-acceptor-9.1.1.0100.25741214.yaml VIDB/ (Identity broker; note the plugin name) vidb-9.1.1.0100.25796677.tgz vidb-upgrade-plugin-9.1.1.0100.25796677.tgz configuration-schema-vidb-9.1.1.0100.25796677.yaml depot-manifest-vidb-9.1.1.0100.25796677.yaml VCF_SERVICE_VCD_MIGRATION_BACKEND/ (Migration service engine) vcd-migrator-9.1.1.0200.25801570.tgz vcd-migrator-plugin-9.1.1.0200.25801570.tgz configuration-schema-vcd-migrator-9.1.1.0200.25801570.yaml depot-manifest-vcd-migrator-9.1.1.0200.25801570.yaml VRA/ (VCF Automation, 15.69 GB; note the plugin name) vcfa-bundle-9.1.1.0200.25801570.tar vcfa-plugin-9.1.1.0200.25801570.tgz configuration-schema-vcfa-bundle-9.1.1.0200.25801570.yaml depot-manifest-vcfa-bundle-9.1.1.0200.25801570.yaml |
The VCF services runtime needs six files, in PROD/COMP/VSP/ (16.11 GB):
|
1 2 3 4 5 6 |
vmsp-platform-9.1.1.0100.25801571.tar vmsp-plugin-9.1.1.0100.25801571.tgz vmsp-cli-9.1.1.0100.25801571.tar.gz vcf-services-platform-template-9.1.1.0100.25801571.ova configuration-schema-vmsp-platform-9.1.1.0100.25801571.yaml depot-manifest-vmsp-platform-9.1.1.0100.25801571.yaml |
The portal’s display names don’t match the folder names. Use this mapping:
| Portal display name | Folder |
|---|---|
| Fleet Lifecycle | VCF_FLEET_LCM |
| SDDC Lifecycle | VCF_SDDC_LCM |
| Software Depot | DEPOT_SERVICE |
| Salt master | VCF_SALT |
| Salt RaaS | VCF_SALT_RAAS |
| Telemetry | TELEMETRY_ACCEPTOR |
| Identity broker | VIDB |
| VCF service – Migration service engine | VCF_SERVICE_VCD_MIGRATION_BACKEND |
| VCF Automation | VRA |
| VCF services runtime | VSP |
 The Procedure
 1. Deploy the VCF Installer Appliance
Nothing special here. Deploy it the usual way and make sure you can SSH to it as vcf.
 2. Prepare the Folders
On the installer, as root:
|
1 2 |
mkdir -p /nfs/vmware/vcf/nfs-mount/depot /nfs/vmware/vcf/nfs-mount/vcfdt chown vcf:vcf /nfs/vmware/vcf/nfs-mount/depot /nfs/vmware/vcf/nfs-mount/vcfdt |
 3. Copy the Downloads to the Installer
Download every file listed above from the portal into one folder on the workstation. Then copy it from WSL. Install rsync first if you don’t have it:
|
1 2 |
sudo apt install -y rsync rsync -rtvP /mnt/host/c/Users/<user>/Downloads/<folder>/ vcf@<installer-fqdn>:/nfs/vmware/vcf/nfs-mount/depot/ |
Use -rtvP rather than -aP. Files on a Windows mount carry odd permissions, and -a would try to preserve them. Mind the trailing slashes, which decide whether you copy the folder’s contents or the folder itself. -P lets an interrupted copy resume, which you’ll appreciate with a 16 GB file.
 4. Sort the Flat Files into the Component Folders
The folder structure and file names are what VCFDT reads to find the binaries. It looks in PROD/COMP/<FOLDER> for the file names the product version catalog lists, and the folder names must match the catalog’s component names, case included. A file in the wrong folder, a renamed or extracted file, or a missing yaml or plugin file means the bundle is skipped without an error, and that component never reaches the VCF Installer. Keep every file as downloaded and let the loop below place it.
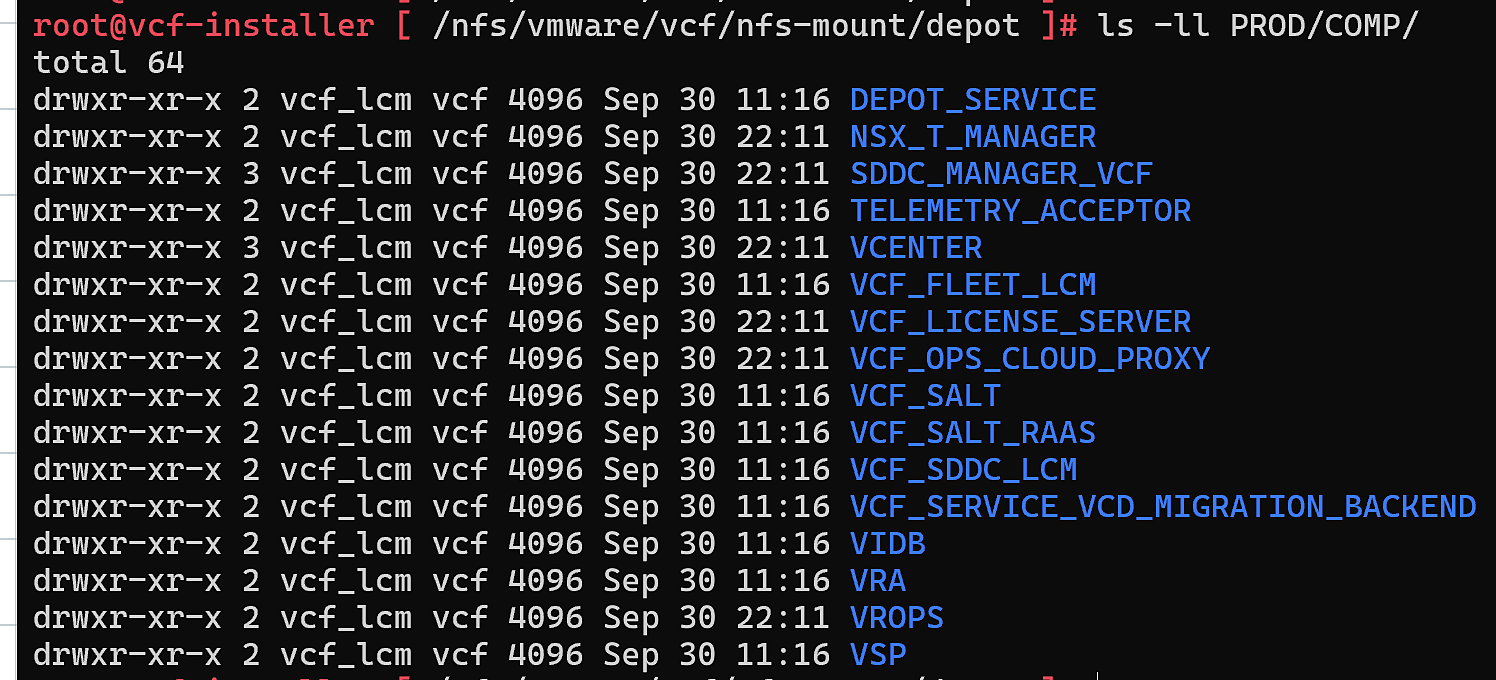
The files landed flat in the depot root. As root, from the depot root, this loop moves each one into PROD/COMP/<FOLDER>:
|
1 2 3 4 5 6 7 8 9 10 11 12 13 14 15 16 17 18 19 20 21 22 23 24 25 |
cd /nfs/vmware/vcf/nfs-mount/depot for f in *; do [ -f "$f" ] || continue b=${f#configuration-schema-}; b=${b#depot-manifest-} case "$b" in VCF-SDDC-Manager-Appliance-*) d=SDDC_MANAGER_VCF ;; VMware-VCSA-all-*) d=VCENTER ;; nsx-unified-appliance-*) d=NSX_T_MANAGER ;; Operations-Appliance-*) d=VROPS ;; Operations-Cloud-Proxy-*) d=VCF_OPS_CLOUD_PROXY ;; Vcf-License-Server-*) d=VCF_LICENSE_SERVER ;; vcfa-*) d=VRA ;; vidb-*) d=VIDB ;; vcf-fleet-lcm-*) d=VCF_FLEET_LCM ;; vcf-sddc-lcm-*) d=VCF_SDDC_LCM ;; vcf-fleet-depot-*) d=DEPOT_SERVICE ;; salt-raas-*) d=VCF_SALT_RAAS ;; salt-*) d=VCF_SALT ;; telemetry-acceptor-*) d=TELEMETRY_ACCEPTOR ;; vcd-migrator-*) d=VCF_SERVICE_VCD_MIGRATION_BACKEND ;; vmsp-*|vcf-services-platform-*) d=VSP ;; *) echo "SKIP $f"; continue ;; esac mkdir -p PROD/COMP/$d && mv -v "$f" PROD/COMP/$d/ done |
A few things in that loop are deliberate:
salt-raas-*has to be matched beforesalt-*, or the Salt RaaS files end up in the Salt master folder.- Match
vcfa-*, notvcfa-bundle-*, so thatvcfa-pluginlands inVRAalong with the bundle. vcf-services-platform-templategoes toVSP, which is why the last pattern has two alternatives.- The prefix strip at the top sends each yaml to the same folder as its package.
To use it, run it as root from the depot root, as shown. It only looks at regular files sitting directly in that folder, so PROD and anything already sorted is left alone, and it’s safe to run again after you copy in more files. Anything it doesn’t recognise prints SKIP <name> and stays where it is, which tells you to check the file name or add a pattern.
Sorting by hand means placing 48 files into 16 folders, and the plugin and yaml files are the ones that end up in the wrong folder or get forgotten. The loop sorts them the same way every time, so the ordering rules above are written down once instead of remembered for every file.
 5. Copy the Metadata into PROD
Put the metadata files at the paths shown in the layout above, exactly. VCFDT reads fixed locations, and a file one folder off is the same as a file that isn’t there.
 6. Extract VCFDT
Extract the VCFDT tar.gz under /nfs/vmware/vcf/nfs-mount/vcfdt. The bin folder you’ll run it from in step 9 sits under that path.
 7. Fix Ownership and Permissions
As root:
|
1 2 3 |
chown -R vcf_lcm:vcf /nfs/vmware/vcf/nfs-mount/depot find /nfs/vmware/vcf/nfs-mount/depot -type d -exec chmod 755 {} \; find /nfs/vmware/vcf/nfs-mount/depot -type f -exec chmod 644 {} \; |
This step looks cosmetic and isn’t. The troubleshooting section explains why the upload fails without it. Run it again any time you copy something new into the depot as vcf.
 8. Verify Every Bundle against the Catalog
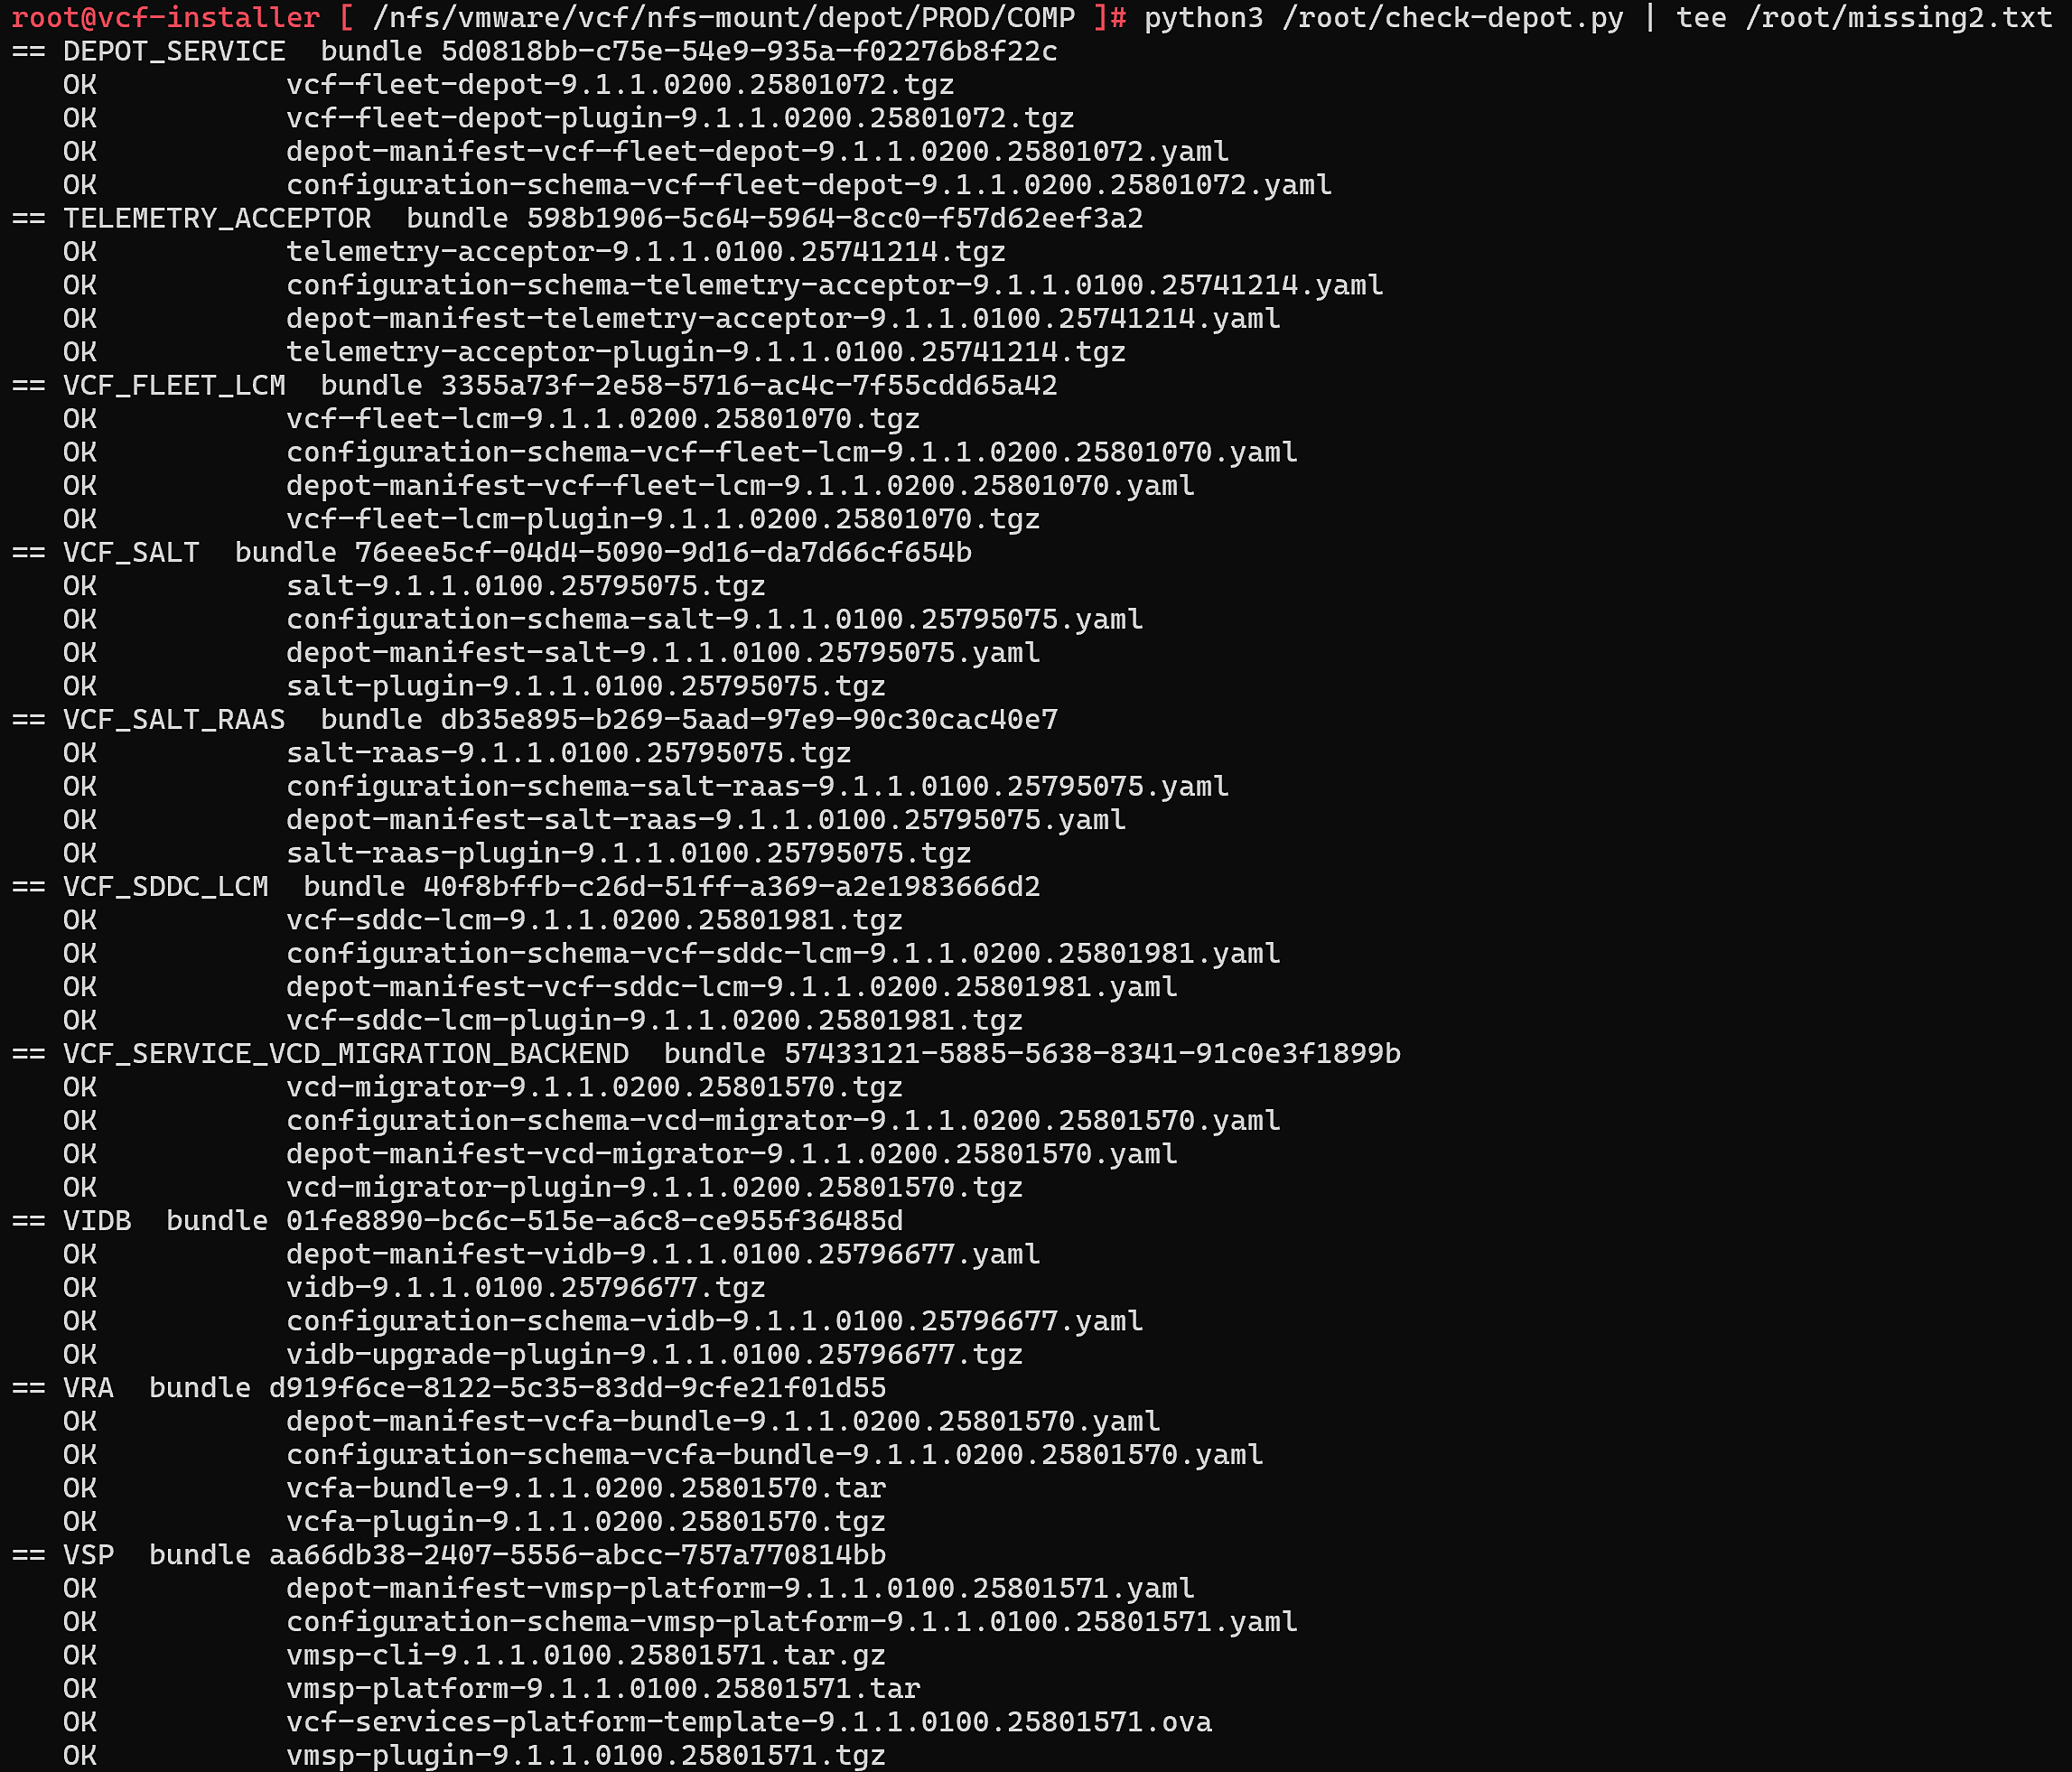
Before you upload anything, check the depot against the product version catalog. The script below reads productVersionCatalog.json, finds each INSTALL bundle that matches a file in each folder, and checks that every file the bundle lists exists at the catalog’s exact size.
|
1 2 3 4 5 6 7 8 9 10 11 12 13 14 15 16 17 18 19 20 21 22 23 |
import json, os P = '/nfs/vmware/vcf/nfs-mount/depot/PROD/metadata/productVersionCatalog/v1/productVersionCatalog.json' C = '/nfs/vmware/vcf/nfs-mount/depot/PROD/COMP' bundles = [] def walk(o): if isinstance(o, dict): if 'binaries' in o and 'id' in o: bundles.append(o) for v in o.values(): walk(v) elif isinstance(o, list): for v in o: walk(v) walk(json.load(open(P))) for comp in sorted(os.listdir(C)): d = os.path.join(C, comp) if not os.path.isdir(d): continue have = set(os.listdir(d)) for b in bundles: if b.get('type') != 'INSTALL': continue if not have.intersection(x['fileName'] for x in b['binaries']): continue print(f"== {comp} bundle {b['id']}") for x in b['binaries']: f = os.path.join(d, x['fileName']) st = 'MISSING' if not os.path.exists(f) else ('OK' if os.path.getsize(f) == x.get('size') else 'WRONG SIZE') print(f" {st:<12} {x['fileName']}") |
Save it with vi rather than pasting a heredoc into the terminal, which can mangle the indentation. Every line must say OK before you upload.
A check based on file name patterns isn’t enough here. Plugin names don’t follow one pattern (vidb-upgrade-plugin, vcfa-plugin), so a pattern-based check passes folders that are missing a file. Reading the catalog is the only way to know what each bundle really wants.
To use it, save it as check-depot.py with vi and run python3 check-depot.py as root. It changes nothing and only prints. The two paths at the top, P for the catalog and C for PROD/COMP, match the depot root used in this post, so edit them if yours is somewhere else. Each folder gets a heading with the catalog’s bundle ID, then one line per required file marked OK, MISSING or WRONG SIZE. Pipe it through tee if you want a copy of the output to work from.
The installer skips an incomplete bundle without telling you, so the first sign of a missing file is a component that never shows up, usually after a long upload. The script turns that into a list of exactly which file is missing or the wrong size, before you upload anything. Doing the same check by hand means opening the pretty-printed catalog and comparing the listed size of every file with what’s on disk, for 48 files. The script does it in a few seconds and reads the file list from the catalog itself, so it catches the oddly named plugin files that a name-based check misses.
 9. Upload
|
1 2 |
cd /nfs/vmware/vcf/nfs-mount/vcfdt/bin ./vcf-download-tool binaries upload --depot-store /nfs/vmware/vcf/nfs-mount/depot --sddc-manager-fqdn vcf-installer.vcf9.ai --sddc-manager-user admin@local --sddc-manager-user-password-file <password file> |
--depot-store points at the folder that contains PROD, not at PROD itself. On the first run VCFDT asks whether to trust the installer’s certificate. Answer yes. Keep the SSH session open, because the two 16 GB components take a while. Delete the password file when you’re done.
 10. Check Binary Management
In the installer UI, open Binary Management for VMware Cloud Foundation 9.1.1.0. Online Depot and Offline Depot both show as not configured. That’s expected when you side-load.
 How the Upload Decides What to Accept
Knowing what VCFDT does makes the failures easier to read.
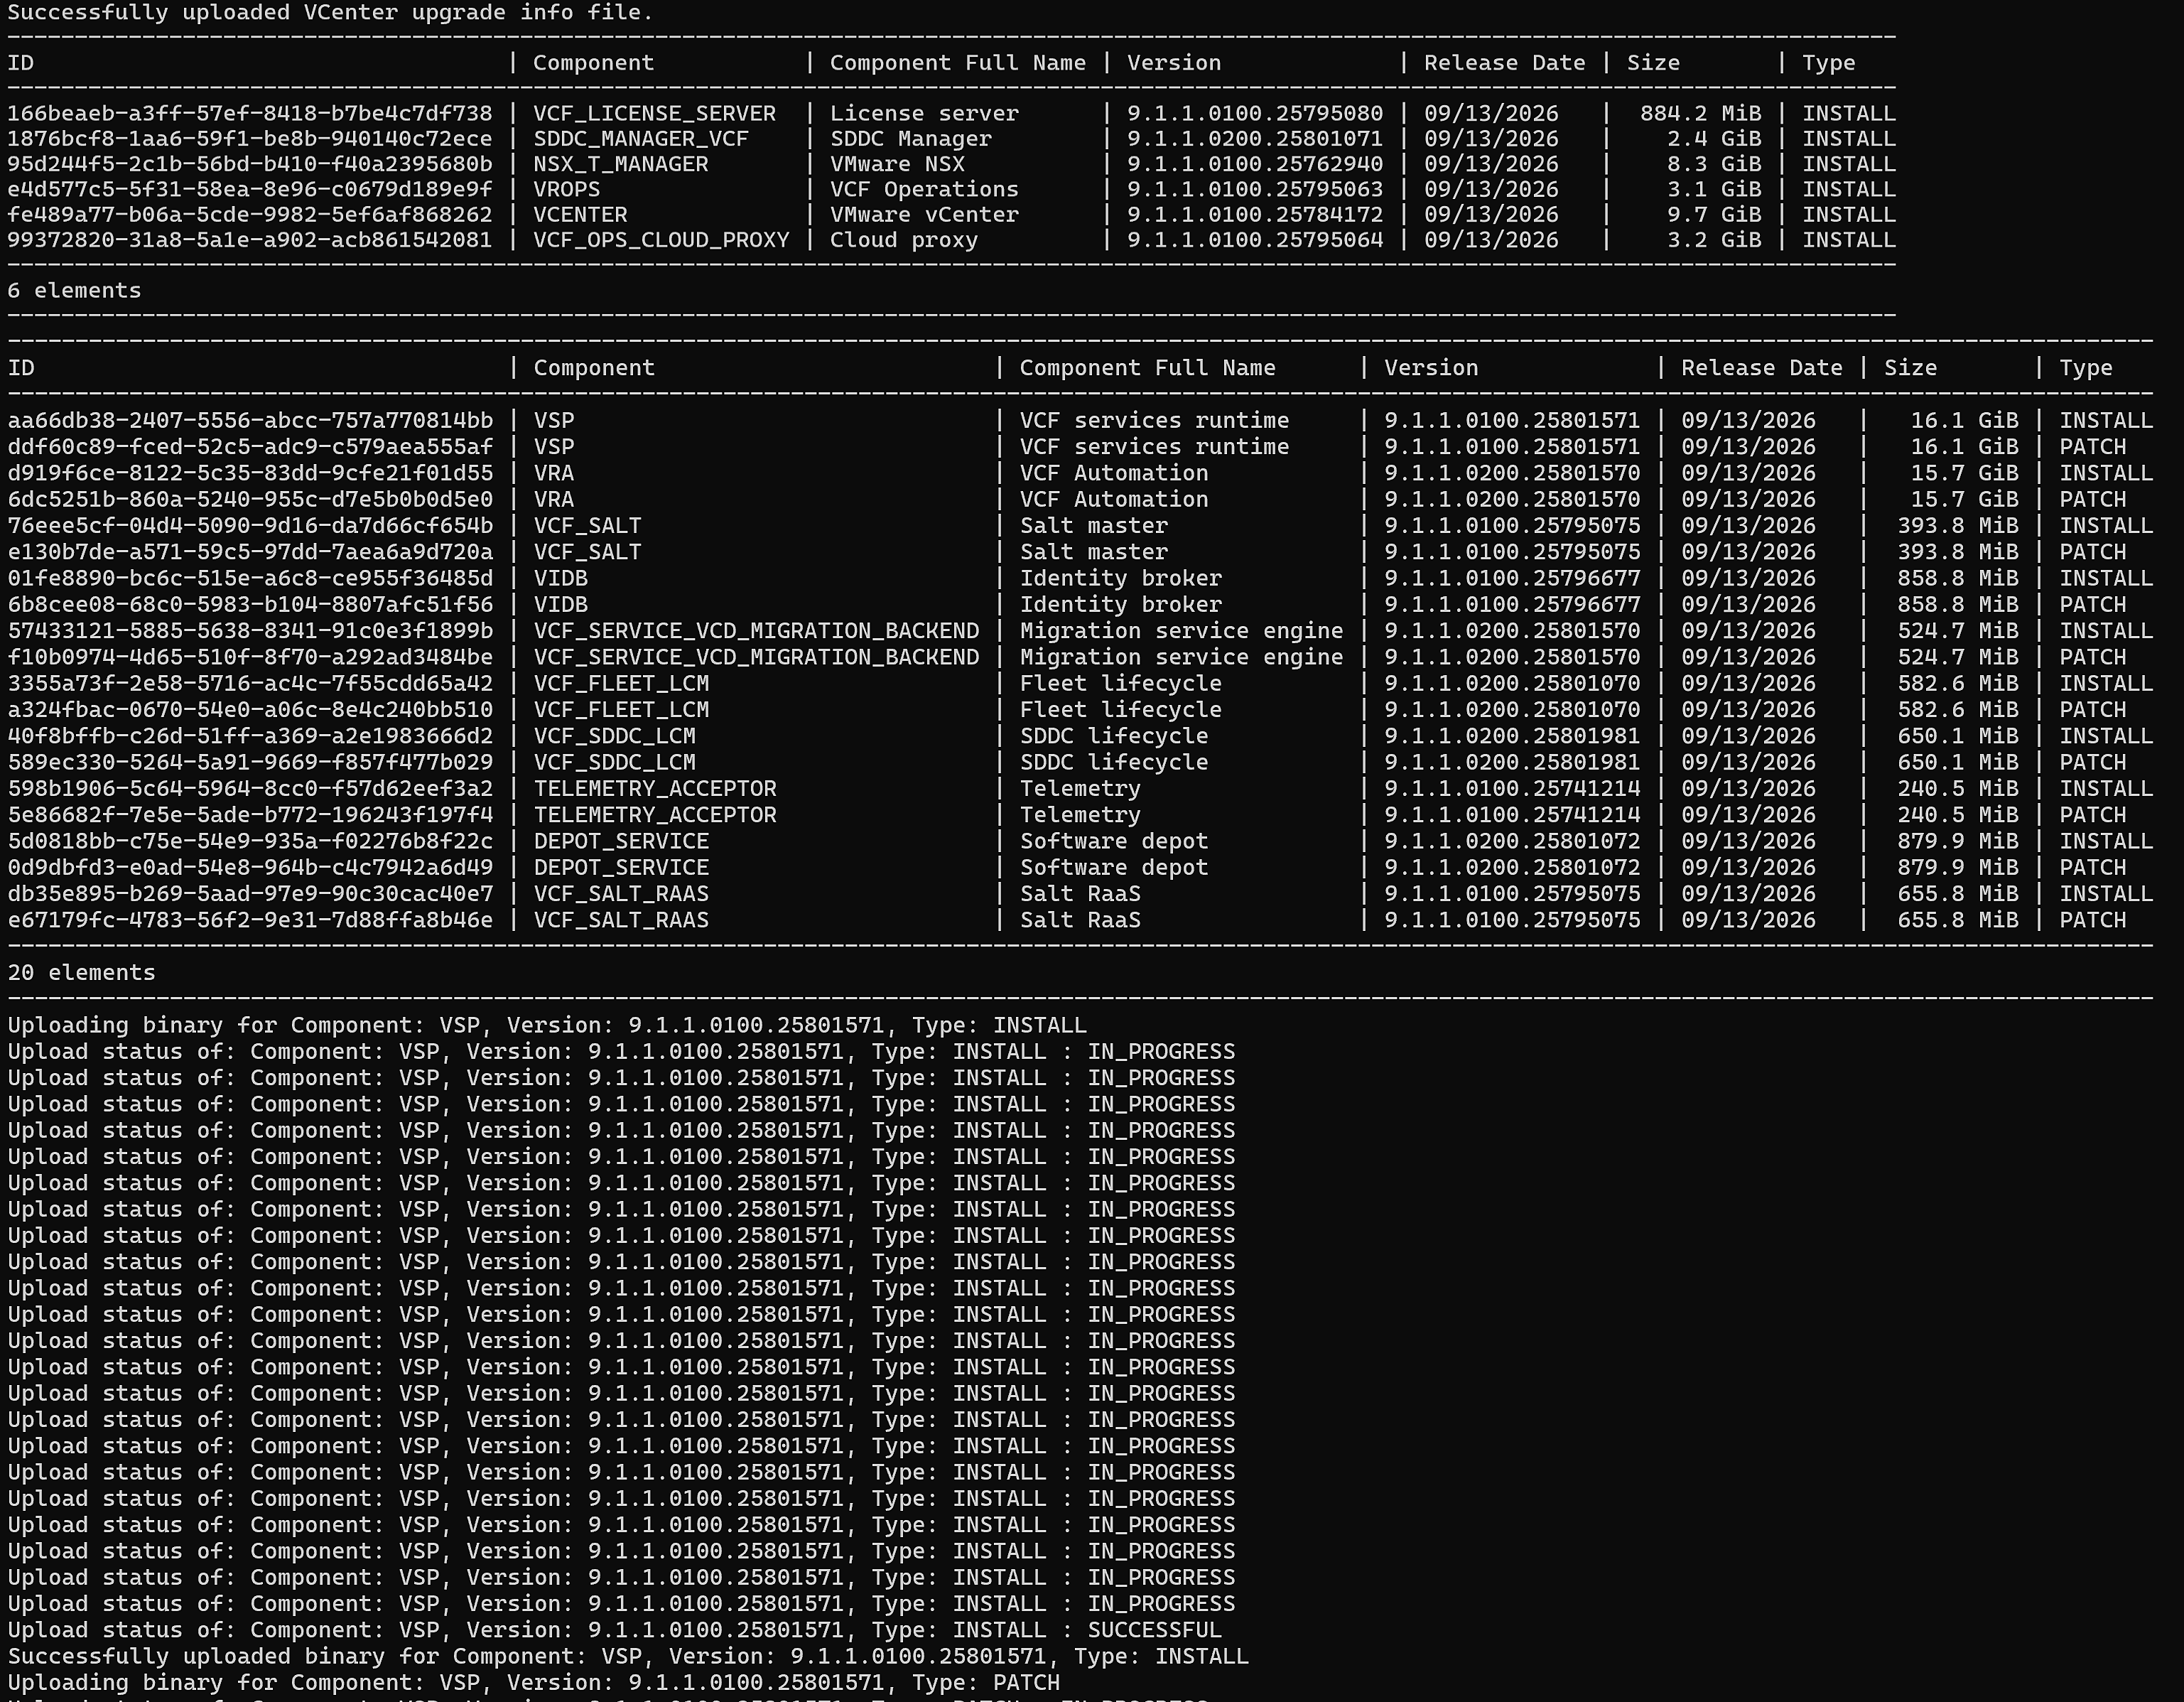
It starts with metadata, uploading in a fixed order: vSAN HCL, compatibility data, the unified release manifest, the product version catalog, and the vCenter upgrade info. It only indexes binaries after all five succeed.
Then it scans each component folder against the catalog’s bundles. Each bundle entry lists every file name with a checksum, a size and a tag: BINARY, BINARY_SCHEMA, DEPOT_MANIFEST or PLUGIN_BINARY. If every listed file is there, VCFDT logs “local files exist (OCI verification disabled)” and queues the bundle. If one is missing, it logs “has missing local files” and skips the bundle. Nothing on the console tells you that happened. The only hint is a smaller element count.
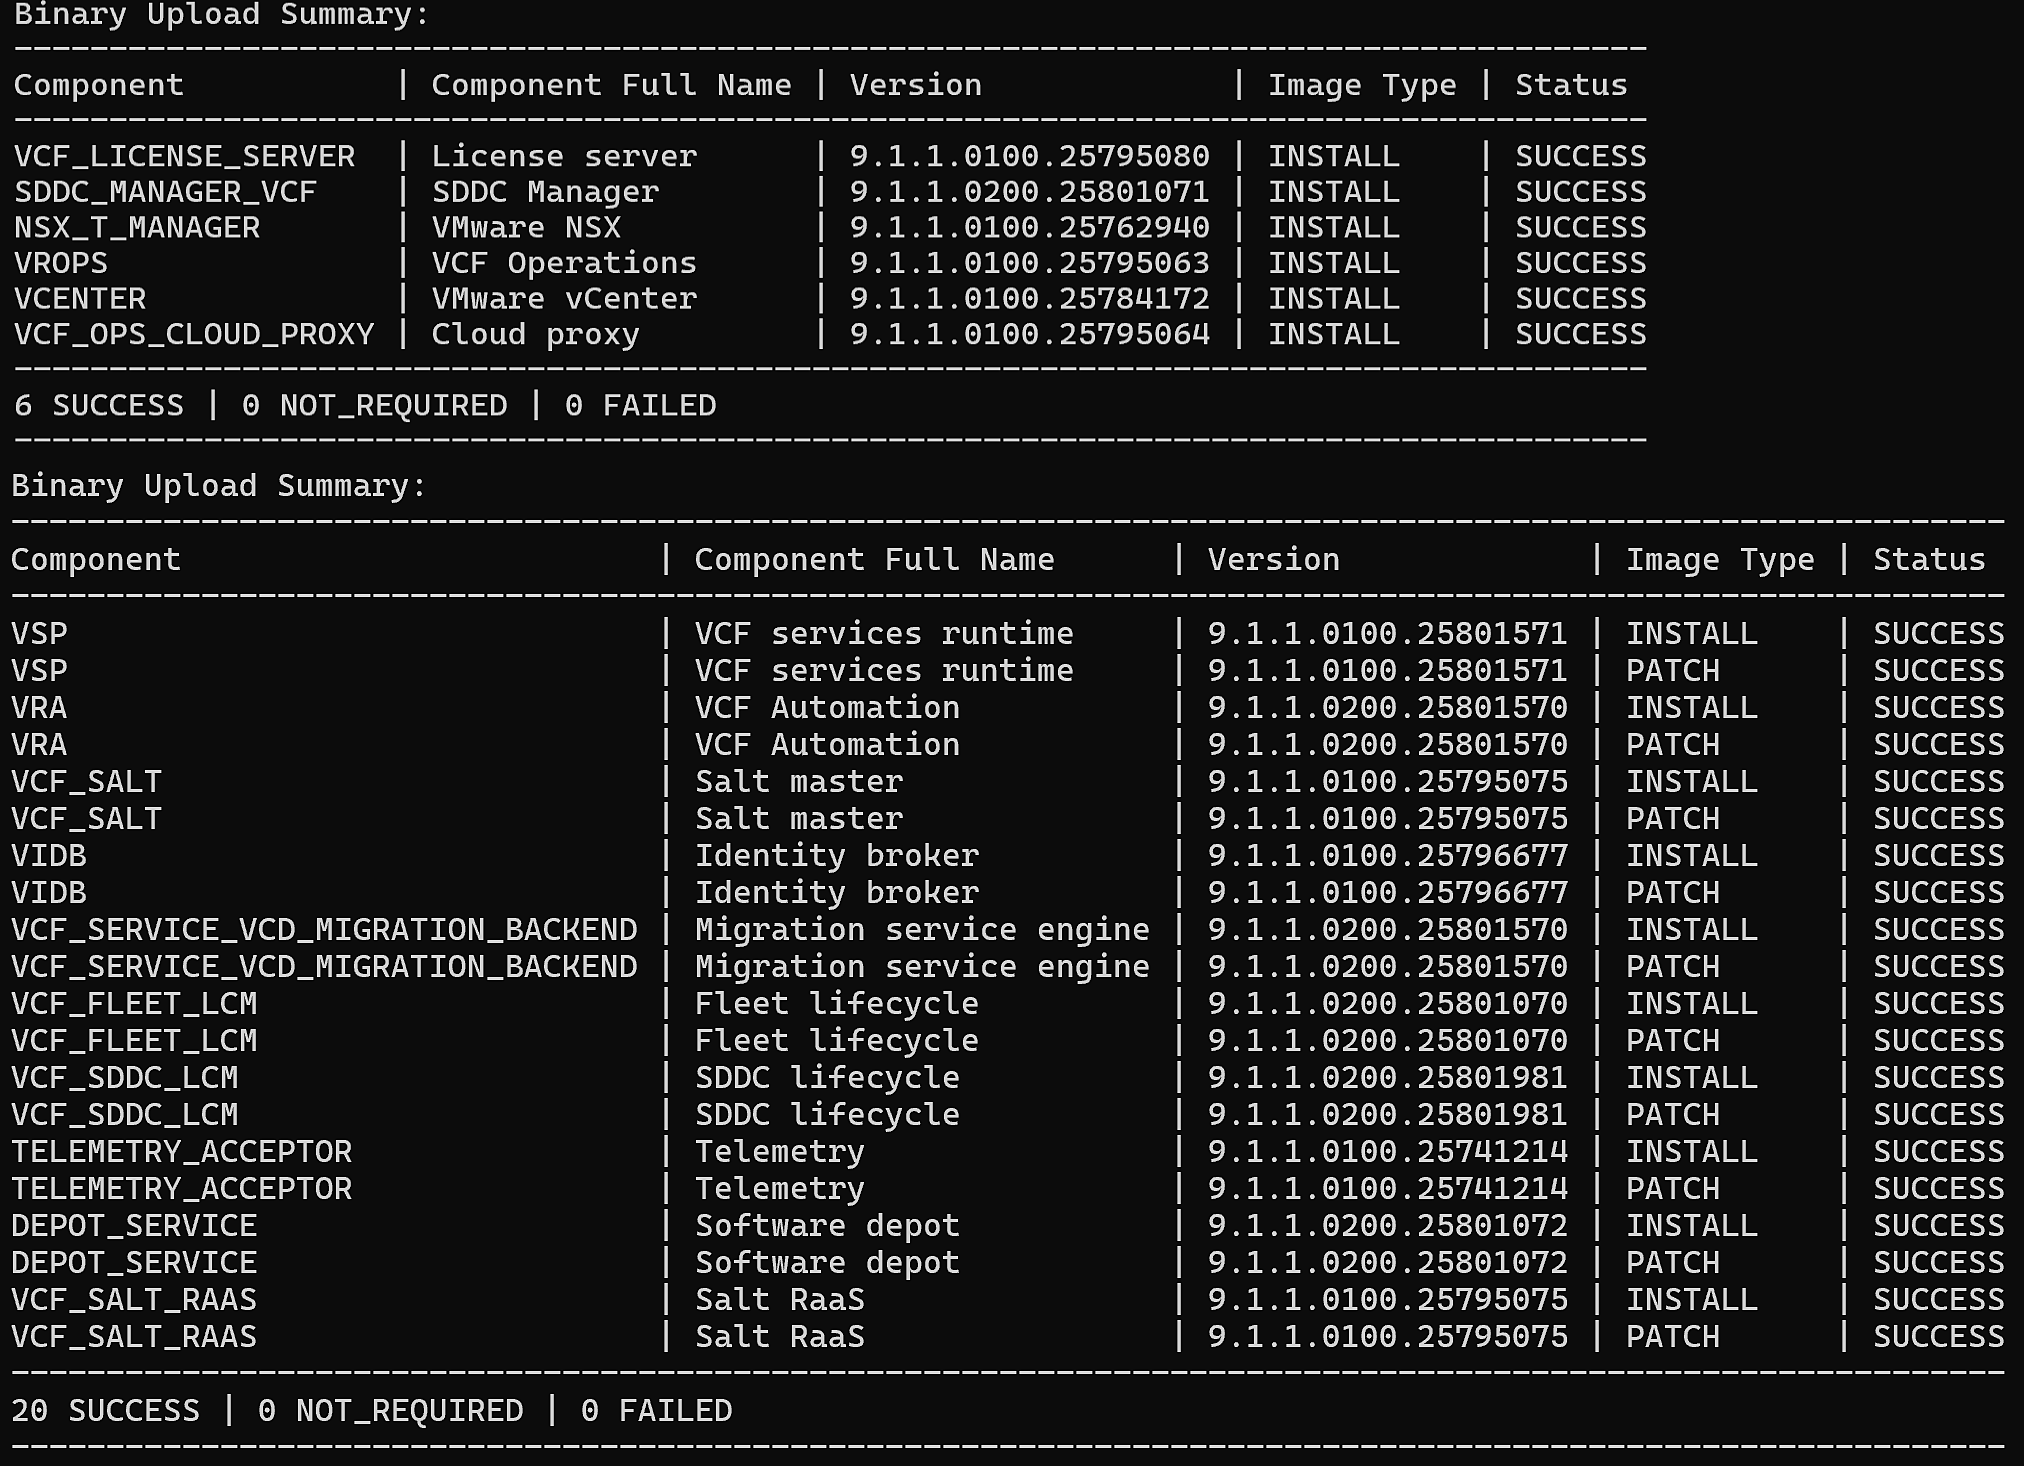
Appliances have a single INSTALL bundle each. Service packages show up twice, as an INSTALL bundle and a PATCH bundle that share the same files. Six appliances plus ten service components gives 26 bundles.
Once a bundle is queued, the console prints “Uploading binary for Component: …” and polls IN_PROGRESS every 10 seconds until it reaches SUCCESSFUL. A Binary Upload Summary table closes the run.
After a successful upload, VCFDT deletes the uploaded binaries from the depot (“Cleaning binary files … after successful upload”). Re-running is safe. Components already at Success stay at Success, and the manifest step logs LCM_MANIFEST_ALREADY_EXISTS and still reports success.
 Troubleshooting
 “The SSO credentials for user vcf are not correct or the SSO account is locked.”
You passed the OS user to the tool. Use the installer’s local admin instead: --sddc-manager-user admin@local.
 Metadata Files Not Found
You’ll see a NoSuchFileException for PROD/vsan/hcl/all.json, VmwareCompatibilityData.json or vcfManifest.json. Put the metadata at the exact paths in the layout above. Note that all.json is needed in two places: under PROD/metadata/vsan/hcl/ and under PROD/vsan/hcl/.
 INSUFFICIENT_PRODUCT_VERSION_CATALOG_READ_PERMISSIONS or INSUFFICIENT_VCENTER_UPGRADE_INFO_READ_PERMISSIONS
This one is confusing because the log can say “Signature in productVersionCatalog.sig is valid” right before it fails.
VCFDT runs as vcf and streams some files itself. For the catalog and the vCenter upgrade info, though, it only passes the path, and the installer’s LCM service reads the file from disk as vcf_lcm. Folders created by the vcf account are private (drwx------), so vcf_lcm can’t get in. Running namei -l on the file path shows which folder is blocking it.
The fix is step 7. To verify it, read the file as vcf_lcm:
|
1 |
su -s /bin/bash vcf_lcm -c "cat <file> > /dev/null && echo OK" |
Re-run step 7 after you copy anything new in as vcf.
 File Does Not Exist at the Password File Path
The path to installer-password.txt is wrong for the user running the tool. Check it from the same account.
 Only the Appliances Upload and the Service Packages Stay “Not downloaded”
Someone downloaded only the .tgz or .tar package without its yaml and plugin files. Download all four files per package (six for VSP) and run the step 8 script.
 The Upload Lists “0 elements” and Nothing Uploads
The files look right and nothing happens. The cause is a missing plugin file or the VSP template OVA, which name-based checks don’t catch. Read the catalog entry to see every file the bundle requires:
|
1 |
grep -n -B30 -A20 '"fileName": "<file>"' PROD/metadata/productVersionCatalog/v1/productVersionCatalog.json |
The catalog is pretty-printed JSON, so grep -o on a single line shows nothing useful.
 “Failed to load the token … /etc/security/token/token.properties (Permission denied)”
This appears on every run as vcf. It’s harmless.
 The Outcome
All 26 bundles uploaded with status SUCCESS and none failed. The six appliances have one INSTALL bundle. The ten service components have both INSTALL and PATCH:
| Folder | Component | Version | Bundles |
|---|---|---|---|
VCF_LICENSE_SERVER | License server | 9.1.1.0100.25795080 | INSTALL |
SDDC_MANAGER_VCF | SDDC Manager | 9.1.1.0200.25801071 | INSTALL |
NSX_T_MANAGER | VMware NSX | 9.1.1.0100.25762940 | INSTALL |
VROPS | VCF Operations | 9.1.1.0100.25795063 | INSTALL |
VCENTER | VMware vCenter | 9.1.1.0100.25784172 | INSTALL |
VCF_OPS_CLOUD_PROXY | Cloud proxy | 9.1.1.0100.25795064 | INSTALL |
VSP | VCF services runtime | 9.1.1.0100.25801571 | INSTALL + PATCH |
VRA | VCF Automation | 9.1.1.0200.25801570 | INSTALL + PATCH |
VCF_SALT | Salt master | 9.1.1.0100.25795075 | INSTALL + PATCH |
VIDB | Identity broker | 9.1.1.0100.25796677 | INSTALL + PATCH |
VCF_SERVICE_VCD_MIGRATION_BACKEND | Migration service engine | 9.1.1.0200.25801570 | INSTALL + PATCH |
VCF_FLEET_LCM | Fleet lifecycle | 9.1.1.0200.25801070 | INSTALL + PATCH |
VCF_SDDC_LCM | SDDC lifecycle | 9.1.1.0200.25801981 | INSTALL + PATCH |
TELEMETRY_ACCEPTOR | Telemetry | 9.1.1.0100.25741214 | INSTALL + PATCH |
DEPOT_SERVICE | Software depot | 9.1.1.0200.25801072 | INSTALL + PATCH |
VCF_SALT_RAAS | Salt RaaS | 9.1.1.0100.25795075 | INSTALL + PATCH |
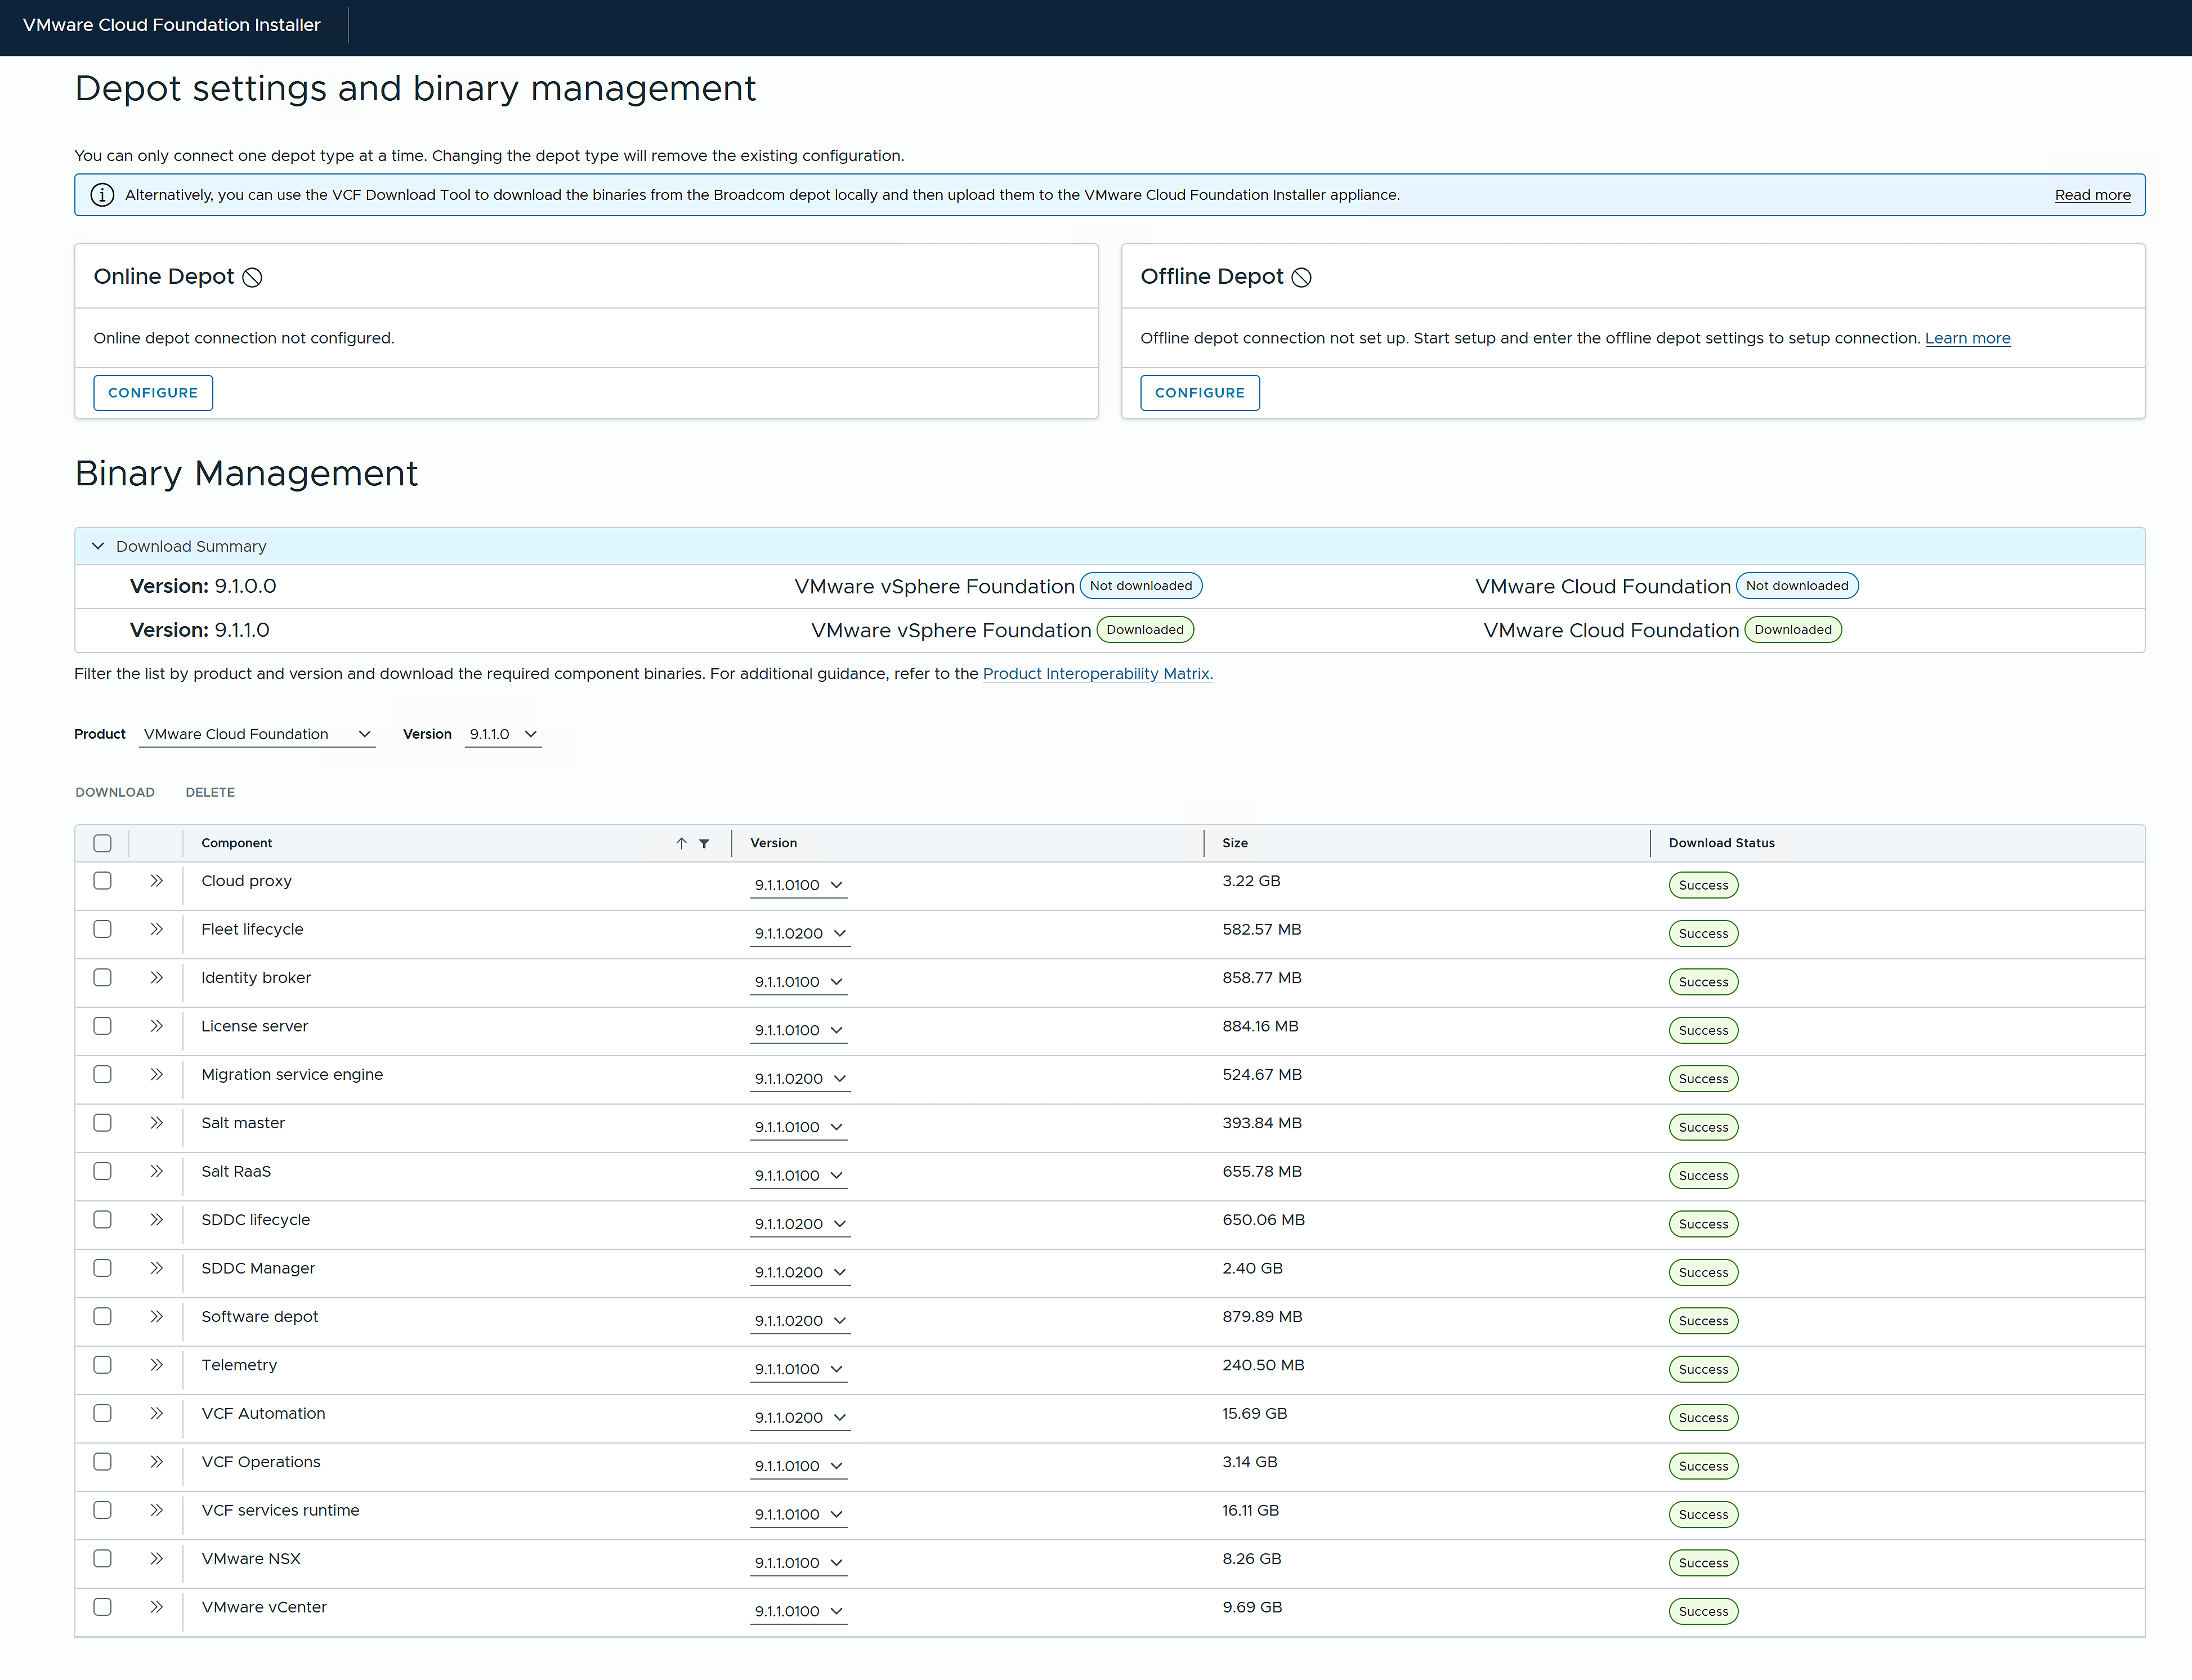
Binary Management for VMware Cloud Foundation 9.1.1.0 now shows all 16 components at Success:
| Component | Version | Size |
|---|---|---|
| Cloud proxy | 9.1.1.0100 | 3.22 GB |
| Fleet lifecycle | 9.1.1.0200 | 582.57 MB |
| Identity broker | 9.1.1.0100 | 858.77 MB |
| License server | 9.1.1.0100 | 884.16 MB |
| Migration service engine | 9.1.1.0200 | 524.67 MB |
| Salt master | 9.1.1.0100 | 393.84 MB |
| Salt RaaS | 9.1.1.0100 | 655.78 MB |
| SDDC lifecycle | 9.1.1.0200 | 650.06 MB |
| SDDC Manager | 9.1.1.0200 | 2.40 GB |
| Software depot | 9.1.1.0200 | 879.89 MB |
| Telemetry | 9.1.1.0100 | 240.50 MB |
| VCF Automation | 9.1.1.0200 | 15.69 GB |
| VCF Operations | 9.1.1.0100 | 3.14 GB |
| VCF services runtime | 9.1.1.0100 | 16.11 GB |
| VMware NSX | 9.1.1.0100 | 8.26 GB |
| VMware vCenter | 9.1.1.0100 | 9.69 GB |
The Download Summary for 9.1.1.0 shows VMware vSphere Foundation and VMware Cloud Foundation both as “Downloaded”. The installer is ready for fleet deployment.
 Two More Things
This is a 9.1-specific step. After the fleet deploys, the management component binaries also have to be uploaded into the new Fleet Depot Service when you aren’t using an offline depot.
If you can get a customer token or activation code, use it. VCFDT then pulls all files and metadata itself, and none of the layout rules above apply. The online depot is easier again if the installer has internet or proxy access.

Discover more from VMware Cloud Foundation (VCF) Blog
Subscribe to get the latest posts sent to your email.