
Set up Intel TDX in VCF 9.1 and Verify Attestation End to End
Advanced Services Architecture
Data-in-use protection has long been the missing piece of the encryption story. We routinely encrypt data at rest and in flight, but the moment a workload runs, its memory sits in the clear — visible, in principle, to a compromised hypervisor or a malicious administrator. Intel Trust Domain Extensions (TDX) closes that gap by running a VM inside a hardware-isolated, memory-encrypted Trust Domain that even the hypervisor cannot read.
With VMware Cloud Foundation (VCF) 9.1 and ESX 9.1, Intel TDX is now a first-class, supported capability. To see how it behaves in a real SDDC, we ran it through a full validation cycle on Dell PowerEdge R770 hosts powered by Intel Xeon 6 (Granite Rapids) processors. This post walks through what we did, what worked, and how the platform surfaces it.
Why this matters
For regulated and multi-tenant workloads — confidential databases, key-management services, sensitive analytics — TDX changes the trust model. The tenant no longer has to trust the cloud operator’s software stack. Instead, the hardware itself issues cryptographic proof, via remote attestation, that a workload is running unmodified inside a genuine, isolated Trust Domain on authentic Intel silicon.
The other headline for VCF 9.1: the modern guest operating systems we tested, RHEL 10 and Ubuntu 25.04 / 25.10, ship with upstream Linux kernels (6.11+) that support TDX guests natively. No out-of-tree drivers, no patching. Confidential computing is increasingly an out-of-the-box experience.
Our test environment
- Hardware: Dell PowerEdge R770, Intel Xeon 6 (Granite Rapids), latest Dell BIOS for current TDX module microcode
- Platform: VCF 9.1 / ESX 9.1, VM Hardware Version 22
- Guest OS: RHEL 10, Ubuntu 25.04/25.10 (kernel 6.12+), SUSE Linux Enterprise 15
Always confirm your exact combination against the Broadcom Compatibility Guide under the Confidential Computing filter.
Step 1 — Enable Intel TDX support in BIOS (Day 0)
TDX builds on Intel’s memory-encryption stack, so several processor features must be switched on in Dell System Setup. (Note: Intel SGX cannot be toggled from iDRAC directly — you must boot into BIOS directly.)
In System BIOS Settings → System Security, enable:
- Total Memory Encryption (TME): Enabled
- Multi-Key TME (MK-TME): Enabled (Memory Encryption → Multiple Keys)
- Intel TDX: Enabled
- TDX Secure Arbitration Mode Loader (SEAM): Enabled
- Intel SGX: On
- PRMRR Size: sized to your enclave footprint (caveat below)
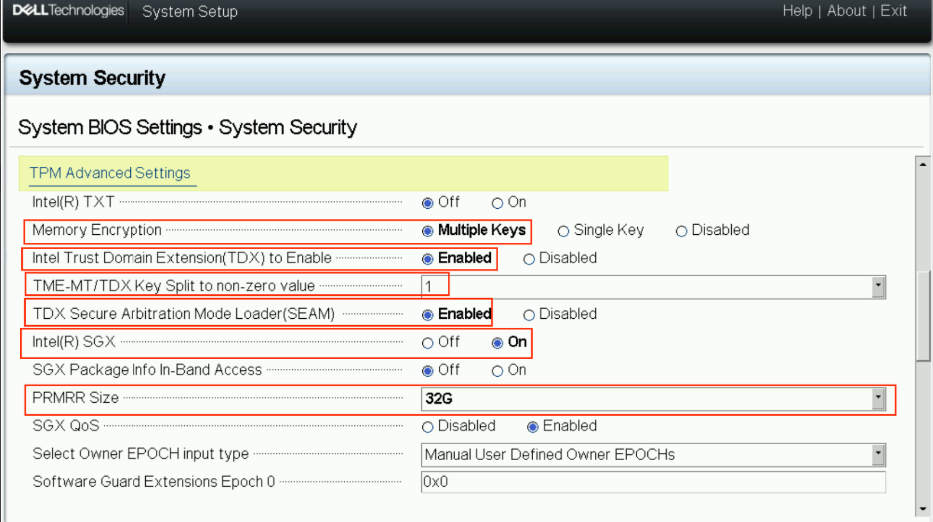
A word on PRMRR sizing: the Processor Reserved Memory Range Register defines the physical pool from which SGX’s Enclave Page Cache is carved, and that memory is hidden from the hypervisor. On a 512 GB R770, allocating 128 GB to PRMRR leaves only 384 GB for everything else. Size it to your actual enclave footprint plus a 10–15% buffer: 2–4 GB for a light key-management or attestation service, 64–128 GB for large confidential databases. Don’t max it out “just in case.” (In our lab, ESX reported 32 GB less RAM after enabling a 32 GB PRMRR — exactly as expected.)
Step 2 — Register the host with Intel (Day 0)
Before a host can issue valid attestations, ESX must capture its unique CPU signatures (the Platform Manifest) and transmit them to the Intel Registration Service (IRS). The IRS is a public endpoint hosted by Intel (as shown in FIGURE 3), which requires the ESX host to have outbound internet connectivity.
In vCenter: Hosts and Clusters → [host] → Configure → Hardware → SGX → Register.
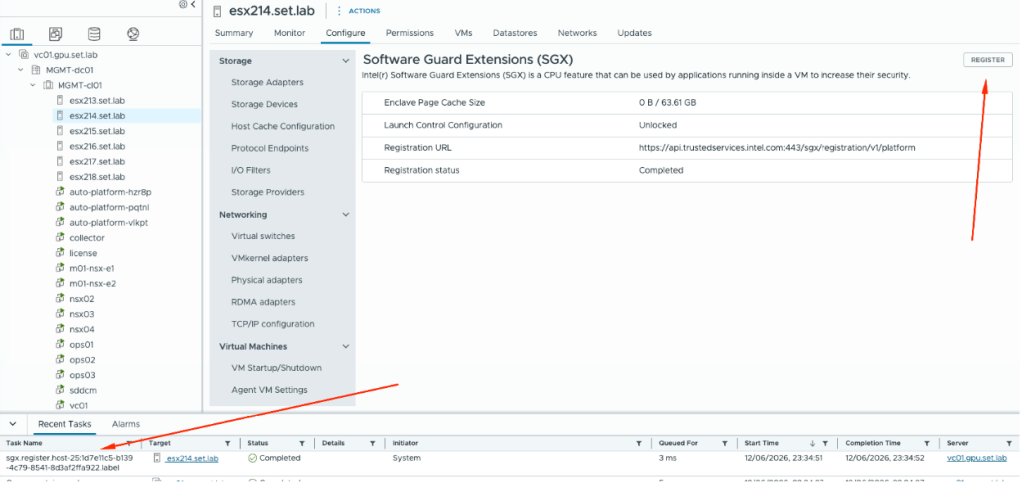
One gotcha worth flagging: ESX and vCenter must share the same NTP source and time zone. A clock skew here causes registration to fail and may require an SGX reset from BIOS. Once registration completes, install the tdx-quote-pod VIB on each host and reboot:
[root@esx214:/tmp] esxcli software vib install -v /tmp/tdx-quote-pod-9.1.0-0.25370933.i386.vib
Message: The update completed successfully, but the system needs to be rebooted…
VIBs Installed: VMware_bootbank_tdx-quote-pod_9.1.0-0.25370933
Reboot Required: true
tdx-quote-pod VIB is available in https://support.broadcom.com/ in VMware Cloud Foundation (9.1.0.0 release) > VMware ESX > Drivers and Tools section.
Step 3 — Deploy a confidential VM (Day 1)
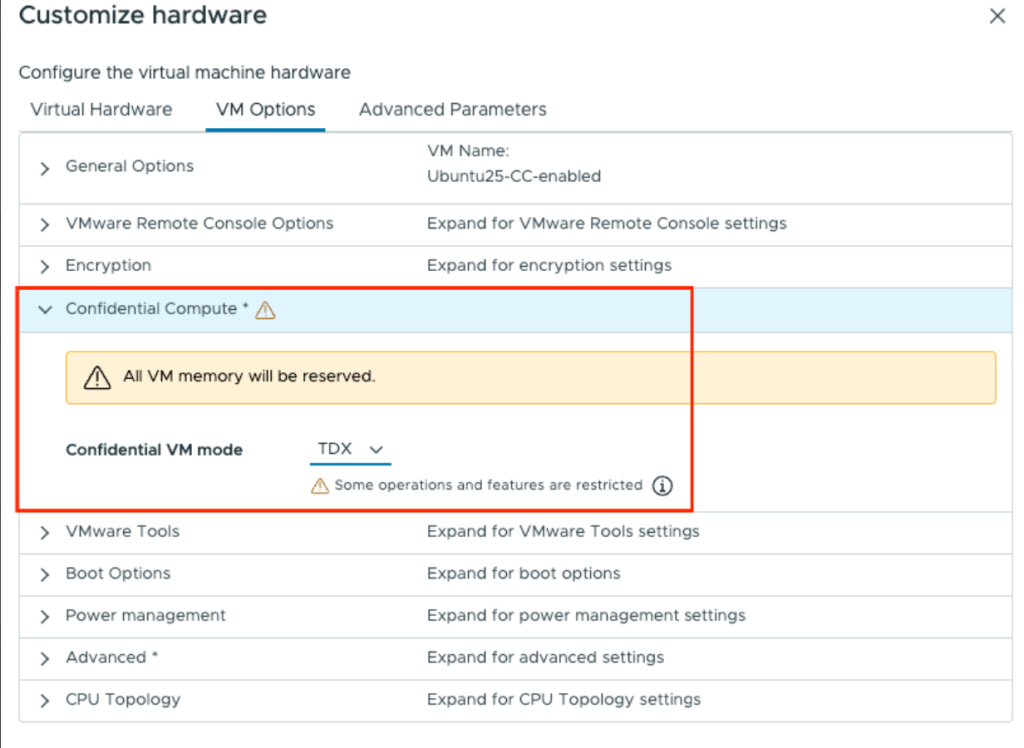
On a TDX-enabled host, create a VM with Hardware Version 22. Under Customize hardware → VM Options → Confidential Compute, set Confidential VM mode → TDX. Note that all VM memory is reserved for a confidential VM. Mount your RHEL 10 or Ubuntu 25.x ISO and install as normal. The VM should boot cleanly, with no kernel panics.
Step 4 — Verify the guest sees TDX
SSH into the guest and confirm the kernel picked up the Trust Domain natively:
|
1 2 3 4 5 6 7 8 9 10 |
# uname -rv 6.17.0-35-generic ... SMP PREEMPT_DYNAMIC ... 2026 # ls -la /dev/tdx_guest crw------- 1 root root 10, 263 /dev/tdx_guest # dmesg | grep -i tdx tdx: Guest detected Memory Encryption Features active: Intel TDX systemd[1]: Detected confidential virtualization tdx. |
The presence of /dev/tdx_guest and the “Guest detected” log lines confirm the guest is running as a genuine Trust Domain.
Step 5 — Prove it with remote attestation (Day 1)
This is the payoff. Using Intel’s sample app (which is bundled with the libtdx-attest-dev Ubuntu package), the guest generates a TD Quote — a signed report of its measurements.
|
1 2 3 4 5 6 7 8 9 10 11 12 13 14 15 |
# sudo apt install -y libtdx-attest libtdx-attest-dev # cd /opt/intel/tdx-quote-generation-sample/ ### sample app installed via `libtdx-attest-dev` package # make # ./test_tdx_attest cc -O2 test_tdx_attest.c -ltdx_attest -o test_tdx_attest # ./test_tdx_attest ……… Successfully get the TD Quote Wrote TD Quote to quote.dat Successfully extended rtmr[2] Successfully extended rtmr[3] |
We then verify it with Intel’s Quote Verification Library, pointing the QCNL config at Intel’s public PCCS (api.trustedservices.intel.com):
|
1 2 3 4 5 6 7 |
# git clone https://github.com/intel/confidential-computing.tee.dcap.git # cd confidential-computing.tee.dcap/SampleCode/QuoteVerificationSample # make QVL_ONLY=1 # ./app -quote ~/quote.dat [APP] Info: tee_verify_quote successfully returned. [APP] Info: App: Verification completed successfully. [APP] Info: Supplemental data Major Version: 3, Minor Version: 4 |
That single line — “Verification completed successfully” — represents a full multi-tier validation: the library retrieved the platform certificate chain and TCB info, matched the quote’s ECDSA signature up to the Intel Root CA, and checked revocation lists. The result is mathematical proof that the workload runs in an untampered Intel TDX Trust Domain on genuine hardware — proof a tenant can verify without trusting the operator.

Step 6 — See it in VCF Operations (Day 2)
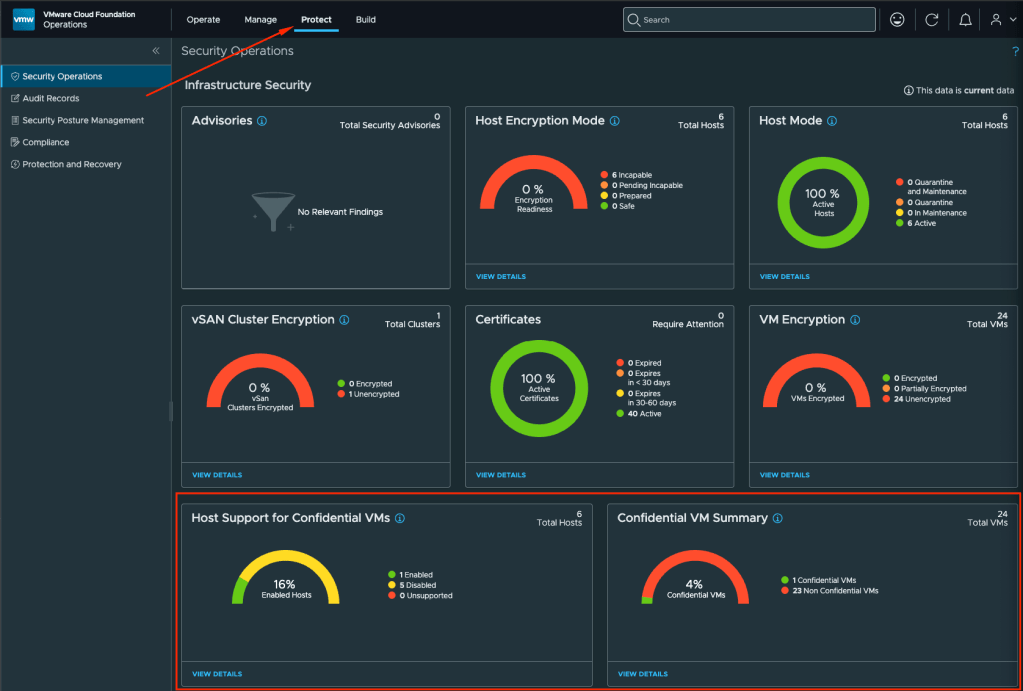
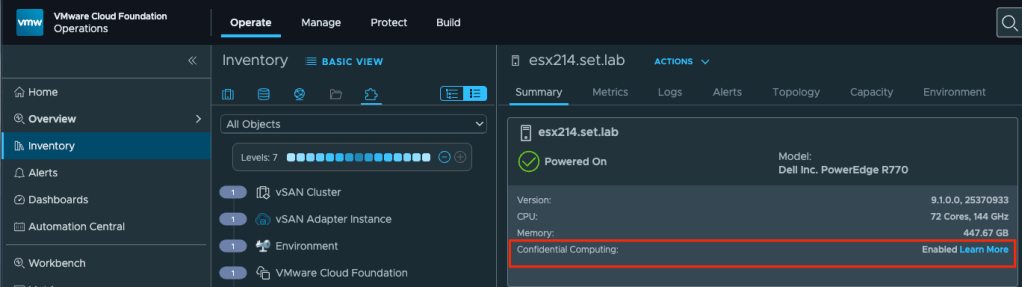
Finally, the operational view. In VCF Operations → Protect → Security Operations, the Host Support for Confidential VMs panel reports which hosts are confidential-capable and how many vCPUs and how much RAM are allocated to confidential VMs, while Confidential VM Summary counts the confidential workloads. Drilling into an individual host shows Confidential Computing: Enabled.
Takeaways
- Intel TDX on VCF 9.1 is real and supported, from BIOS to attestation to operational visibility.
- Modern guests make it easy. RHEL 10 and Ubuntu 25.x enable TDX guests with stock kernels, no patching.
- Get the fundamentals right. Size PRMRR deliberately, and keep ESX/vCenter time in sync before registering, or attestation will fail.
- Attestation is the differentiator. A successfully verified TD Quote is portable, cryptographic proof of workload integrity — the foundation for zero-trust confidential computing in the private cloud.
References
- Securing Virtual Machines with Intel TDX
- Registering an ESX host with Intel SGX
- Broadcom KB 401005
- Intel TDX Enabling Guide
- Intel SGX DCAP / sample code
- Intel Trusted Services API documentation
- Broadcom Compatibility Guide — Confidential Computing
Discover more from VMware Cloud Foundation (VCF) Blog
Subscribe to get the latest posts sent to your email.