One of the core tenets of VMware Cloud Assembly is blueprint creation. Cloud Administrators will use Cloud Assembly to design their services not just in the graphical interface, but also directly editing the infrastructure as code.

As customers discover the capabilities of VMware Cloud Assemblies blueprint interface, their requirements and blueprint complexity are going to rise quickly.
Blueprint Expressions provide a set of blueprinting tools to extend the capabilities of a blueprint. These functions we’re added as part of our general availability release of Cloud Automation Services.
Before we jump in – Please have a look at the following VMware Document as a primer on Blueprint Expressions – https://docs.vmware.com/en/VMware-Cloud-Assembly/services/Using-and-Managing/GUID-12F0BC64-6391-4E5F-AA48-C5959024F3EB.html
Let’s jump into a few examples where blueprint expressions become helpful!
Standardizing Our Tagging
In Cloud Assembly, another core concept is the “tagging” of resources. Applying specific tags to a Cloud Zone, Network, or Storage Construct allows us to influence the provisioning engine to decide “where” a deployment lands.

In the example above, we have a tag applied to a computer cluster in AWS titled cloud:aws – applying this tag in a blueprint will send our deployed workload into AWS. Easy stuff!
In our blueprint, we likely would want to create an input to allow this to be a drop down that we can select. This might look something like…
formatVersion: 1
inputs:
  cloudenv:
    type: string
    enum:
      - cloud:aws
  resources:
    Cloud_Machine_1:
    type: Cloud.Machine
    properties:
      image: 'ubuntu'
      flavor: 'small'
      constraints:
        - tag: ${input.cloudenv}
The resulting request for this is going to have a drop down menu that has a “cloud:aws” as a drop down. This is functionally sound, but isn’t as “user friendly”. We can use blueprint expressions to make this better. See the following example…
formatVersion: 1
inputs:
  cloudenv:
    type: string
    enum:
      - AWS
resources:
  Cloud_Machine_1:
  type: Cloud.Machine
  properties:
    image: 'ubuntu'
    flavor: 'small'
    constraints:
      - tag: ${'cloud:' + to_lower(input.cloudenv)}
Notice that we have capitalized our AWS drop down, and removed the “cloud:” from the front. Instead, we have moved this functionality down to the constraints section – and wrapped it in an expression. We’ve attached “cloud:” to the front, and then executed a “to_lower” function around the input – which will make it lower case. This makes the form visually a bit nicer, as well as enforces that all constraints are lowercase!
Evaluating Values Within A Property
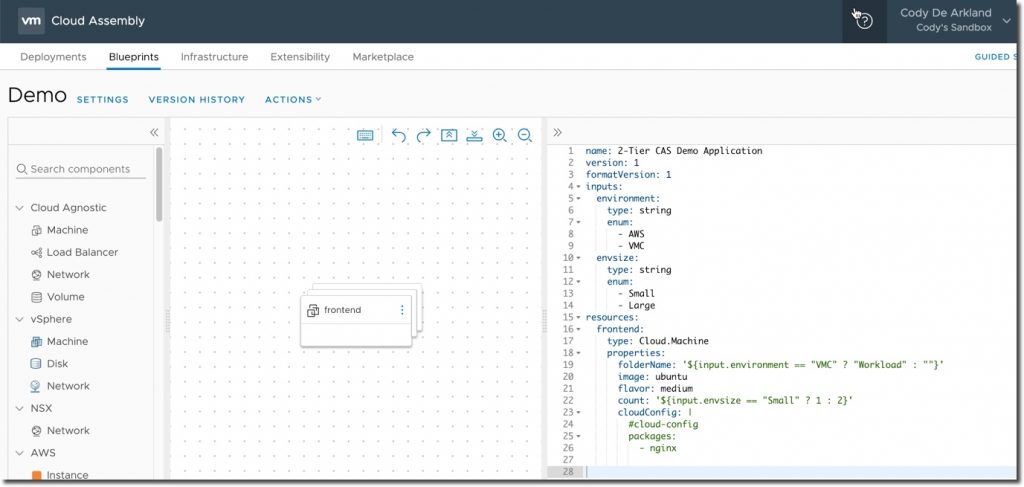
We can also use blueprint expressions to evaluate between configuration options to return a value. A good example of this use case is in regards to blueprinting for VMware Cloud on AWS. In VMware Cloud on AWS, workloads need to be deployed into “Workloads” folder (or a subfolder of that). In non VMC use cases, we may not want to leverage the folder property. Additionally, what if we want to increase the size of the cluster based on a size selection? Let’s look at how we can accomplish this in Blueprint Expressions
name: 2-Tier CAS Demo Application
version: 1
formatVersion: 1
inputs:
  environment:
    type: string
    enum:
      - AWS
      - VMC
  envsize:
    type: string
    enum:
      - Small
      - Large
resources:
  frontend:
    type: Cloud.Machine
    properties:
      folderName: '${input.environment == "VMC" ? "Workload" : ""}'
      image: ubuntu
      flavor: medium
      count: '${input.envsize == "Small" ? 1 : 2}'
      cloudConfig: |
        #cloud-config
        packages:
          - nginx
In the above example, we’re using blueprint expressions to evaluate endstate values. If a user selects the VMC value, it is going to establish “Workload” as the property value; otherwise, it will leave the value as blank applying no folder. Think of the : as an “else” in this case. The same concept applies to the “count” property, where a selection of Small indicates a single node, but any other setting sets it as a count of 2.
Leveraging a “Zero” Count
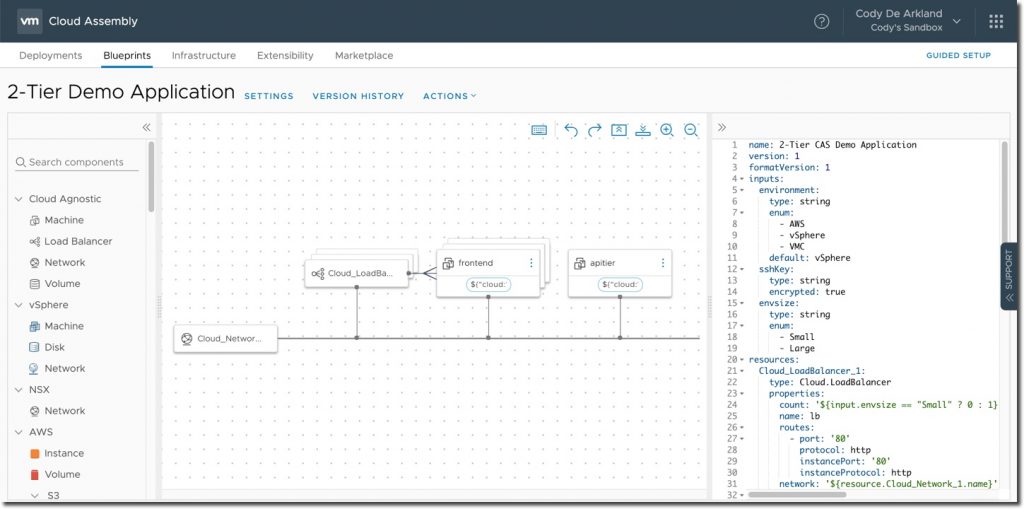
Often times, you may want to include the framework of an object in your blueprint – but only deploy that object if specific values are selected. A great example of this is load balancers. When deploying a small deployment, you may want to have users connect directly to the endpoint machine, however in the case of a “large” deployment, enable the load balancer and increase the count to 2 (similar to the example above).
Let’s take a look!
name: 2-Tier CAS Demo Application
version: 1
formatVersion: 1
inputs:
  envsize:
    type: string
    enum:
      - Small
      - Large
resources:
  Cloud_LoadBalancer_1:
  type: Cloud.LoadBalancer
  properties:
    count: '${input.envsize == "Small" ? 0 : 1}'
    name: lb
    routes:
      - port: '80'
      protocol: http
      instancePort: '80'
      instanceProtocol: http
    network: '${resource.Cloud_Network_1.name}'
    instances:
      - '${resource.frontend.id}'
    internetFacing: false
  frontend:
    type: Cloud.Machine
    properties:
      image: ubuntu
      flavor: medium
      count: '${input.envsize == "Small" ? 1 : 2}'
Notice in the above example we’ve applied a simular evaluation statement to the load balancers count property. If we select “Small” it deploys no load balancer, due to the 0 count. If we select “Large“, it will up the deployment to 1 but also up the count for the frontend machine to 2.
Wrapping Up

These are just a few examples of how you can leverage blueprint expressions within your cloud assembly blueprints to drive more advanced configurations. There are thousands of possible examples of ways these can be used to create more advanced blueprints. As a call to action, I’d again draw your attention to the following VMware Document on Blueprint Expressions. I’d highly recommend observing the built in functions which expose a lot of really powerful capabilities!


