Updated 2/5 – You can see a video of this integration on YouTube, here – https://www.youtube.com/watch?v=h0vqo63Sdgg
Cloud Assembly is the infrastructure, and platform provisioning component of VMware Cloud Automation services. Among many others, one of the key themes of a user interacting with Cloud Assembly is Blueprint authoring through not only the native design canvas, but directly through Infrastructure as Code. To get more information around Cloud Assembly, take a look at this earlier blog post here – Cloud Assembly Technical Overview
With the General Availability release of VMware Cloud Automation Services, we are loading many new features and capabilities into the platform. One of the most exciting features is the ability to leverage source control as a method for storing blueprints. Source control refers most typically, to Git. Git has become a first-class citizen in customer environments. Interactions with Git in the enterprise can be a number of possible paths – administrators are storing software, scripts, documentation, and even full websites into Git source control. Storing content this way gives greater control and flexibility around content control. We expose the capability of tracking all changes through versioning, collaboration across multiple teams through a central repository, and a number of quality of life features for managing shared content such as Pull Requests, Issue Tracking, Tagging and much more. Furthermore, the approach of committing into a source control supports one of our key focuses of Cloud Assembly as being an Infrastructure as Code Platform first.

In Cloud Assembly, we have now exposed the ability to bind an external GitLab account (from the Software as a Service offering) as a Blueprint or Cloud Formation Template Source Control store! This addition allows Cloud Administrators and Developers to directly commit blueprints into repositories, and have it synchronize into VMware Cloud Assembly projects. From a Day-2 perspective, the same administrators can collaborate, iterate, and commit changes to blueprints stored in GitLab and expect a consistent synchronization experience into the platform! This feature is an example of how VMware is focused on enabling Developers and the next generation of Cloud Administrators to interact with Cloud Assembly in more Developer/SRE Native ways. In this post, we’re going to quickly unpack how to consume this integration, and some key callouts.

Getting Started
For the purposes of this post, we’re going to assume that you have already setup a Gitlab account and created an empty repository. If you have not, I recommend having a read around the following content – https://docs.gitlab.com/ee/user/project/repository/
In order to consume the integration, we’ll need to populate this repository with our Blueprints. A major callout here is that your repository must be structured in a specific way in order for the blueprints to be detected.
- Create a folder for each of your Blueprints

- Ensure your blueprint code is stored within a blueprint.yaml file – this name is important!

- Confirm the top of your blueprints include the name: and version: properties; these are new properties so many blueprints may not include them currently. Double check!

- Extract an API key from Gitlab for the repository in question. This can be obtained by accessing your Gitlab account, selecting your login on the top right and navigating to the settings menu. Within that menu you can select “Access Tokens” on the left, name your token, set expiration, select API and create the token. Copy the resulting value and save it. We’re going to use this shortly!
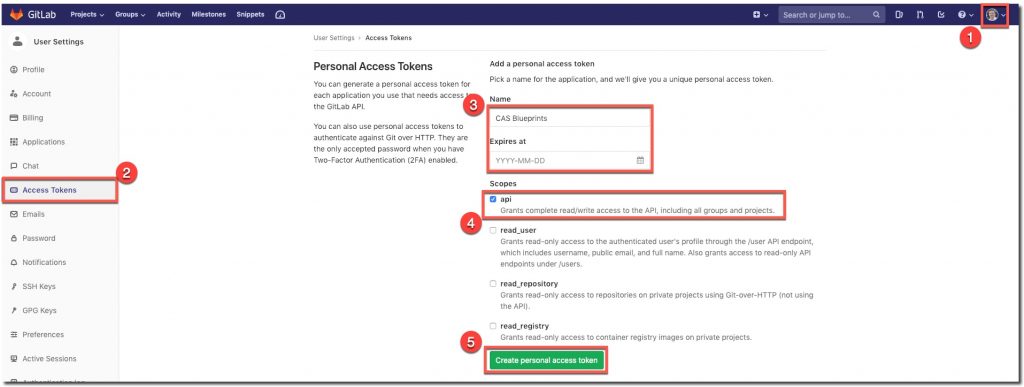
With all of these settings in place, and values collected, we can configure Cloud Assembly for Gitlab integration!
Configuring Gitlab Integration in VMware Cloud Assembly
From within Cloud Assembly on the Infrastructure menu, navigate to the Integrations tab on the left. Select Add New, and Select the new GitLab integration.

On the configuration screen, provide the following details
- URL – in this case it’s gitlab.com; in the future this will expand to include on-premises options, but for now we’re leveraging the Software as a Service GitLab exclusively
- Token – This is the Access Token we exported earlier
- Name – Provide a friendly name for your repository
- Description (Optional)
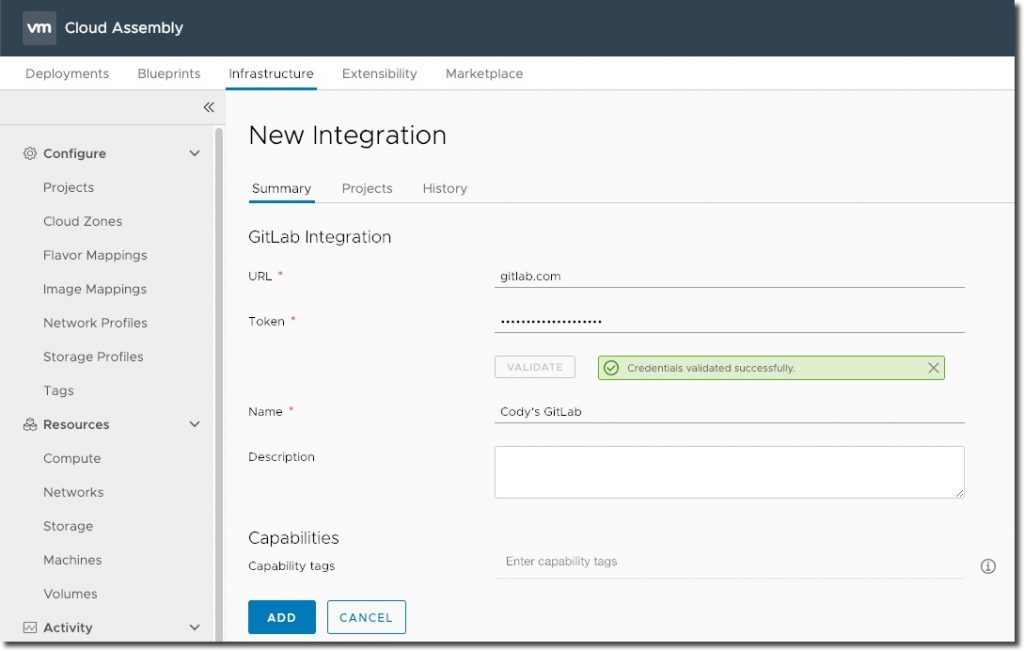
When we select validate, we should be presented with a successful validation. We can now select Add and move forward!
Configuring Our GitLab Integration
Repository synchronization is on a per project basis, so we will need to bind our cas-blueprints repository to a project in our Cloud Assembly environment. Remember, Projects are the binding of users to the resources they can consume. Blueprints are project specific – so it makes sense that our blueprint repositories would share the same commonality.
From the Integrations screen, click on our newly configured GitLab integration. We will see our configuration details with new menus on the top of the page. Select Projects to move forward. From within the Projects menu, select “New Project” and select our project. In my environment the Project I have configured is called “Lab”.
We will now be prompted to configure our Repository. For the purposes of this walk-through, I am leveraging my standard GitLab blueprint repository located here – https://gitlab.com/codydearkland/cas-blueprints. You are welcome to fork this repository into your own GitLab instance and consume it as well (https://docs.gitlab.com/ee/gitlab-basics/fork-project.html)!
We need to fill in the details of our repository as shown in the screenshot below –
- Repository – This is our repository path within GitLab, it can be found easily by taking the username of the main account you are interacting with (in my case, codydearkland) and appending the repository name (cas-blueprints). We can also see this on the end of our repository URL – codydearkland/cas-blueprints
- Branch – We have the capability of consuming multiple branches of existing repositories. In my case, we are leveraging the master branch – so we will specify master
- Folder – We can consume individual folders within a repository if we want to. In my case, I have many blueprints that I’d like to consume within Cloud Assembly so I’ll leave this blank to specify “all”
- Type – We can either store Blueprints or Cloud Formation Templates in GitLab. I have all of my blueprints constructed in native YAML – so I’m going to specify “Blueprints” here
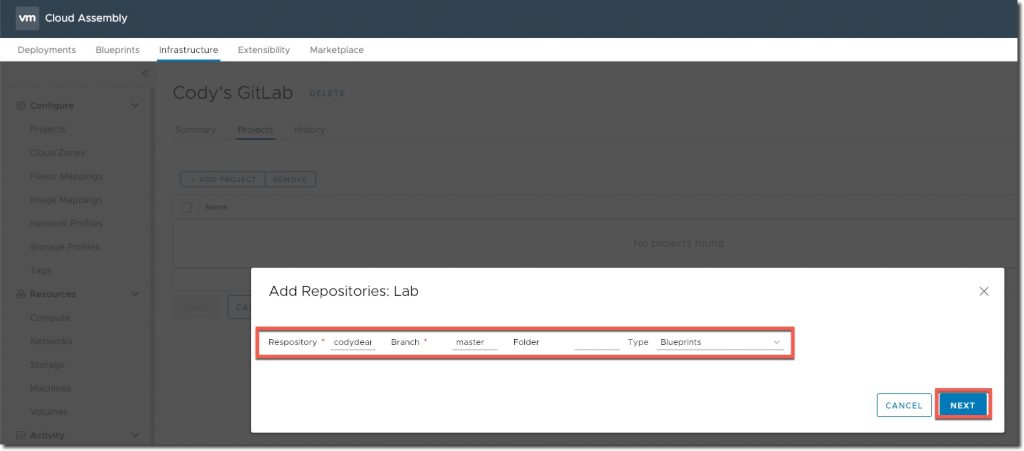
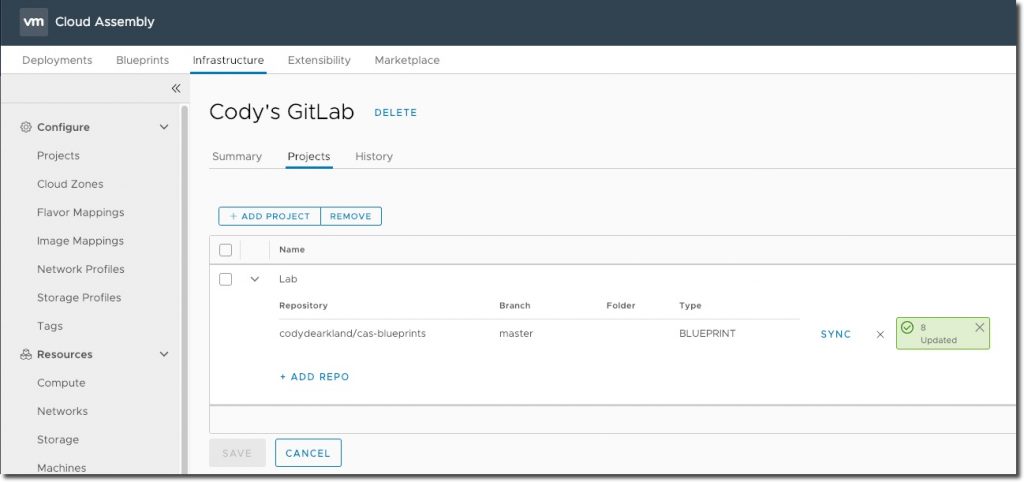
Select “Next” to finish adding our repository. When we select “Next“, an automated synchronization task will kick off to bring blueprints into the platform. When this sync is successful – it will notify you the blueprints that have been imported. In our case we can see that 8 blueprints have been brought into the platform and assigned directly to our project.
If we navigate to our Blueprints tab, we can see that our blueprints have been synchronized into the platform!

Further Capabilities
Moving forward, as blueprint changes are made directly to the Gitlab repository, they will be reflected within Cloud Assembly as this integration is currently known as a PULL operation. What does this mean? Cloud Assembly will always pull changes in from GitLab if the integration is present. So what happens if we change the blueprint within Cloud Assembly directly? If a blueprint administrator makes a change, Cloud Assembly will recognize that this is now a new fork – and establish that change as a new draft to blueprint – halting the synchrionization. This functionality allows administrators to bring content into the platform quickly – and then iterate on those blueprint changes from within the platform if they choose.
Additionally if we increment the version tag within our blueprint YAML, the new synchronization’s will respect the new version, and create additional versions within Cloud Assembly!
In the future, this functionality will be expanded to include pushing these changes back into source control as versions are established within Cloud Assembly. Stay tuned for this functionality in the future!

