So far, we’ve walked through installing the Webhook Shims. In this blog post we’ll configure the Orchestrator shim for use. The Orchestrator shim is but one of the handful of shims included in the solution. More are being added via the community. Participation is encouraged! In addition to providing a self-healing datacenter, Webhook Shims have capability for notifications, interaction with ticketing and CMDB systems and more.
Installing the Orchestrator Shim for Self-Healing
First, note that the Orchestrator shim includes its own readme file that contains some helpful information. You can view that file via the github repository web page or within the cloned repo we downloaded earlier. It is located in
/webhooks-shims/loginsightwebhookdemo/vrealizeorchestrator.readme
Check the file out if you wish, but here’s what we need to do to configure the Orchestrator shim. NOTE: Currently the .netrc functionality is not working – update is pending. For now, you can use basic authentication by modification of the vrealizeorchestrator.py and inputting the vRO username and password where indicated.
- Create a .netrc file in the user’s home directory with credentials for vRealize Orchestrator
- Modify the vrealizeorchestrator.py file to set the IP address for the Orchestrator instance we will be using
For the first task, the following commands will take care of what we need. Substitute the information in the curly braces for your own settings.
cd ~
echo 'machine {vro-host-or-ip} login {vro-login-name} password {vro-password}' > .netrc
chmod 600 .netrc
That takes care of our authentication. By the way, if you are wondering why we need this; .netrc allows for automatically entering credentials. We changed the permissions on the file so that only the owner can view them. For those more experienced, if there’s a better way to do this feel free to leave a suggestion or fork the repo and take care of business!
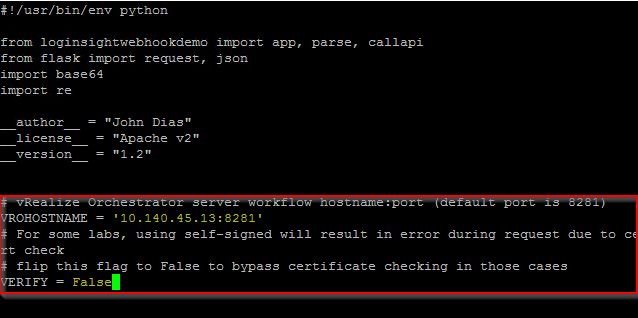
Now, time to make some changes in vrealizeorchestrator.py and the first of those is the VROHOSTNAME var in the Python code. This should contain the hostname:port for your Orchestrator instance.
The second, and optional, change is to bypass certificate verification if needed. By default, the certificate for the Orchestrator server will be validated by the Python module making the request. If you are using self-signed certificate (such as in a lab) you’ll want to set this VERIFY flag to False.
For example, in my lab my vrealizeorchestrator.py looks like this (changes in yellow text inside the red boxed area):
OK, with those changes made and saved we can test things out quickly. One last thing we need to do, if you are using the Python OS image like me, is to open a firewall port for the Translator Shims server. By default, it uses 5001.
iptables -A INPUT -p tcp --dport 5001 -j ACCEPT
Great, now start the Translation Shims server…
cd ~/webhook-shims

python runserver.py
Testing the Webhook Shims Server
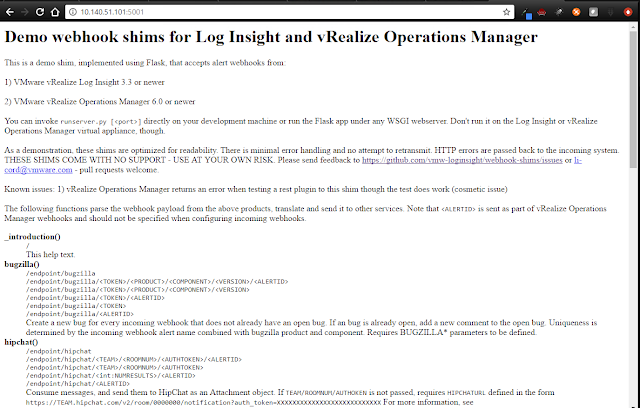
The server is now running and ready to accept requests! Note the port number is 5001. You should keep this SSH session open to view activity as you test. Let’s do that now. Open a browser and http to the IP address of the host running the Translation Shims on port 5001.
Success! This is the default page for the server – lots of great information on all the shims available in this solution. Check it out. If you do NOT get this web page, then check the firewall settings on the host running the Webhook Shims.
Our focus in the next blog post will be on using the Orchestrator shim, by creating a workflow, setting up an alert notification and testing it all out.


