In Part 1 of this series, we compared and contrasted the 5 most common options for how vRealize Automation (vRA) 6.X can assign hostnames to its provisioned machines. In this article, we’re taking a deeper-dive into setting up one of those options: creating your own vRealize Orchestrator (vRO) hostnaming workflow.
You can find Part 1 of this series here:
Manage Hostnames with vRealize Automation – Part 1: Understand your options!
I won’t spend a ton of time going over the benefits of using a vRO workflow vs. vRA’s other options for custom hostnaming, since we already covered that in the first article. I’ll just sum up by saying that a vRO workflow can execute any logic you like in order to put together the hostname, which makes it extremely flexible. To illustrate just how flexible, we’ll walk through 3 different example scenarios:
- Example A – Typical hostname scenarios
- Hostnames will be comprised of codes for things like location, server type, OS, etc. We’ll store the values for these codes in custom properties on various elements in vRA, such as Blueprints and Compute Resources. The end of the hostname will be some number of digits for an auto-incrementing number.
- Example B – Hostname includes a portion of the IP address
- Same as Example A, but instead of an auto-incrementing number, we’ll use the last 2 octets of the provisioned VM’s IP address.
- Example C – Hostnames are already pre-created in DNS
- After vRA assigns the provisioned machine an IP address, the workflow then looks up the corresponding hostname from DNS, and assigns it to the machine.
Initial Setup
Before we get to the vRO workflows, make sure you’ve already configured the vCloud Automation Center plug-in within vRO. If you haven’t done this yet, or aren’t sure, here is a blog series from one of my colleagues that can walk you through it:
- http://extendingclouds.com/2013/12/18/vcac-vco-a-marriage-made-in-the-clouds/
- If you’re running the embedded vRO instance on the vRA 6.1/6.2 Appliance, you can skip running the “Add a vCAC host” workflow, as that is already done.
- If you’re running vRA 6.1/6.2, you’ll need to perform an additional step: Add an IaaS Host.
Make sure you’ve verified that you can assign a state change workflow to a Blueprint (I use a test workflow like this one), and that it successfully runs at the expected Lifecycle State. Once that’s complete, you’re ready to move on…
Now, the workflows for all 3 of our examples will follow the same high level steps:
- First, vRA calls the workflow, and waits for it to finish.
- Next, the workflow needs to figure out what the hostname should be, based on some criteria (differs for each example).
- Finally, the workflow inserts this hostname into vRA’s provisioning process.
The first and last steps will be identical for all 3 examples, so let’s focus on those common elements first.
Common Workflow Elements
We really want vRA to call our vRealize Orchestrator (vRO) hostnaming workflow before vRA tells vCenter to create the VM. We do this so that when vRA gives vCenter all the info it needs to create the VM, that info will include the correct hostname. The easiest way to have vRA kick off a vRO workflow prior to the VM creation, is to assign it as a state change workflow for the BuildingMachine lifecycle state of your Blueprints.
That brings me to the question how the workflow is going to insert the new hostname into vRA’s provisioning process. Typically, when we want to insert information into vRA’s provisioning process, we would just lookup the appropriate custom property to update from the Property Reference. Doing so in this case, it would seem that the best property is the Hostname property. However, Hostname is a special property that was intended specifically for prompting the user at request-time, which we covered in Part 1 of this blog series. Unfortunately, assigning it a value mid-way through the provisioning process (such as during BuildingMachine), doesn’t have any effect. So what now?
Since the custom property we wanted to use doesn’t work in BuildingMachine, our next best option is to use a property of the machine’s “vCAC Entity” object (not the same as a custom property). Whoa, what’s a “vCAC Entity” object, you ask? Great question! To be perfectly honest, I wasn’t 100% sure myself, but with a bit o’ Googling around I was able to find that every construct in vRA’s IaaS engine has a vCAC Entity object. Each vCAC Entity object has properties that you can manipulate.
If you define a workflow Input called virtualMachineEntity, and with a type of vCAC:Entity, then vRA will pass the vCAC Entity object of the machine into your workflow, where you can manipulate it. On a side note, the Test Workflow that I mentioned previously includes this and the other common inputs for a state change workflow. Here are the workflow Inputs that I used for the examples in this article:
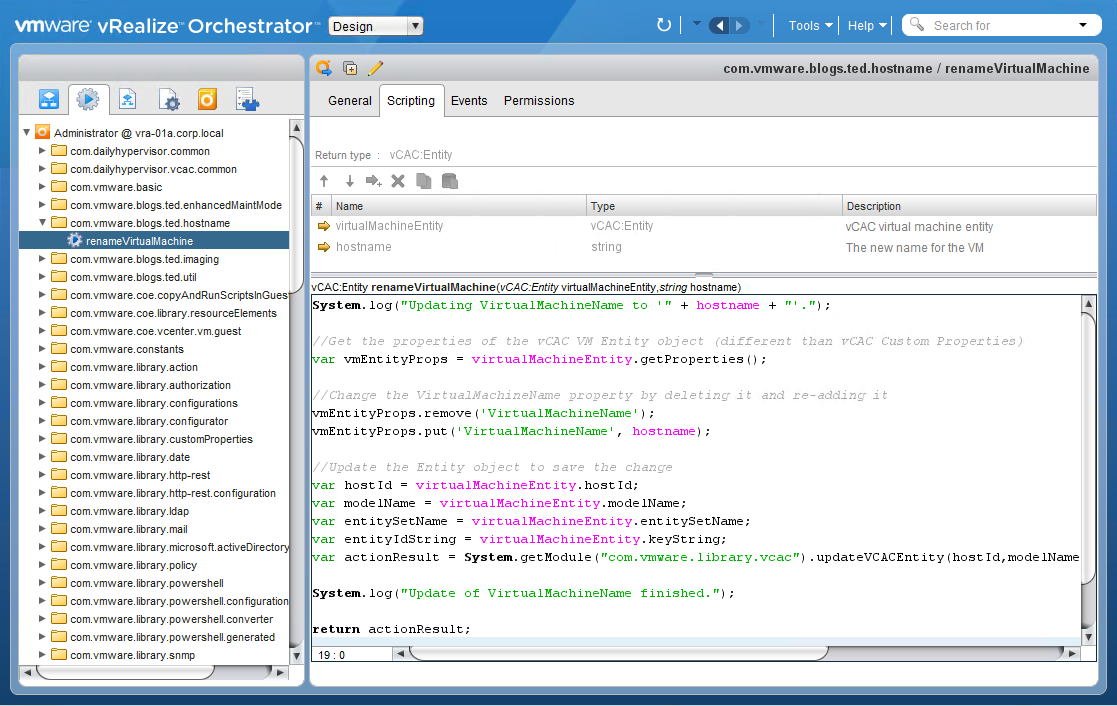
So going back to the task at hand, renaming the machine, we need to update the VirtualMachineName property of its vCAC Entity object. Thanks to VMware Community member, bogdang77, for posting the JavaScript, here. Here’s my rendition of that script, for this example:
As you can see, I made it an Action, as opposed to a Scriptable Task within a workflow. I did this because I use this script in a few different workflows (including the 3 examples for this blog article); whenever I re-use a script in multiple workflows, I like to consolidate it to an Action so I don’t duplicate my effort, and so that I can centralize any future updates. Anyway, you can just as easily make this a Scriptable Task if you like – if so, remember to make virtualMachineEntity and hostname the Scriptable Task’s Inputs, make actionResult the Output (optional), and remove or comment out the last script line, “return actionResult;”
Here’s the text of the above script, for your copy/paste convenience:
System.log("Updating VirtualMachineName to '" + hostname + "'.");

//Get the properties of the vCAC VM Entity object (different than vCAC custom properties)
var vmEntityProps = virtualMachineEntity.getProperties();

//Change the VirtualMachineName property by deleting it and re-adding it
vmEntityProps.remove('VirtualMachineName');
vmEntityProps.put('VirtualMachineName', hostname);

//Update the Entity object to save the change
var hostId = virtualMachineEntity.hostId;
var modelName = virtualMachineEntity.modelName;
var entitySetName = virtualMachineEntity.entitySetName;
var entityIdString = virtualMachineEntity.keyString;
var actionResult = System.getModule("com.vmware.library.vcac").updateVCACEntity(hostId,modelName,entitySetName,entityIdString,vmEntityProps,null,null);

System.log("Update of VirtualMachineName finished.");

return actionResult;
Example A – Typical Hostname Scenarios
The most common hostname scenarios that I see combine various code strings, which represent specific attributes of the machine, with a unique identification number. Such codes could represent a location, a server-type (web, DB, app, domain controller, etc), an OS (Windows, Linux, Unix, etc.), a birth year, physical vs. virtual, or any other useful bit of information. For example, if I wanted to embed a server’s location, its type, and its OS into a hostname standard that could accommodate up to a million servers, I might devise a format that could be represented like this:
LOC-TYPE-OS-999999
I don’t typically include hyphens in my actual hostnames; I just included them here for a visual delineation of each code within the hostname. To further illustrate how this might look in practice, if I had a location code of dt01 (for my Detroit data center), a type code of web, (for a web server), and an OS code of l (for Linux), then one hostname could be:
dt01webl000001
Setup the Plumbing in vRA
To start automating this example in vRA, I created a Machine Prefix, LOC-TYPE-OS, depicted below. If you aren’t familiar with Machine Prefixes yet, see Part 1 of this series: Understand your options!
The idea here is that our vRO workflow will take the name generated by this Machine Prefix, such as LOC-TYPE-OS-000001, and it will replace each code with the appropriate value, to produce the desired hostname: dt01webl000001.
So this begs the question of where do we define these values, with which to replace each code? And the answer is that we’ll create custom properties for each code on various elements within vRA, such as Blueprints, Business Groups, and Compute Resources. I’ll illustrate this concept by starting with the first code in our example hostname format, location (LOC). Since each VM’s location is determined by the location of the ESXi cluster on which it resides (aka Compute Resource in vRA), it makes sense to create a custom property for the location code on each Compute Resource:
In similar fashion, the next two codes, server type and OS, make sense to be defined for each Blueprint:
Whenever I do a custom automation project in vRA, I like to use a common prefix for all the custom properties I create, so that I can easily keep track of which automation project that they’re a part of. In this case, I prefixed everything with “Hostname.” since they’re for a hostnaming project.
Create the vRO Workflow
The primary function of our vRO workflow will be to read the initial hostname generated by the Machine Prefix, such as LOC-TYPE-OS-000001, and replace each code to produce the correct hostname, such as dt01webl000001. Here’s what our hostname replacement workflow looks like:
We already looked at the script for the renameVirtualMachine Action. Now, here’s the code for the ReplaceNamingCodes Scriptable Task. Did you notice when we created our custom properties, above, how we included the hypens from the Machine Prefix, such as LOC– and TYPE– ? This is so that when we start replacing portions of the Machine Prefix generated hostname, the hyphens are included in the codes to be replaced.
//Make sure the input is valid
if (vCACVmProperties == null) { throw "Unable to retrieve vCAC Properties."; }

//Read the hostname generated by the vCAC Machine Prefix
newHostname = vCACVm.virtualMachineName;
System.log("Performing substring replacement(s) on initial hostname generated by vCAC Machine Prefix (" + newHostname + ").");

//Loop through all vCAC custom properties looking for any that start with "Hostname."
//  For each one that is found, look for that property in newHostname, and replace it
//  with the value of the property.  For example, if a custom property called
//  Hostname.LLL contains a value of dt01, this code block will replace "LLL" in
//  newHostname with "dt01".
for each (var key in vCACVmProperties.keys) {
    if ( key.indexOf("Hostname.") != -1 ) {
    //Note, .search() seems to ignore the "." so I used indexOf() instead

        var code = key.substring(9);                       //code = the substring after "Hostname."
        var newValue = vCACVmProperties.get(key);        //the value with which to replace the code
        System.log("Replacing substring '" + code + "' with '" + newValue + "'.");
        newHostname = newHostname.replace(code, newValue);
    }
}
And here’s what the Visual Binding tab for our ReplaceNamingCodes Scriptable Task looks like:
And that should pretty much wrap up the workflow! Go ahead and run the “Assign a state change workflow to a blueprint and its virtual machines” workflow, and assign the new hostnaming workflow to the BuildingMachine state!! Now you should see 3 custom properties on your Blueprint:
Go ahead and request it from your Catalog, and we’ll watch its progress in vRA. To watch its progress, go to the Infrastructure tab, and then on the left go to Machines -> Managed Machines.
Note that initially the machine has its hostname generated by the Machine Prefix, LOC-TYPE-OS000001. If we wait a couple seconds and click the Refresh icon, we can see that when the machine gets to BuildingMachine, our workflow updates it with the new hostname.
Pretty slick, eh? You can also download a ready-to-rock copy of this workflow by following the steps below.
Download all 3 Examples
For the other 2 examples, I won’t walk you through the minutia of creating each workflow. Instead, you can just download them, and then I’ll point out how they differ from the first example.
- Download the workflow package from my FlowGrab project.
- In the dropdown at the top of the vRO Client, choose Design. Next, click the Packages tab on the left, and then the Import button on the right.

- Import the workflow package into your vRO.

- You should now have this workflow structure in your vRO Client.

Example B – Hostname Includes a Portion of the IP Address
This example is just like the first one, but in addition to replacing the codes in the text portion of the hostname, it also replaces the numeric portion of the hostname with the last 2 IP octets. Since we’re still replacing the various codes within the Machine Prefix-generated hostname, this example uses the same custom properties on the Compute Resources and Blueprints as the first example. In order to replace the last 6 digits of the hostname with the last 2 octets of the IP address, we’ll want to setup the Machine Prefix to have 6 digits.
And here’s what the workflow looks like:
To create it, I just duplicated the workflow from the first example, and added another Scriptable Task to replace the numeric portion of the hostname, “ReplaceLast6WithIP.” The important thing to note about that script is that it reads the VirtualMachine.Network0.Address custom property to obtain the machine’s IP address. This property is populated by either a vRA Network Profile or a custom IPAM integration, so be sure you’ve setup one them before you try out this workflow.
Example C – Hostnames are already pre-created in DNS
This example is for a scenario that I seem to run across in labs and PoCs, in which all the DNS A records for the environment have already been pre-created. For this scenario, vRO will use the machine’s IP Address to look up its corresponding hostname from DNS. The reason I don’t tend to see this in production is because vRA isn’t truly managing/automating the hostnames in this example – its only looking them up. For this example, let’s say that the lab has the following 50 A records pre-created in DNS:
192.168.1.150 devlab0030
192.168.1.151 devlab0031
192.168.1.152 devlab0032
192.168.1.153 devlab0033
…
192.168.1.199 devlab0079
Since we’re going to be throwing out whatever name the Machine Prefix might come up with, I just created a dummy prefix, “tempname,” as a placeholder to assign to my Blueprint.
In order to lookup the hostname from the IP address, the workflow needs to run an nslookup command, locally on the vRO server. Before the workflow can do that, you’ll need to enable local command execution on the vRO server, by following a few steps in the online manual: Set JavaScript Access to Operating System Commands.
Here is the workflow for this example:
We’re reusing the same renameVirtualMachine Action that we created toward the beginning of this article. The GetIPAddrFromProp Scriptable Task simply reads the VirtualMachine.Network0.Address custom property to obtain the machine’s IP Address. This property is populated by either a vRA Network Profile or a custom IPAM integration, so be sure you’ve setup one them before you try out this workflow. All of the heavy lifting here is done in the GetHostnameFromIP Scriptable Task. First, it executes a few lines of JavaScript to call the nslookup command, like this:
var cmdText = "nslookup " + ipAddress;  //ipAddress is an input
var command = new Command(cmdText);
command.execute(true);  //true tells it to wait for the command to finish
System.log(command.output); //log the nslookup output
Next, it uses some fancy string manipulation to extract the hostname from command.output. IMPORTANT NOTE: In my lab, I’m using the vRO instance that comes embedded within the vRA Appliance, so my JavaScript is written specifically to work with the output of the SLES version of nslookup (also the same version as the vRO Appliance). If you’re running an older, Windows-installable version of vCO/vRO, you’ll need to edit the JavaScript to make it work with Windows’ version of nslookup.
Enough Already!
I know we went through a lot of explanation to get everything setup, but I do think that the end result in each example is actually a pretty compact little workflow. I hope you find them useful!


