
This is part 1 of a 2-part series.
Communication Service Providers (CSPs) often utilize VMware Cloud Director, a cloud delivery platform, to enable Infrastructure-as-a-Service (IaaS) capabilities and onboard infrastructure components on demand that can help them effectively deliver services to their customers. VMware Cloud Director aggregates physical data center resources and presents them as multiple logical data centers. This helps the CSPs to serve each of these logical data centers as a stand-alone environment for their customers and allocate the resources on demand.
VMware Cloud Director brings in a set of capabilities in VMware Telco Cloud Infrastructure that solve certain problems CSPs face. To cater to modern communication services, however, CSPs face additional challenges in orchestrating the operations of multi-vendor network functions and efficiently delivering reliable communication services to their customers, at scale.
Some of those challenges include:
- Lack of expertise and stable tools in the MANO space resulting in a lot of manual overhead.
- Lack of tools that can deliver both, the infrastructure orchestration, and the orchestration for network functions & services, installed either as containers or as virtual machines.
- Lack of tools to keep up the promise of an open, easily customizable, and agnostic infrastructure for multi-vendor network functions.
- Lack of adherence to ETSI standards resulting in integration issues.
With the need to overcome these challenges, VMware put forth a solution to integrate VMware Telco Cloud Automation with VMware Cloud Director. VMware Telco Cloud Automation integrates with VMware Cloud Director, the virtual infrastructure manager for VMware Telco Cloud Infrastructure, to deliver modular, multi-vendor, multi-domain, and hybrid execution environments, coupled with orchestrating the deployment, management, and operation of network functions and services.
In this blog, we will illustrate the integration of VMware Telco Cloud Automation and VMware Cloud Director (VCD), which includes the Telco Cloud Automation Manager connecting to Telco Cloud Automation Control Plane, which, in turn, connects to VMware Cloud Director and RabbitMQ server, as depicted in Figure 1 below. We will then move to onboard and instantiate a 3-tier application as our network function utilizing the VMware Cloud Director catalog. Telco Cloud Automation supports instantiating VNFs from the VMware Cloud Director catalog–a repository of vApp templates that can either be externally accessible, private or shared among the organizations in VMware Cloud Director.

The following stack would be used for validating the integration of Telco Cloud Infrastructure (with VMware Cloud Director as the virtual infrastructure manager) with Telco Cloud Automation:
- VMware vCenter Server
- VMware vSphere
- VMware NSX-T Data Center
- VMware Cloud Director
- RabbitMQ server
- VMware vRealize Operations
- VMware Telco Cloud Automation
Procedure
The deployment and integration of VMware Telco Cloud Infrastructure – Cloud Director with Telco Cloud Automation from scratch involve the following steps:
- Install VMware ESXi on all the servers
- Install VMware vCenter Server Appliance on an ESXi host
- Configure VMware vSphere
- Install and configure VMware NSX-T Data Center
- Install and configure an NFS server
- Install VMware Cloud Director
- Install RabbitMQ
- Install VMware Telco Cloud Automation Manager
- Install Telco Cloud Automation Control Plane
- Configure VMware Cloud Director
- Configure the RabbitMQ server
- Configure Telco Cloud Automation Control Plane
- Configure VMware Telco Cloud Automation Manager
- Onboard a network function
- Instantiate a network function via the vApp method
Among the listed steps above, the first 9 steps that involve the installation of VMware ESXi, VMware vCenter, VMware NSX-T, VMware Cloud Director, and RabbitMQ are the pre-requisites for the scope of this blog, and we will start with step 10 by configuring VMware Cloud Director.
Configure VMware Cloud Director Once the VMware Cloud Director is installed, we need to integrate it with infrastructure components such as VMware vSphere and VMware NSX-T. To do so, log in to the VMware Cloud Director provider portal, go to Resources -> Infrastructure Resources -> vCenter Server instances, and add the vCenter server by providing the VMware vCenter server details, disabling NSX-V, and configuring any other details as required, highlighted in Figure 2 below.

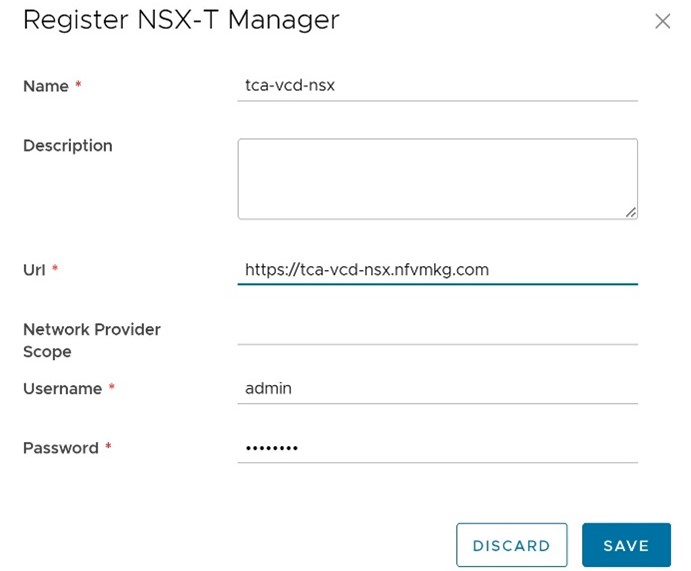
Navigate to NSX-T Managers in Infrastructure Resources and furnish appropriate parameters of NSX-T manager to register it with VMware Cloud Director as shown in Figure 3.
Then steer to Network Pools in Cloud Resources, select Geneve backed pool type, the registered NSX-T manager, and applicable overlay transport zone to create the network pool as depicted in Figure 4.

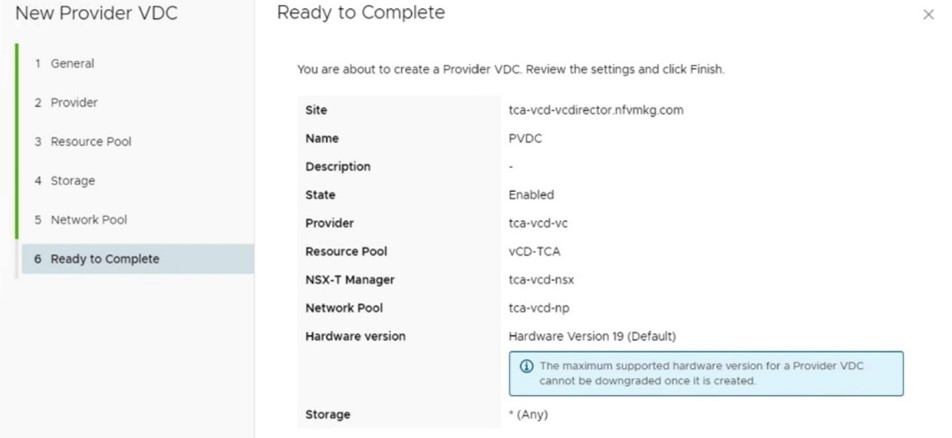
The next step is to create the Provider Virtual Data Center (VDC). The provider VDC is a virtual data center that is created over the physical resources offered by a single resource pool of a vCenter with the storage resources of one or more data stores connected to that resource pool. CSPs create provider VDCs that serve as sources for different customers. Navigate to Provider VDCs in Cloud Resources and create the VDC by selecting the pertinent registered vCenter server, resource pool in that vCenter, storage policy, registered NSX-T manager, and the network pool created in the last step, highlighted in Figure 5.
While the provider VDCs act as the source from which the service providers allocate the resources, organizations in VMware Cloud Director represent a common type of grouping scheme or tenants that would require data center resources, and organization VDCs represent the virtual data centers being allocated to those organizations.
So, let us create an organization by navigating to Organizations in Cloud Resources and furnishing the details as depicted in Figure 6.

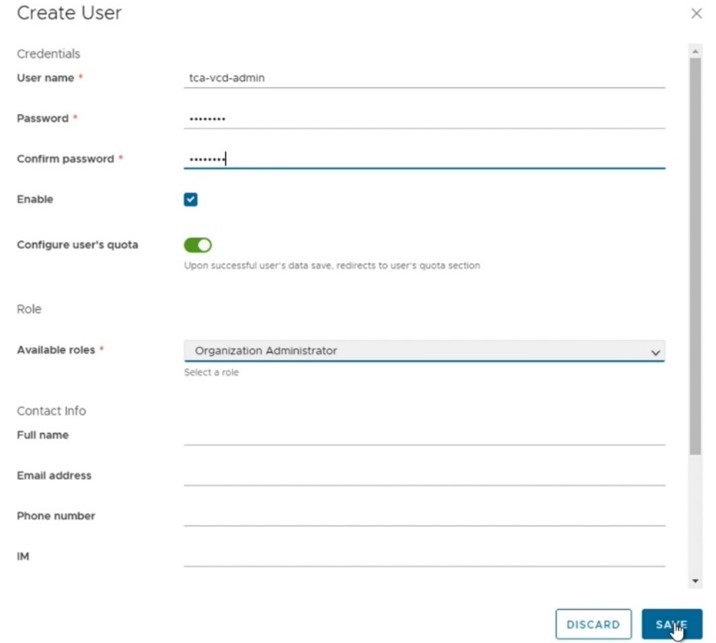
Once the organization is created, let’s create a user to access and manage this organization.
Open the tenant portal for the newly created organization, navigate to Administration -> Users and create a user for that organization by providing the username, password, role, permissions, and other details. Figure 7 depicts an example of this step.
The next step is to create an organization VDC. These organization VDCs are like clouds–virtual data center resources carved out of a provider VDC resources and allocated to a tenant for use. Like clouds, the organization VDCs have a variety of allocation models:
- Allocation pool: In the allocation pool model, a percentage of resources you allocate from provider VDC is committed to the organization VDC.
- Reservation pool: In this model, all the resources you allocate will be committed to the organization VDC.
- Pay-as-you-go: In this model, the resources are committed only when vApps are created and there is no pre-commitment.
- Flex: In the flex model, you can control the allocation and commitment percentage allowing better control over the consumption at both the VDC and the individual virtual machine (VM) levels.

For more details on the allocation models, refer to the documentation here.
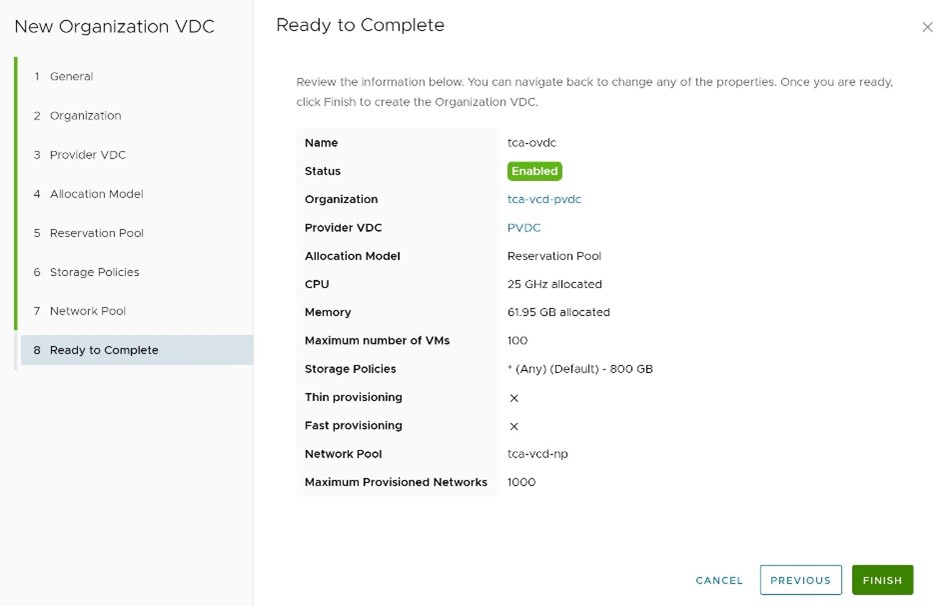
In this blog, we chose the reservation pool allocation model, providing us assured control of the resources committed to the organization VDC, which in turn guarantees the performance level, as depicted in Figure 8.
Go back to the provider portal, Cloud Resources -> Organization VDC, and click New. Select the organization created in the previous step, the provider VDC, the allocation model, allocate the resources as per the chosen model, select the appropriate storage policy, and previously created network pool. Review the configuration and create the organization VDC, as highlighted in Figure 9.
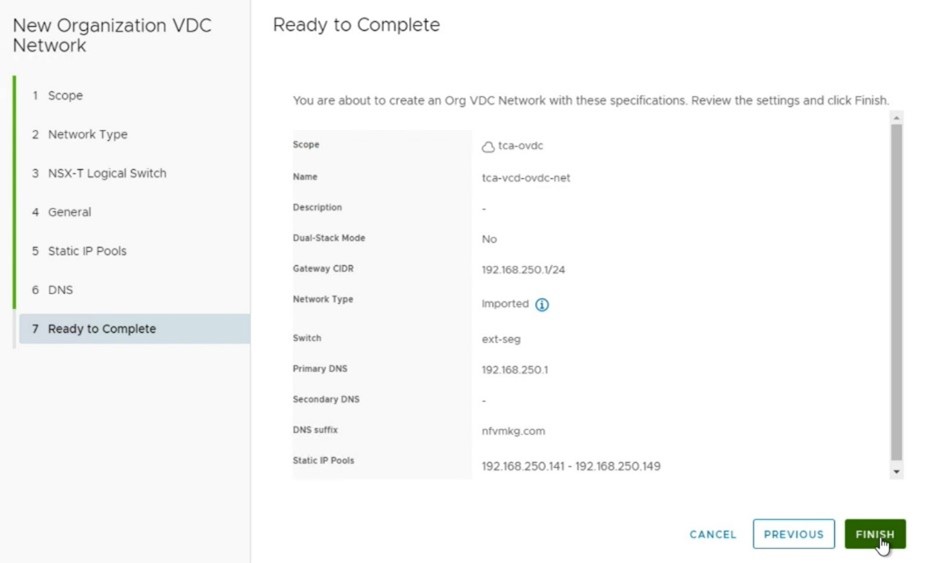
After creating the organization VDC, we must create a network in the organization VDC that provides external connectivity. To do that, log in to the organization VDC tenant portal, go to Networking -> Networks and create a new network by selecting the imported NSX-T logical switch and furnishing the relevant attributes such as IP pools, gateway, DNS servers, and domains. An example of this step is highlighted in Figure 10.
The above process has prepared the virtual infrastructure, in this case, the organization VDC on VMware Cloud Director that is required to host the network functions. Now, let us move on to configure the integrations. Log in to the VMware Cloud Director provider portal, navigate to Administration -> Extensibility and add the RabbitMQ server by furnishing the FQDN, port, credentials, and the exchange name. An illustration of this step is depicted in Figure 11.

Configure the RabbitMQ server
RabbitMQ server is required for VMware Cloud Director to publish notifications and other messages which would be collected by Telco Cloud Automation. So once the RabbitMQ server is installed, we need to log in to RabbitMQ, navigate to Exchanges, and create a direct exchange with the name ‘systemExchange’.

As illustrated in Figure 12 above, there is already a pre-existing exchange with the format ‘vcd.notifications<number>’. This is created when the RabbitMQ server was registered in VMware Cloud Director.
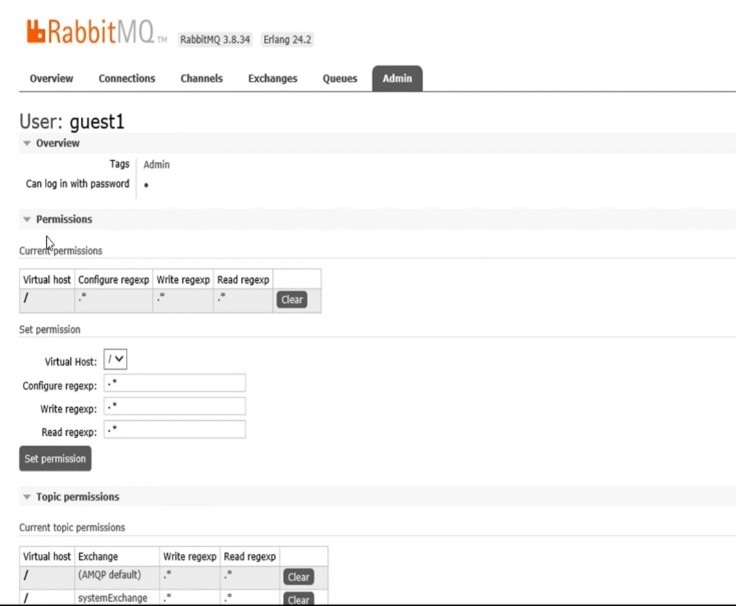
Once the exchanges are configured, navigate to the Admin tab and click on the user you wish to use for configuring the integration with VMware Cloud Director and ensure that it has the appropriate permissions, as highlighted in Figure 13.
Configure Telco Cloud Automation Control Plane
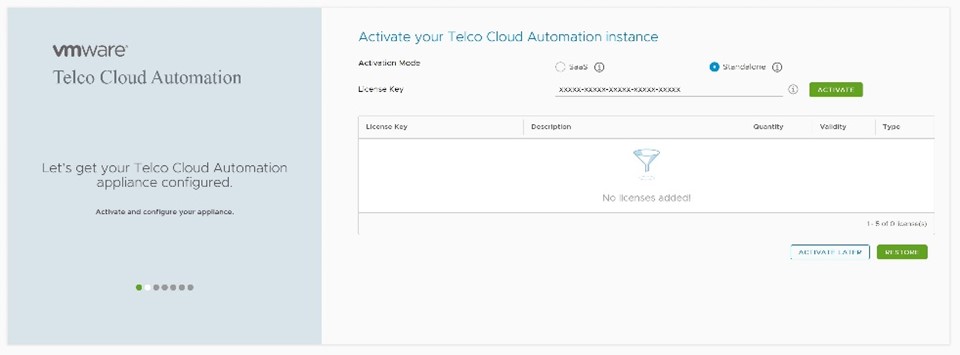
Log in to Telco Cloud Appliance Manager for the Telco Cloud Automation control plane, activate it with the appropriate license as a standalone platform, or by connecting it to SaaS. An illustration of this step is depicted in Figure 14.
Then provide the location, and the system name, select the VMware Cloud Director as the Telco Cloud Automation instance type, and enter the details and credentials of VMware Cloud Director, vCenter, NSX-T, RabbitMQ, vRealize Orchestrator, then restart the services. This configuration step is highlighted in Figure 15 below.

Configure Telco Cloud Automation Manager
Log in to Telco Cloud Appliance Manager for Telco Cloud Automation Manager, activate it with the appropriate license as a standalone platform, or by connecting it to SaaS. An illustration of this step is depicted in Figure 16.

Enter the location, and vCenter details and restart the services. An example of the configuration of Telco Cloud Automation Manager is depicted in Figure 17.

Now log in to the Telco Cloud Automation Manager portal, navigate to Virtual Infrastructure and click “Add.” Select the VMware Cloud Director, enter the Telco Cloud Automation control plane details, and the name of the organization in VMware Cloud Director to connect to. Then validate and add the virtual infrastructure manager (VIM), which connects the Telco Cloud Automation Control Plane to Telco Cloud Automation Manager as illustrated in Figure 18.

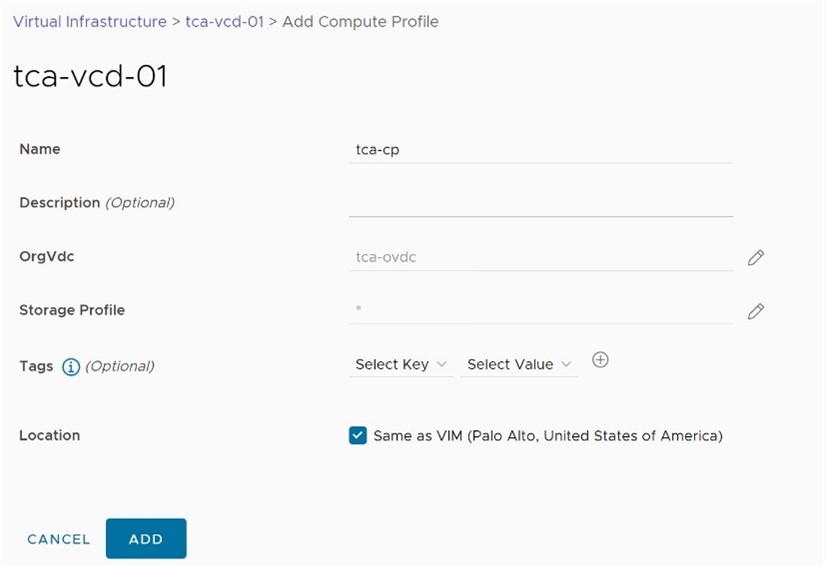
Navigate to Virtual Infrastructure and click on the ellipsis then click on Manage Compute Profiles. Then add a compute profile by furnishing the details of the organization VDC and the storage profile. The creation of compute profile is depicted in Figure 19.
Once the compute profile is created, we have a platform ready on the Telco Cloud Automation Manager to instantiate the network functions.
Onboard the network function Before instantiating a network function, we need to onboard it. For the purposes of this blog, we have considered a simple 3-tier application to be our network function. This 3-tier application consists of an app VM which is the frontend, a database VM and a load balancer VM for external access.
To onboard this network function, go to Network Functions in the Catalog sub-section and upload the TOSCA template for the 3-tier application, as illustrated in Figure 20.

Instantiate the network function via the vApp method
Before we instantiate a network function, we need to make sure that the images or templates needed for the network functions are uploaded to the appropriate registry or catalog. For our 3-tier VNF, we will upload the OVAs into vApp templates in the VMware Cloud Director catalog.
Log in to the organization VDC portal, navigate to Libraries -> Catalog and create a new catalog by providing a relevant name for the catalog as depicted in Figure 21.

Go to vApp templates and add new vApp templates. Browse and select the OVA, enter a name for the vApp template, and select the catalog created in the previous step to create the vApp template using the OVA and add it to the catalog, as illustrated in Figure 22. Repeat the same procedure for the other two OVAs of the 3-tier application.

Once the vApp templates are created, log in to Telco Cloud Automation Manager and go to Network Functions under the Catalog sub-section, and click on the ellipsis beside the onboarded network function for the 3-tier application (see Figure 23).

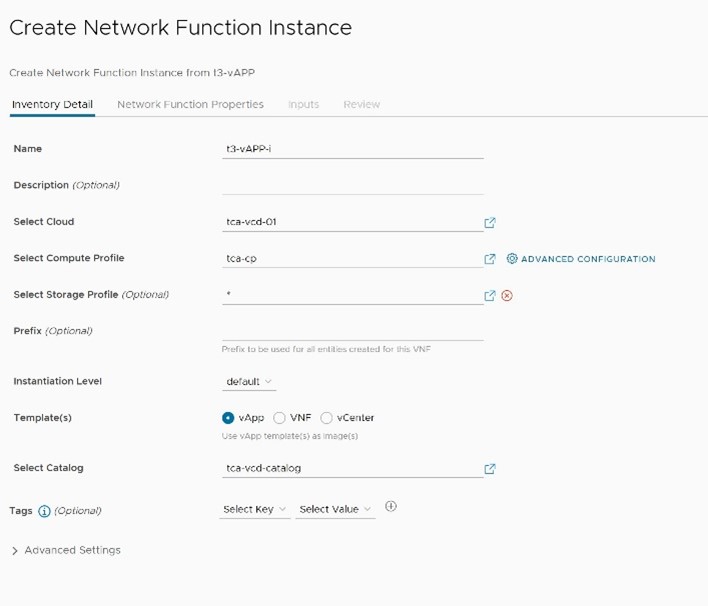
Then click Instantiate, provide a name for this instance, select the VMware Cloud Director VIM, compute profile pointing to the respective organization VDC, a storage profile, then choose the vApp template method and select the VMware Cloud Director catalog containing the vApp templates as depicted in Figure 24 below.
Then select the overlay network segment for the load balancer VM’s external network connection point lb-external as illustrated in Figure 25.

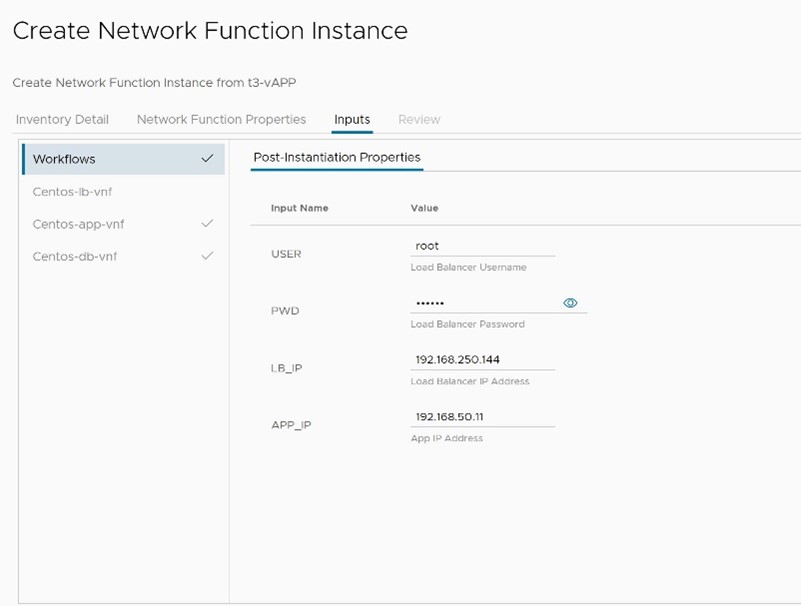
In the workflows tab, fill in the load balancer external IP. In our case, we used an overlay segment as the external network for the load balancer VM and for this reason, the traffic entering or leaving the environment will need to be NAT’ed. If you are using a similar configuration, configure the DNAT IP here. An example of this configuration is portrayed in Figure 26.
In the Load Balancer VM tab, enter the IP address, prefix, and gateway to be assigned to VM NIC attached to the overlay network segment, as illustrated in Figure 27.

Review the whole configuration and instantiate the VNF. The instantiation process takes a while to create and configure the VMs, an illustration of this process is represented in Figure 28.

Once the instantiation process is completed, we can browse the application and see that it is rendering the service as expected in Figure 29.

We have also created a demo of the process outlined in this post. Tune-in to the video demo to watch the integration in action.
Conclusion
In this post, we have described the process of integrating Telco Cloud Infrastructure’s VMware Cloud Director as a virtual infrastructure manager for Telco Cloud Automation and demonstrated onboarding and instantiation of a simple network function via the vApp template method (where one vApp represents one VM or part of the VNF). Through this process, we have established that this integration allows Communication Service Providers to deliver a modular, multi-tenant infrastructure that eases the lifecycle management of Virtual Network Functions (VNFs). In the next part of this blog series, we intend to showcase the process of onboarding and instantiating a network function using the VNF method which allows the packaging of the whole VNF into a single vApp template, providing flexible and consistent interoperability of the network function components. Stay tuned!
Discover more from VMware Telco Cloud Blog
Subscribe to get the latest posts sent to your email.


