One of the cool new features that VMware has introduced into vRealize Operations 7.5 is the ability to deploy agents to monitor the operating systems and applications inside your virtual machines. With vRealize Operations 8.0, we have added the extra feature to run custom scripts using the Application Monitoring agent and then collect the script output as a metric. This provides a lot of flexibility and robustness to our in-guest monitoring feature since now you can monitor any information that can be pulled by running a script inside your operating system.
In this blog, I will show off a simple bash script that checks for security patches in an Ubuntu VM and then passes that metric to vRealize Operations, where we can create an alert to let us know if there are any patches available for our OS. This allows us to centralize our Linux patch management into vRealize Operations and lets us corollate our patching with other metrics collected by vRealize Operations to do things like patch when the system is the least busy, or when our app is least busy as reported by the application monitoring features in vRealize Operations.
1. Setting up the script in our operating system
Let’s start by testing the script that we want to monitor patches with.

We have a simple script that checks apt-get for security patches and counts the output. When we run the script, it gives us an integer output of 6, for six available patches. You need to be aware of a few things when writing and executing a script using the application monitoring agent. Please see this link to our VMware documentation for those caveats.
2. Configuring the agent to call the script
Once we are happy with our script output, let’s configure the agent within vRealize Operations to call the script.
Log in to vRealize Operations and navigate to ‘Home -> Monitor Applications -> Manage Agents’. This guide assumes you have already deployed an application remote collector and have deployed some agents to your virtual machines. Navigate to the VM that you want to call the script from and select ‘Manage Service’ from the menu bar at the top and choose ‘Custom Script’.

On the next screen, configure a new instance with a display name, script path and timeout value. You can specify a few other advanced entries, but we don’t need them for our script.

After we hit ‘Save’ and if everything configures correctly, we should start to receive data from our script. A green checkmark means the agent is collecting the script output properly, and our agent setup is complete.

3. Verifying our metrics and creating an alert
Now we can verify that our collection is working by searching for our operating system instance in the vRealize Operations search bar (mine was ‘Linux OS on Ubuntu01’) and selecting it. Under ‘Related Objects’ we should have a new object called ‘Custom Script’, if we click on that we can see that the script is showing as healthy, and we might even have security patches available. Click the ‘Metrics’ tab at the top and choose ‘All Metrics -> Scripts -> Security Patches Available’. My metric is showing that we have 6 security patches available.

4. Create an alert to apply patches
This is all well and good, but now we need an alert to tell us when we hit a threshold and should apply our patches.
On the vRealize Operations home screen, we want to go to the ‘Alerts’ tab and start by creating a new symptom definition for our patching alert. We want to add a new symptom definition based on a custom script that will fire off a warning when ‘Patches available’ is greater than zero. I chose zero, but please customize the number for your environment.

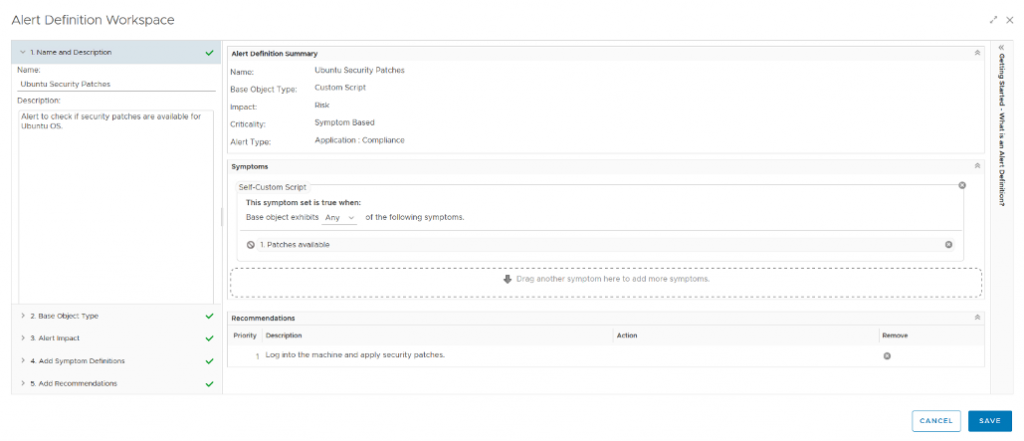
Now we want to save our symptom definition and create an alert based on the symptom. Navigate to ‘Alert Settings -> Alert Definitions’ and create a new alert. I called mine ‘Ubuntu Security Patches’ and added our symptom definition as a symptom, with the impact as ‘Risk’ and the recommendation to log into the VM and apply the security patches.

With our alert definition created, we should see an alert fire up in a moment if we have any security patches available on our VM.

I had a few security patches available, so my alert immediately triggered in vRealize Operations. If we click on it, we can see that I have 6 patches waiting to be applied.

5. Create a notification
Now if we want, we can create a notification to send this alert to email, SNMP, ServiceNow or any other notification method.
Harness the Power of Custom Script Monitoring in vRealize Operations 8.0
This was just a small sample of the power of the custom script monitoring capabilities in vRealize Operations 8.0. If you can write a script to monitor it, we can now ingest it into vRealize Operations. This is just one more small step towards making vRealize Operations the only monitoring solution you’ll ever need in your environment!


