
VMware announced the availability of the migration tool to migrate an on-prem VMware Cloud Director deployment to VMware Cloud Director service in November 2022.
This blog will demonstrate how to perform a migration of an on-prem VMware Cloud Director deployment to VMware Cloud Director service using the migration tool provided by VMware, as explained in the documentation How Do I Migrate from On-premises VMware Cloud Director to VMware Cloud Director service by Using the Migration Tool.
An overview of the steps required is:
- Setup the requirements to run the migration tool if this will be performed from a Windows machine
- Create a migration.properties file to read into the migration tool
- Run the migration tool (download the latest version from https://github.com/vmware-samples/cloud-director-service-migration and extract to the host you will perform the migration from
Prerequisites:
- A login to the VMware provider portal, see Before You Begin with VMware Cloud Director Service for more information
- Either an existing subscription for VMware Cloud Director service or a free trial
- Prerequisites met for Deploying the Reverse Proxy appliance.
- The version being migrated must currently be at least 10.3.3 or 10.4 or above.
Before running the migration tool, you will need to install the required packages for Linux or on Windows, use a shell such as cygwin to run the tool. The below instructions demonstrate the migration tool on Windows using cygwin. For a full list of the migration tool requirements, see Migration Tool Prerequisites.
Setup the Migration Tool Requirements
For cygwin install curl, jq, zip, ssh, scp, sshpass, and md5sum.
Create a Migration Properties File
You do not have to create the migration.properties file to do a migration, but it makes it easier to see the data in a file, and if you have to rerun the script for any reason, you don’t have to keep retyping the same information in.
For cygwin, in the default location when opening it, CD to /tmp and create the file called migration.properties. File in the following keys and their corresponding values:
- SITE_NAME – this is the VMware Cloud Director site name that will be migrated, such as vcd-site1
- SITE_ADMIN_USERNAME – this would generally be the administrator account
- IS_APPLIANCE – tells the tool whether the VMware Cloud Director is an appliance deployment
- CSP_ORG_ID – this is the long org ID of your organization in the VMware portal. For more information on how to find this information, see
- CSP_ORG_REFRESH_TOKEN – this is the token generated in the VMware portal to use for running tasks such as associations, migrations, and other functions. For more information, see How Do I Generate an API Token.
- CELL_USERNAME – this would generally be root
- DBHOST_USERNAME – this would generally be root
Here is an example of a migration.properties file filled out.
|
1 2 3 4 5 6 7 |
SITE_NAME=vcd-01a.corp.local SITE_ADMIN_USERNAME=administrator IS_APPLIANCE=true CSP_ORG_ID=abcdef-ghjk-1234-5678-abcdef CSP_ORG_REFRESH_TOKEN=12345678910 CELL_USERNAME=root DBHOST_USERNAME=root |
Note that if your VMware Cloud Director instance is not publicly available, such as a lab instance for dev/test/UAT, you will need to add one additional line to the migration.properties file. The migration tool connects to VCD to verify the version before attempting a migration and does so by connecting to the public DNS name listed in the migration.properties file, so if it is not publicly available, add the line below with the possible values in the link. You will need to replace version with the major version number being migrated, such as 10.3, 10.4, etc.
UPGRADE_CATEGORY=release-version:production
Below is an example of my filled out migration.properties file with UPGRADE_CATEGORY added as the VCD instance is not publicly available.

If you run the migration script and it fails for any reason past the point where it starts reading in the migration.properties file, you will need to open the properties file and re-add the line for UPGRADE_CATEGORY as it will be removed.
Run the Migration Tool
Once the migration.properties file has been completed, save it and open your cygwin bash or which ever bash you are using. Navigate to the folder that the migration tool was extracted to and run the script by running ./migrate.sh.
The script will prompt you line by line to accept the values that were entered in the migration.properties file, or if the file does not exist, you will need to manually enter the information when prompted.
- Migration properties file found, wish to reuse. Enter y to read in the entries from the properties file.
- On-prem VCD site FQDN name (found: name_from_file). Enter y to use the value from the properties file.
- On-prem VCD admin user name (found: admin_user). Enter y to use the value from the properties file.
- Enter admin password for for on-prem VCD site name_from_file. Enter the password for the admin account specified to connect to VCD.
- Is VCD name_from_file appliance based? Enter y to specify it is an appliance based VCD.
- Username for cell name_from_file found. Enter y to use the user specified in the file.
- Enter password for cell name_from_file. Enter the password the account specified to connect to the VCD appliance.
- CSP ORG ID found csp_org_from_file. Enter y to use the org id specified in the file.
- CSP ORG refresh token found token_from_file. Enter y to use the CSP org token specified in the file.
- Enter CDI Name to migrate: This will be the name of the CDS instance in the VMware portal. Enter the name you wish the CDS to be called. Note that this will be the site name within VCD as well.
In the screen shot below, you can see that you will need to answer each questions per line.
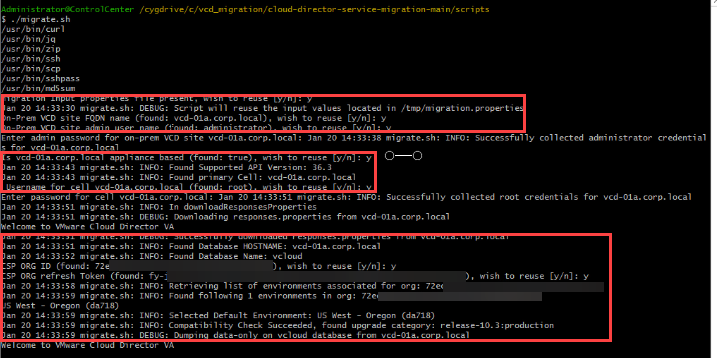
The migration tool will collect the database information from the VCD database cell, upload it to an S3 bucket, create the CDS instance and import the database dump to the new instance. You can see in the screen shot above on the last line in the bottom red box that it is dumping the database from vcd-01a.corp.local to prepare to upload it to an S3 bucket.
Once the database dump has completed, the script will upload the files to an S3 bucket to be imported to create the CDS instance. In the screen shot below, the top red box shows that the files were collected, then successfully uploaded. The bottom red box shows that VMware Cloud Director on prem appliance that is being migrated is put into maintenance mode to avoid changes in the configuration between the migration and the CDS instance coming online.


You should now see the CDS instance that was migrated with the name provided during the migration.


