Key Points
- Network Extension: Learn how to stretch Layer 2 networks from your legacy vSphere environment to VMware Cloud Foundation (VCF) 9.1, ensuring workloads retain their original IP and MAC addresses.
- Workload Migration: Understand the different HCX migration types available, with a step-by-step guide to perform your first migration.
About This Series
- Part 1: Deploy VMware Cloud Foundation Operations HCX 9.1 directly from VCF 9.1 and manually deploy it on the legacy environment.
- Part 2: Creating the Network Profile, Compute Profile, Site Pair, and HCX Service Mesh.
- Part 3: Extending the networks and performing your first migration.
Understanding HCX Migration Types
Before migrating workloads, selecting the appropriate HCX migration type depends on the following main considerations:
- Tolerance for Downtime: If your applications require zero downtime, you must use a live migration method (vMotion, RAV, or HAV). Among these, Replication Assisted vMotion (RAV) is generally the preferred choice for large scale migrations because it uniquely combines the benefits of zero downtime (vMotion) with parallel disk replication.
- Underlay Network Reliability: Live migrations demand a highly stable network with at least 250 Mbps bandwidth and a strict maximum of 0.1% packet loss. VCF Operations HCX 9.1 includes the WAN Optimization appliance, which lowers the minimum bandwidth requirement to 150 Mbps while maintaining the strict 0.1% packet loss threshold. Dropping below these network limits can cause live migrations to fail. Consequently, if the network is not reliable for live migration, non-live Bulk Migration is the safest choice due to its tolerance for lower bandwidth (50 Mbps) and higher packet loss (1.0%). For additional details, review the official Broadcom Network Underlay Minimum Requirements.
- Replication vs. Relocation (Rollback Requirements): Most migration methods fully relocate the virtual machine, meaning the original VM is no longer available on the source vCenter once migration is completed. If your business requires a fast rollback plan, Bulk Migration is recommended. It functions as a replication process, safely preserving the original VM in a powered off and disconnected state on the legacy environment.
Note: While all migration methods support reverse migration, returning a workload to the source environment always requires initiating a separate migration job.
For more information on each migration type and additional limitations, see the table below:
Blog Scope: The OS Assisted Migration (OSAM) method is designed for non-vSphere workloads (Hyper-V or KVM). However, this guide focuses exclusively on migrating from a legacy vCenter to a VCF 9.1 vCenter.
1. Pre-Migration Health Checks
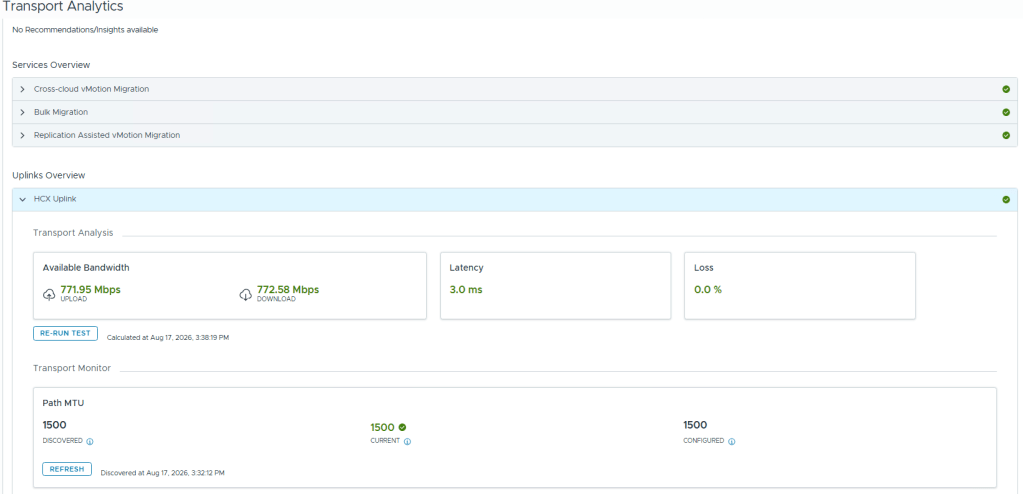
Before starting migrations, run HCX Diagnostics and Transport Analytics. Diagnostics verifies that required firewall ports are open, while Transport Analytics measures underlay bandwidth, latency, and packet loss. Completing these checks helps to identify issues and avoid unexpected failures during migration.
Step 1: Running HCX Diagnostics
- Log in to your source HCX Manager. Running diagnostics from the source automatically tests the target side as well.
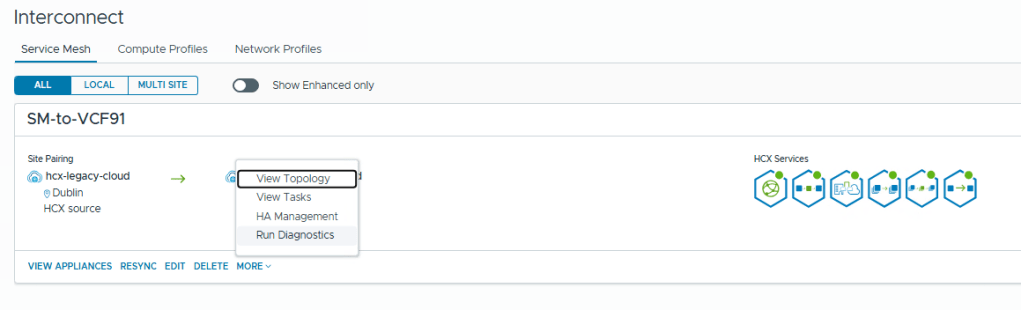
- Go to Interconnect > Service Mesh, select your service mesh, click More, and choose Run Diagnostics.
- When the process completes, verify all probes are successful. Do not proceed to migration if any probes fail.
Note: If you see failed probes, check the VMware Ports and Protocols and verify your firewalls are allowing the traffic.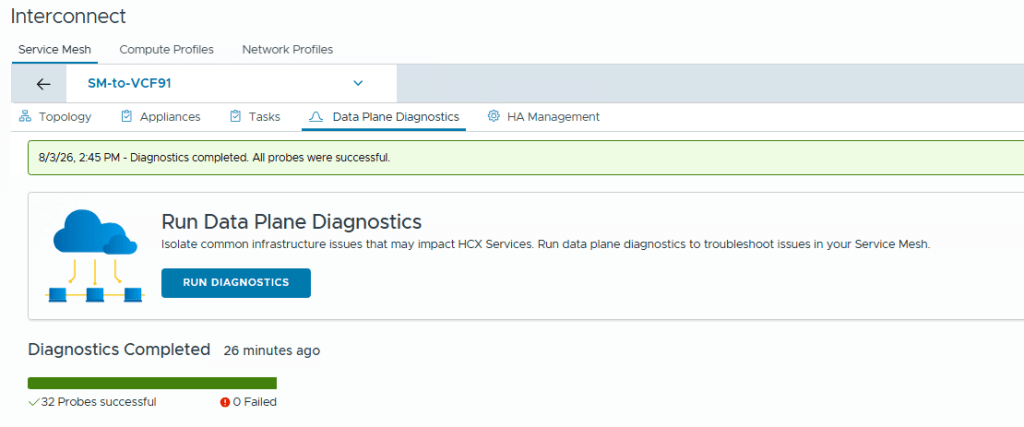
Step 2: Running Transport Analytics
- From the left navigation menu under Infrastructure, select Transport Analytics.
- Expand HCX Uplink and click RUN TEST (click YES on the prompt to proceed).
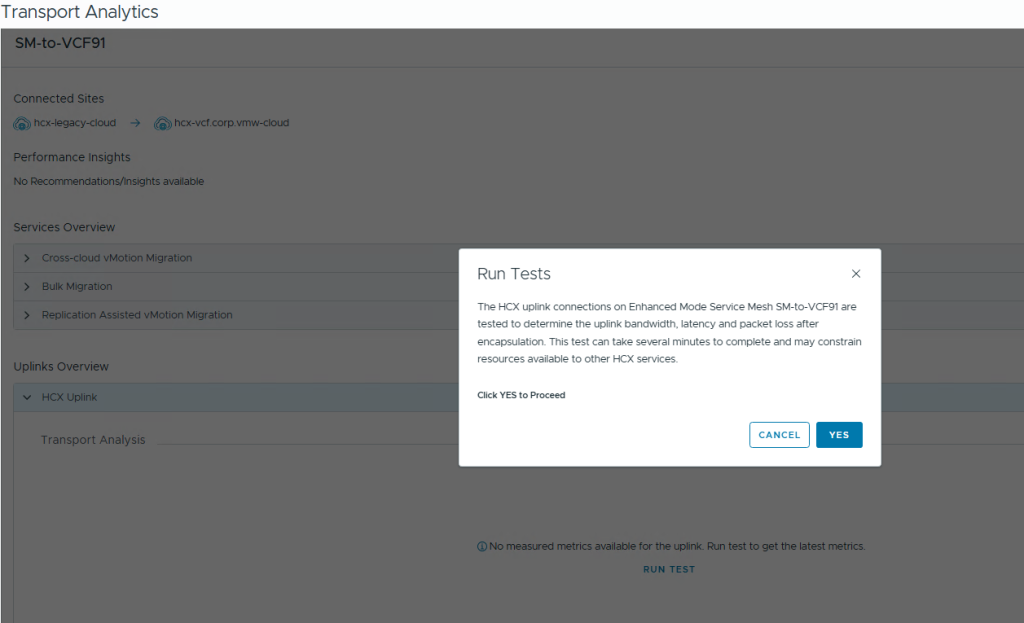
- Once the test completes, verify that your Available Bandwidth, Latency, and Loss meet or exceed the underlay requirements for your target migration type. Green checkmarks next to each migration service in the Services Overview confirm that the underlay network can support those methods.
2. Network Extension
Extending Layer 2 networks allows workloads migrated to VMware Cloud Foundation (VCF) 9.1 to retain their original IP and MAC addresses, eliminating application re-IP requirements during migration. Follow these steps to stretch your source network across the HCX Service Mesh:
Reviewing Prerequisites & Supported Topologies
Before proceeding, it is highly recommended to review the official documentation to ensure your environment configuration is fully supported:
- Requirements for Network Extension
- Restrictions and Limitations for Network Extension (Review this to identify any unsupported source and destination configurations).
When extending networks with HCX, keep the following supported network types in mind:
- Supported Sources: DVS portgroup, NSX overlay, NSX VLAN, or NSX VPC (if the source is NSX 9).
- Supported Targets: NSX VPC, NSX Overlay, and NSX VLAN.
Step-by-Step Configuration
For comprehensive details, reference the official Broadcom guide on Extending Networks. Below is a simplified breakdown of the process:
- From the HCX Manager UI, navigate to Network Extension under the Services menu and click Extend Networks.
- Select your Service Mesh, browse your source datacenter, and check the boxes next to the specific networks you want to extend.

- Click Next to open the extension properties configuration.
- For each selected network, enter the Gateway IP Address / Prefix Length and choose your Destination First Hop Router (e.g., your NSX Tier-1 gateway or NSX VPC).
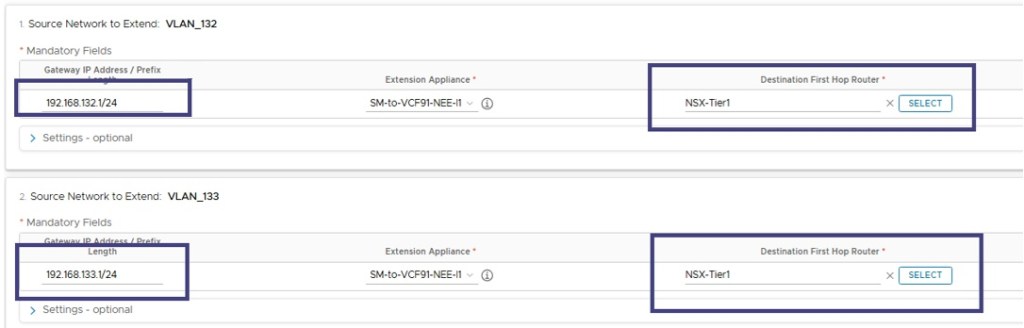
- Click Submit to initiate the extension process. Once finished, your Layer 2 networks will be successfully stretched to VCF 9.1.
3. Migrating Virtual Machines
Now that your Layer 2 networks are successfully extended, the environment is ready to migrate virtual machines. Because the network is stretched, workloads will retain their original IP and MAC addresses upon moving to VCF 9.1. VCF Operations HCX orchestrates this process using Mobility Groups, allowing you to batch and manage multiple workloads at once. For detailed operational instructions, review the official guide on Migrating Virtual Machines using Mobility Groups.
Step-by-Step Configuration
- In the VCF Operations HCX UI, navigate to Migration under the Services menu.
- Click Create Mobility Group.
- Browse your source inventory, select the set of virtual machines to include in the migration group, and click Add to Selection.
- Configure the migration settings for your group. During this step, you can define essential parameters, including:
- Switchover: Schedule exactly when the migration completes the final sync and cuts over.
- Advanced Options: Configure specific behaviors like retaining MAC addresses or upgrading VMware Tools.
Warning: Be cautious when enabling Upgrade Virtual Hardware or Disable HCX Per-VM EVC. These settings can cause lock-in, preventing you from migrating the workload back to the legacy environment due to hardware or CPU instruction set incompatibilities.- Migrate NSX Tags: Ensure security tags are carried over to the destination NSX environment.
- Seed Checkpoint: Enable this option to retain target disks if a migration fails, allowing subsequent attempts to reuse transferred data.
- Validate the migration and click Go to start the process.
Conclusion
This concludes our three-part series on VCF Operations HCX 9.1. From the initial deployment and Service Mesh configuration to extending Layer 2 networks and executing VM migrations, you now have the foundational steps to successfully transition your workloads to VCF 9.1.
Special thanks to Abhilash Kunhappan, Chris O’Sullivan (Support Domain Expert), Vipul Patel (HCX Engineering) and Jose Gonzalez Cobo (Product Management).
Discover more from VMware Cloud Foundation (VCF) Blog
Subscribe to get the latest posts sent to your email.