

Introduction
Memory Tiering in VCF 9.1 lets you extend your memory capacity by using high-speed NVMe devices as a Tier 1 layer alongside DRAM (Tier 0), and the business case is compelling. You can consolidate more VMs per host, lower your TCO by delaying costly DRAM upgrades, and consume existing resources far more efficiently. The hypervisor manages data placement automatically, so your workloads get more addressable memory without any major hardware changes.
What makes VCF 9.1 a genuine leap forward is how dramatically simpler the configuration experience has become. The entire setup happens in one place; vSphere Configuration Profiles, through a guided point-and-click workflow that applies consistently across every host in your cluster. No ESX CLI commands, no scripts, no manual host-by-host coordination. VCF 9.1 also introduces software mirroring as a brand-new feature, delivering enterprise-grade Tier 1 memory redundancy with no additional RAID controllers required. Before we dive in, let’s make sure you’ve got the right pieces in place.
Prerequisites
- VMware Cloud Foundation 9.1 deployed and operational.
- A cluster with compatible NVMe devices — one per host for basic tiering, two per host if you want software mirroring.
- Administrative permissions to manage cluster configuration profiles.
- vMotion-compatible VMs so the automation can live-migrate workloads during each host’s maintenance window.
Step-by-Step Configuration
Step 1: Navigate to the Cluster Configuration Profile
- Select your target cluster from the vSphere Client inventory.
- Click the Configure tab.
- Scroll down to vSphere Configuration Profiles (aka Desired State Configuration), your central hub for applying consistent host configurations across the entire cluster. Any setting you define here is automatically pushed to every host uniformly.
Step 2: Create a New Draft
- Click Draft and select Create a new Draft
- In the left panel, click memtier
- Click on nvme, then click Configure Settings
Think of the draft as a staging area. You can build it incrementally and come back to add features like mirroring or encryption without starting over.
Step 3: Enable Memory Tiering (Minimum Configuration)
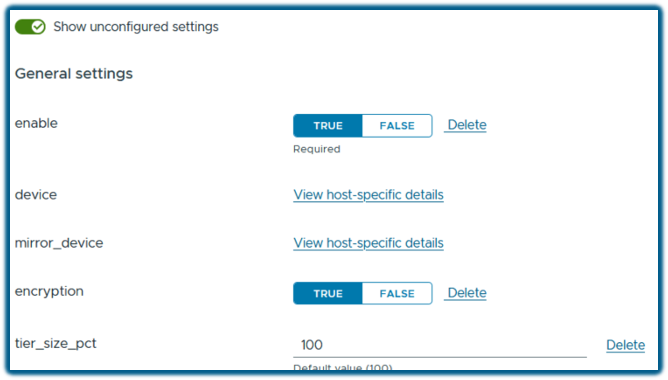
Within the draft editor, find the Memory Tiering section:
- Toggle Memory Tiering onby clicking TRUE next to enable
- Select the primary NVMe device to use as Tier 1 memory for each host, by clicking on View host-specific details
- Repeat the device selection for every host in the cluster.
That’s the minimum viable configuration. If all you need is extended memory capacity, you’re already done. Make sure the NVMe devices you select are dedicated for this purpose and not shared with VM storage workloads or vSAN.
Step 4 (Optional but Recommended): Enable Software Mirroring
New in VCF 9.1, software mirroring adds redundancy to your Tier 1 memory layer — no specialized hardware required. This is actually a big deal, you get the redundancy you want without the extra expense of Hardware RAID or operational overhead that comes with it.
- In the draft editor, click View host-specific details option.
- For each host, select a second NVMe device to act as the mirror of the primary. Make sure you select a different device than the previous step.
- Repeat for every host.
Each host needs two NVMe devices of equivalent capacity. The mirroring is handled entirely in software, protecting workloads from a single device failure with zero additional infrastructure investment.
Step 5 (Optional): Enable Encryption
If your environment has data-at-rest compliance requirements:
- Locate the Encryption toggle in the draft configuration and enable it by clicking TRUE
Easy enough to configure, and it adds meaningful coverage for regulated or multi-tenant workloads.
Step 6 (Optional): Set the DRAM-to-NVMe Memory Ratio
- Locate the Size Percentage (tier_size_pct) field in the Memory Tiering section.
- Set the value to 100% which is the default and recommended setting. This gives you a 100% increase in effective memory capacity from your NVMe devices.
Step 7: Save and Review the Draft
- Click Save to commit your configuration.
- Review the summary and verify NVMe device assignments per host, confirm mirroring and encryption settings.
- Edit the draft if anything needs adjusting before you proceed.
It’s worth the 60 seconds. Catching a misconfigured device selection here is a lot easier than after the automation has already run.
Step 8: Apply the Configuration
Click Apply Changes and then Remediate, and let the automation take over. Here’s what it handles for you, in order:
- Places each host into maintenance mode sequentially. Yes, NO REBOOT required!
- Live-migrates VMs off each host before making any changes.
- Creates NVMe partitions automatically. No CLI, no scripts, no ssh into every single host.
- Applies the memory tiering configuration, then exits maintenance mode and moves to the next host.
The process repeats until every host in the cluster is configured. Go grab a cup of coffee, it’ll all be done when you get back.
Monitoring After Configuration
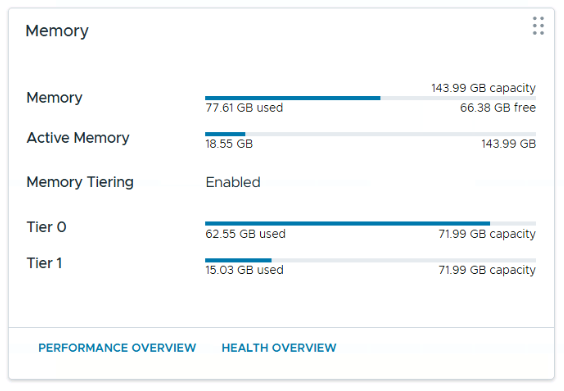
Once complete head to your cluster’s Summary tab. The Memory Tiering panel shows Tier 0 (DRAM) and Tier 1 (NVMe) capacity and utilization across the cluster, plus how many hosts have been enabled.
Drill into any individual host to see DRAM and NVMe capacity side by side, along with active memory utilization, the key metric in memory Tiering to make sure all active memory fits inside DRAM. Watch this over time to validate that Memory Tiering is delivering real value for your environment.
Wrapping Up
Configuring Memory Tiering in VCF 9.1 is genuinely a straightforward, guided workflow that handles the heavy lifting for you. You get more effective memory capacity, optional software-based mirroring for resilience, and full visibility into how your tiers are performing, all without touching the command line. Although you can still do all this from the CLI if you wish, just be aware that those commands are different in VCF 9.1. More on that in a future post, so stay tuned.
Happy Tiering!
Discover more from VMware Cloud Foundation (VCF) Blog
Subscribe to get the latest posts sent to your email.


