
vSphere Configuration Profiles allows VMware Cloud Foundation (VCF) administrators to manage the ESX host configuration at a cluster level. In this article, we discuss how to easily replicate configuration from one cluster to another cluster.
Note: Screenshots and steps described are based on vSphere 9.0.2. Certain UI elements or verbiage may differ in earlier or later versions.
About vSphere Configuration Profiles
vSphere Configuration Profiles is a new feature, first introduced in vSphere 8.0, that is a successor to Host Profiles in its ability to manage ESX host configurations at scale. Host Profiles is made unwieldy by its requirement that the host configuration needs to be specified in its entirety. This places an undue burden on administrators, who may only be aware of the changes that they want to make to the configuration. vSphere Configuration Profiles, in contrast, only requires the admin to define the changes to the default configuration. This also makes the configuration document human-readable and much more manageable.
Replicating configuration to new clusters
A common use case when it comes to configuration management is that, in addition to maintaining consistent configuration within a vSphere cluster, we also may wish to maintain consistent configuration across multiple clusters. vSphere Configuration Profiles makes this very easy to do.
If you have not yet transitioned a cluster to use vSphere Configuration Profiles, see the blog article Transitioning to VMware vSphere Configuration Profiles from Host Profiles.
Tip: You can stage configuration to a cluster even before any ESX hosts have been added to the cluster. All you need to know are the Host BIOS UUIDs.
Let’s step through the workflow to copy configuration from one cluster to another.
Export configuration from an existing cluster
Begin by exporting the desired configuration from an existing cluster. Navigate to Cluster > Configure > Configuration under Desired State. The exported file will be in a JSON format and contain the agnostic configuration of the cluster as well as the unique host attributes like IP address and hostname. At a minimum, we need to edit the host-specific section of the vSphere Configuration Profile with the unique host IDs and attributes for the destination cluster.
Edit vSphere Configuration Profile JSON file
First, let’s explain the structure of the vSphere Configuration Profile JSON file. For example, this is how a vSphere Configuration Profile JSON file typically looks (opened in Notepad++).
For readability purposes, I have collapsed most of the details. Under the profile > esx section we have all the host-agnostic settings. These settings can be applied to every host in the cluster and do not take any host-unique values. Settings such as vSphere Distributed Switch, Port Groups, or Datastores may differ between clusters and you can change those settings in their respective sections. For the sake of simplicity, in the following example I use the same vSphere Distributed Switch, Port Groups, and Datastores that my source cluster is configured with on my new cluster.
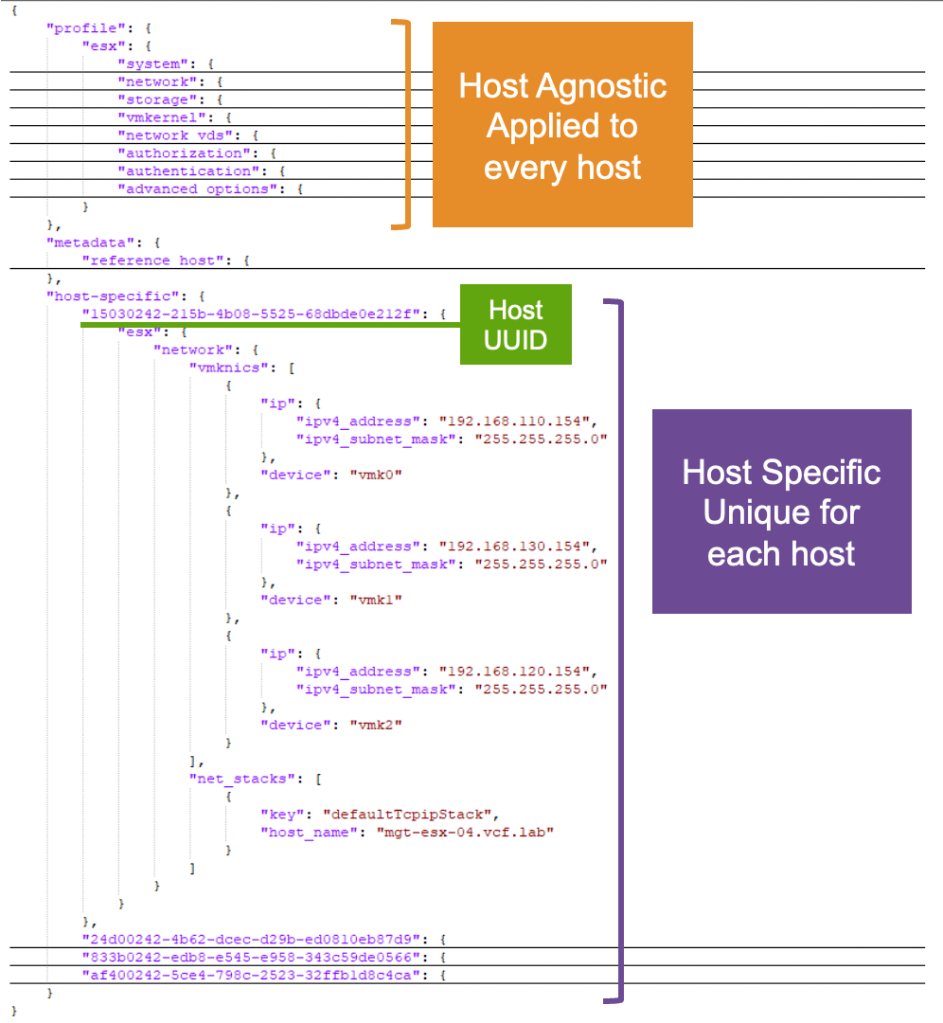
The host-specific section of the JSON file is where we are going to put our focus. As you can see in the example above, the only unique host values specified are IP addresses for our three vmkernel interfaces and host name.
Each ESX host is defined by a Host UUID within the host-specific section. This UUID is sometimes referred to as the BIOS UUID and is unique at a hardware level. In current versions of vSphere and VCF, the easiest way to get the Host UUID is using PowerCLI. From a PowerCLI session connected to vCenter or the ESX directly, the following command can be used to print the Host UUID we need.
|
1 |
(Get-VMHost -Name esx-hostname.fqdn).ExtensionData.Hardware.SystemInfo.Uuid |
Edit the vSphere Configuration Profile JSON file and change the Host UUID, IP Address(es), subnet mask(s), and host name for each host in the destination cluster. You can add or remove hosts from the JSON file as needed; just be careful about correct JSON syntax and those pesky commas (,).
Import the updated configuration to the new cluster
If the cluster has not been created with vSphere Configuration Profiles enabled, or has not yet transitioned to vSphere Configuration Profiles, you can use the transition workflow to import the updated JSON file created earlier.
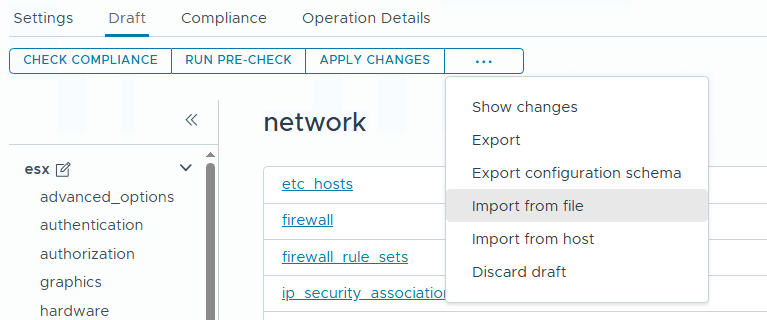
If the cluster is already enabled for vSphere Configuration Profiles, navigate to the Draft tab and choose Import From File and import the updated JSON file.
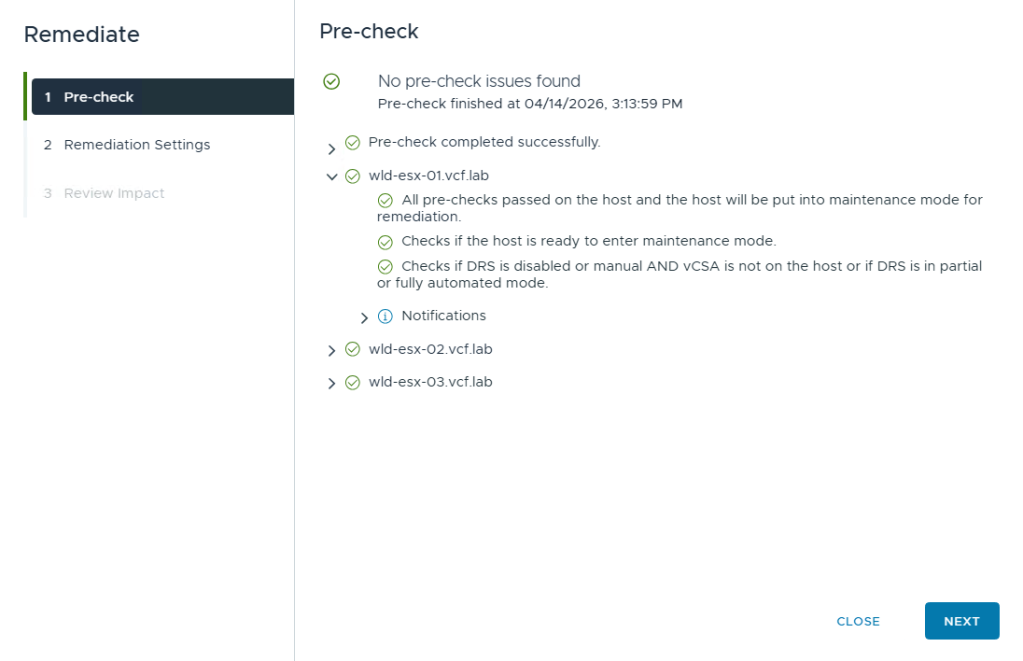
Select Apply Changes from the Draft tab to remediate and apply the imported configuration. Inspect the Pre-check, Remediation Settings, and Review Impact windows.
The pre-check helps ensure that the host is ready for remediation, including ability to enter maintenance mode, and that DRS is enabled to automatically evacuate the host of VMs, if needed. The Remediation Settings window displays the current remediation settings inherited by vSphere Lifecycle Manager.
Expand each host in the Host-Level Details tab in the Review Impact window to see the specific configuration that will be applied, including if the host will enter maintenance mode or not.
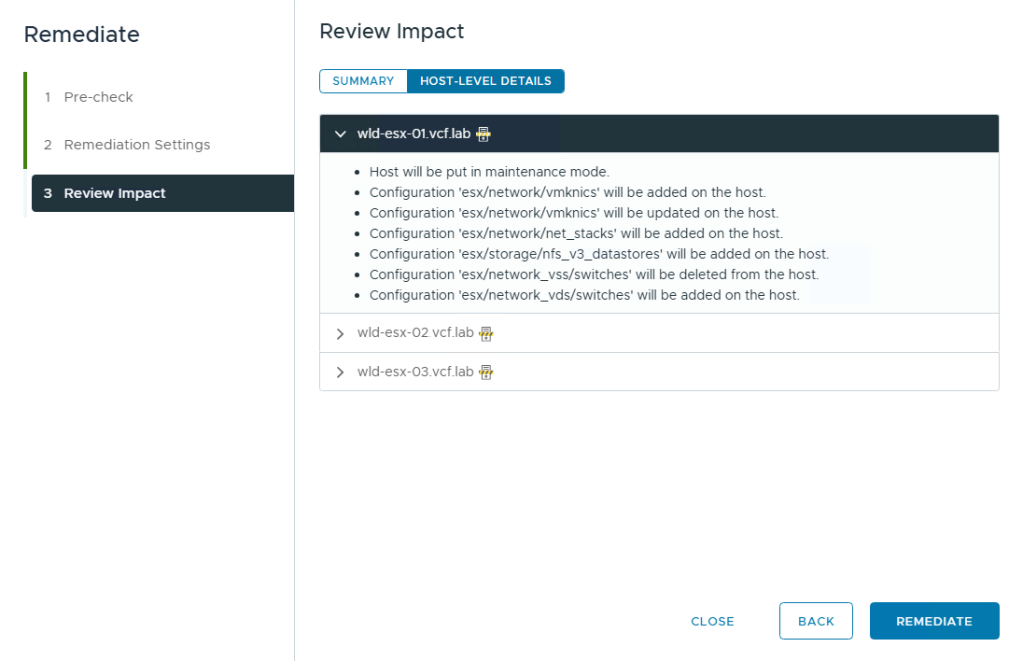
Click Remediate to apply the configuration to the cluster.
Summary
We can easily copy standard configuration from one cluster to another cluster using vSphere Configuration Profiles. Doing so helps ensure consistent configuration not only within a cluster but also across multiple clusters.
Discover more from VMware Cloud Foundation (VCF) Blog
Subscribe to get the latest posts sent to your email.


