Network troubleshooting and monitoring tools are critical in any environment. Especially in data centers where you have many applications or workloads consolidated on server virtualization platforms such as vSphere. When you ask any network administrators, what are the challenges in troubleshooting data center networks, where server virtualization is prominent? They will say that they don’t have the visibility into virtual networks and they don’t know what is going on in the hypervisor world.
To provide the right amount of visibility to the administrators, VMware vSphere Distributed Switch (VDS) supports industry standard features such as port mirroring and NetFlow. These features were introduced with the release of vSphere 5.0. In this latest release there are more enhancements to the features along with configuration workflow improvements. I will provide more details on the different types of port mirroring capabilities and which one to choose while troubleshooting or monitoring your network.
First of all, what is port mirroring? Those who have worked with physical switches know that this feature allows you to copy packets from a port to another port. The port from which the packet is copied is called a monitored or source port while the port where the packet is copied to is called a destination port. As you can tell, this feature allows you to copy packets to a central device for analysis. Now, the device could be a packet analyzer or Intrusion detection system that can help detect any issue in the network. However, the port mirroring capability on physical switches can only replicate traffic that is visible on the physical port and can’t help monitor flows between two virtual machines running on same vSphere host. This is because vm to vm traffic on same host never hits the physical switch port.
Let’s now look at the port-mirroring feature on VDS. The virtual switch, VDS, has virtual ports, where you connect virtual machines vnics or infrastructure vmkernel NICs. When you want to monitor particular virtual machine traffic you really are monitoring a virtual port where that particular virtual machine is connected. Similar to the physical switches, VDS allows you to establish port mirroring sessions with configurable source and destination ports.
We will now walk through a port mirroring session configuration steps on VDS:
As shown below, first select the VDS and under Manage tab click on port mirroring. Then click the “+ New” sign to create a new port mirror session

This will pop up the following five different options for you to choose from !! Let’s choose the first one, which is called as “Distributed Port Mirroring”. This port mirroring option is equivalent to the Switch Port Analyzer (SPAN) feature on a physical switch.

Users should use this type of port mirroring session whenever they want to debug any networking issue directly on a particular host. The diagram below shows a host with three virtual machines. The Analyzer virtual machine on the right is where wireshark tool is installed to help in the debug process. The Monitored virtual machine on the left is the one having application connectivity issues. Let’s continue through the steps of creating the port mirror session from the Monitored VM virtual port to the Analyzer VM virtual port.

Provide a name for this session and make sure to enable Status and enable Normal I/O traffic for this session. Enabling normal I/O on destination port allows the destination virtual port to communicate normally. If you don’t allow the normal I/O traffic in this session, the Analyzer VM will not be able to communicate. It will just be able to receive traffic for monitoring. There are also other parameters such as packet length and sampling rate that controls the amount of traffic you are copying to the destination in this session.

Let’s now select the source port that needs monitoring. As you can see, once you click “+” a screen pops up with the list of virtual ports that are active on VDS. In this example we are going to select the virtual machine (Web server – 03) running on host bk09-h380-07 as the monitored VM.

The next step is to choose the direction of traffic that you want to monitor. You have an option to only monitor Ingress or Egress traffic or both Ingress/Egress traffic. In this example we have selected both Ingress and Egress traffic as shown below.

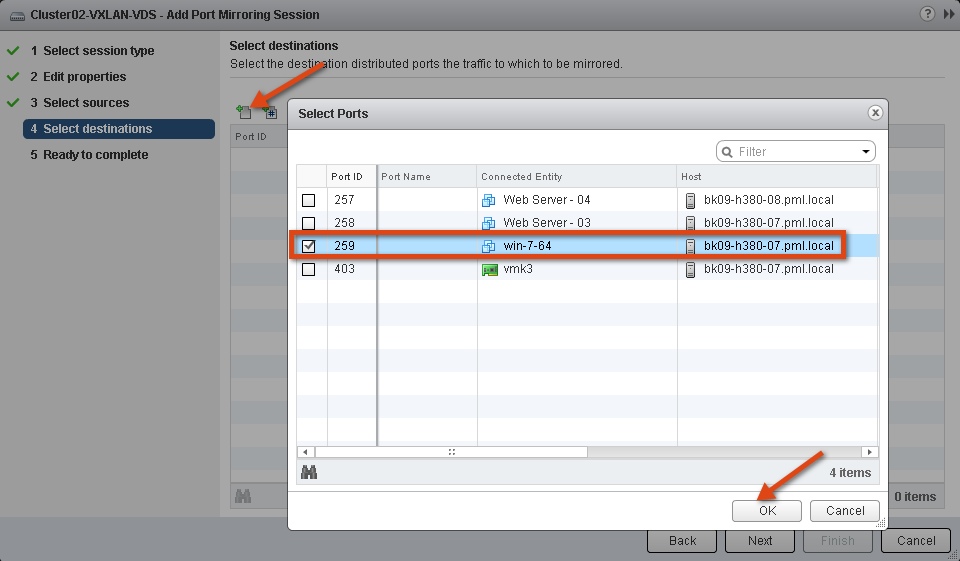
After selecting the direction of traffic to monitor, it is time to choose the destination virtual port where the traffic will be copied. As shown below, an Analyzer virtual machine (win7-64) on the same host bk09-h380-07 is selected as the destination.

This concludes the creation of the port mirror session configuration that allows you to monitor traffic of a virtual machine running on the same host.

Another use case of this port-mirroring configuration is to provide Intrusion detection services for the applications running on a host through an IDS virtual appliance. In the next post, I will discuss another port mirroring session type – Remote Mirroring source and destination also called as Remote Switch Port analyzer (RSPAN). Please stay tuned and let me know if you have any questions about this post.
Get notification of these blogs postings and more VMware Networking information by following me on Twitter: @VMWNetworking


