by Joanna Guan and Davide Bergamasco
The first two posts in this series assessed the performance of some Content Library operations like virtual machine deployment and library synchronization, import and export. In this post we discuss how to fine-tune Content Library settings in order to achieve optimal performance under a variety of operational conditions. Notice that in this post we only discuss the settings that have the most noticeable impact on the overall solution performance. There are several other settings which may potentially affect Content Library performance. We refer the interested readers to the official documentation for the details (the Content Library Service settings can be found here , while the Transfer Service settings can be found here.)
Global Network Bandwidth Throttling
Content Library has a global bandwidth throttling control to limit the overall bandwidth consumed by file transfers. This setting, called Maximum Bandwidth Consumption, affects all the streaming mode operations including library synchronization, VM deployment, VM capture, and item import/export. However, it does not affect direct copy operations, i.e., operations where data is directly copied across ESXi hosts.
The purpose of the Maximum Bandwidth Consumption setting is to ensure that while Content Library file transfers are in progress enough network bandwidth remains available to vCenter Server for its own operations.
The following table illustrates the properties of this setting:
| Setting Name | Maximum Bandwidth Consumption |
| vSphere Web Client Path | AdministrationàSystem ConfigurationàServicesà Transfer ServiceàMaximum Bandwidth Consumption |
| Default Value | Unlimited |
| Unit | Mbit/s |
Concurrent Data Transfer Control
Content Library has a setting named Maximum Number of Concurrent Transfers that limits the number of concurrent data transfers. This limit applies to all the data transfer operations including import, export, VM deployment, VM capture, and synchronization. When this limit is exceeded, all new operations are queued until the completion of one or more of the operations in progress.
For example, let’s assume the current value of Maximum Number of Concurrent Transfers is 20 and there are 8 VM deployments, 2 VM captures, and 10 item synchronization in progress. A new VM deployment request will be queued because the maximum number of concurrent operations has been reached. As soon as any of those operations completes, the new VM deployment is allowed to proceed.
This setting can be used to improve Content Library overall throughput (not the performance of each individual operation) by increasing the data transfer concurrency when the network is underutilized.
The following table illustrates the properties of this setting:
| Setting Name | Maximum Number of Concurrent Transfers |
| vSphere Web Client Path | AdministrationàSystem ConfigurationàServicesàTransfer Serviceà Maximum Number of Concurrent Transfers |
| Default Value | 20 |
| Unit | Number |
A second concurrency control setting, whose properties are shown in the table below, applies to synchronization operations only. This setting, named Library Maximum Concurrent SyncItems,controls the maximum number of items that a subscribed library is allowed to concurrently synchronize.
| Setting Name | Library Maximum Concurrent SyncItems |
| vSphere Web Client Path | AdministrationàSystem ConfigurationàServicesà Content Library ServiceàLibrary Maximum Concurrent SyncItems |
| Default Value | 5 |
| Unit | Number |
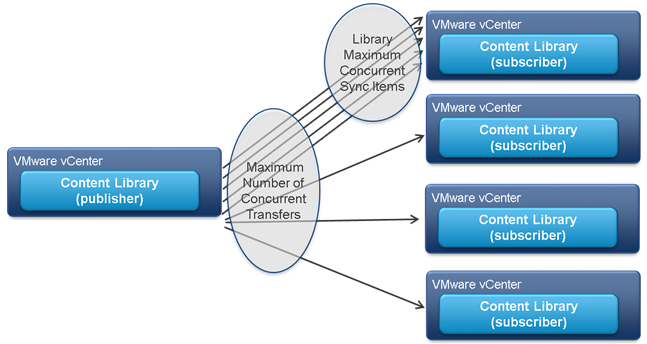
Given that the default value of Maximum Number of Concurrent Transfers is 20 and the default value of Library Maximum Concurrent SyncItems is 5, a maximum of 5 items can concurrently be transferred to a subscribed library during a synchronization operation, while a published library with 5 or more items can be synchronizing with up to 4 subscribed libraries (see Figure 1). If the number of items or subscribed libraries exceeds these limits, the extra transfers will be queued. Library Maximum Concurrent SyncItems can be used in concert with Maximum Number of Concurrent Transfers to improve the overall synchronization throughput by increasing one or both limits.
Figure 1. Library Synchronization Concurrency Control
The following Table summarizes the effect of each of the settings described above on each of the Content Library operations, depending on the data transfer mode.
| Maximum Bandwidth Consumption | Maximum Number of Concurrent Transfers | Library Maximum Concurrent Sync Items | ||
| Streaming Mode | VM Deployment/Capture | √ | √ | |
| Import/Export | √ | √ | ||
| Synchronization (Published Library) |
√ | √ | ||
| Synchronization (Subscribed Library) |
√ | √ | ||
| Direct Copy Mode | VM Deployment/Capture | √ | ||
| Import/Export | √ | |||
| Synchronization (Published Library) |
√ | |||
| Synchronization (Subscribed Library) |
√ |
Data Mirroring
Synchronizing library content across remote sites can be problematic because of the limited bandwidth of typical WAN connections. This problem may be exacerbated when a large number of subscribed libraries concurrently synchronize with a published library because the WAN connections originating from this library can easily cause congestion due to the elevated fan-out (see Figure 2).
Figure 2. Synchronization Fan-out Problem
This problem can be mitigated by creating a mirror server to cache content at the remote sites. As shown in Figure 3, this can significantly decrease the level of WAN traffic by avoiding transferring the same files multiple times across the network.
Figure 3. Data Mirroring Used to Mitigate Fan-Out Problem
The mirror server is a proxy Web server that caches content on local storage. The typical location of mirror servers is between the vCenter Server hosting the published library and the vCenter Server(s) hosting the subscribed library(ies). To be effective, the mirror servers must be as close as possible to the subscribed libraries. When a subscribed library attempts to synchronize with the published library, it requests content from the mirror server. If such content is present on the mirror server, the request is immediately satisfied. Otherwise, the mirror server fetches said content from the published library and stores it locally before satisfying the request from the subscribed library. Any further request for that particular content will be directly satisfied by the mirror server.
A mirror server can be also used in a local environment to offload the data movement load from a vCenter Server or when the backing storage of a published library is not particularly performant. In this case the mirror server is located as close as possible to the vCenter Server hosting the published library as shown in Figure 4.

Figure 4. Data Mirroring Used to Off-Load vCenter Server
Example of Mirror Server Configuration
This section provides step-by-step instructions to assist a vSphere administrator in the creation of a mirror server using the NGINX web server (other web servers, such as Apache and Lighttpd, can be used for this purpose as well). Please refer to the NGINX documentation for additional configuration details.
- Install the NGINX web server in a Windows or Linux virtual machine to be deployed as close as possible to either the subscribed or the published library depending on the desired optimization (fan-out mitigation or vCenter offload).
- Edit the configuration files. The NGINX default configuration file,
/etc/nginx/nginx.conf, defines the basic behavior of the web server. Some of the core directives in the nginx.conf file need to be changed.- Configure the IP address / name of the vCenter server hosting the published library
proxy_pass https://<PublishervCenterServer-name-or-IP>:443; - Set the valid time for cached files. In this example we assume the contents to be valid for 6 days (this time can be changed as needed):
proxy_cache_valid any 6d; - Configure the cache directory path and cache size. In the following example we use
/var/www/cacheas the cache directory path on the file system where cached data will be stored. 500MB is the size of the shared memory zone, while 18,000MB is the size of the file storage. Files not accessed within 6 days are evicted from the cache.
proxy_cache_path /var/www/cache levels=1:2 keys_zone=my-cache:500mmax_size=18000m inactive=6d; - Define the cache key. Instruct NGINX to use the request URI as a key identifier for a file:
proxy_cache_key "$scheme://$host$request_uri";
When an OVF or VMDK file is updated, the file URL gets updated as well. When a URL changes, the cache key changes too, hence the mirror server will fetch and store the updated file as a new file during a library re-synchronization. - Configure HTTP Redirect (code 302)
handling.error_page 302 = @handler;
upstreamup_servers {
serverPublishervCenterServer-name-or-IP:443;
}
location @handler{
set $foo $upstream_http_location;
proxy_pass $foo;
proxy_cache my-cache;
proxy_cache_valid any 6d;
}
- Configure the IP address / name of the vCenter server hosting the published library
- Test the configuration. Run the following command on the mirror server twice:
wget --no-certification-check –O /dev/null https://<MirrorServer-IP-or-Name>/example.ovf
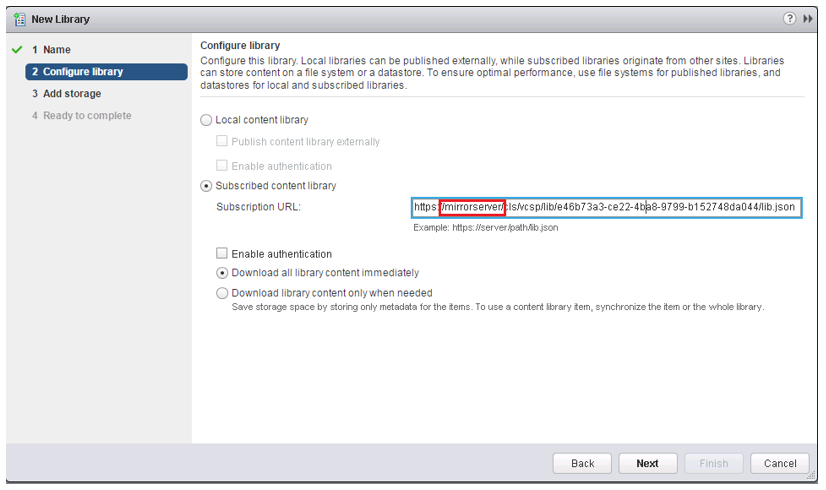
- Sync library content through mirror server. Create a new subscribed library using the New Library Wizard from the vSphere Web Client. Copy the published library URL in the Subscription URL box and replace the vCenter IP or host name with the mirror server IP or host name (see Figure 5). Then complete the rest of the steps for creating a new library as usual.

Figure 5. Configuring a Subscribed Library with a Mirror Server
Note: If the network environment is trusted, a simple HTTP proxy can be used instead of HTTPS proxy in order to improve data transfer performance by avoiding unnecessary data encryption/decryption.


