

by: Director, Platform Services Mehul Patel and Cloud Infrastructure Services Sr. Manger Ashok Raj R D
Suppose a local bakery makes the best cookies, and every time you stroll in, you buy five of your favorites: chocolate chip. While these five cookies are all the same, there are subtle differences, like the number of chocolate chips, basic sizes and shapes, and some might be a bit browner around the edges. These inconsistencies probably don’t bother you in the least—you’ll eat them all and savor every bite.
But for IT environments, subtle inconsistencies can lead to costly system outages, potential security vulnerabilities, data breaches and business revenue loss.
Without configuration management automation, building and maintaining full-stack deployments at scale can be cumbersome and increase the risk of inconsistencies. This can lead to “snowflakes servers,” which are servers that require unique configurations and produce environments that can be expensive to maintain and problematic for keeping track of the workloads being run. These scenarios can cause massive problems when servers need to be replaced, especially for large organizations that support tens of thousands of servers.
Embracing VMware Aria Automation Config™ (formerly known as VMware vRealize® Automation SaltStack® Config) solution helps companies reduce cost, complexity, and errors by ensuring all servers are in a consistent state.
Common VMware Aria Automation Config use cases include:
- Operating system configuration management
- Automated application deployments
- Configuration Drift detection and remediation
- Security compliance enforcement
- Automated OS patching and vulnerability scanning
In this first part of two blogs, we will outline how to install and configure a typical SaltStack Instance so you can deliver the last mile of full-stack automation.
Prerequisites
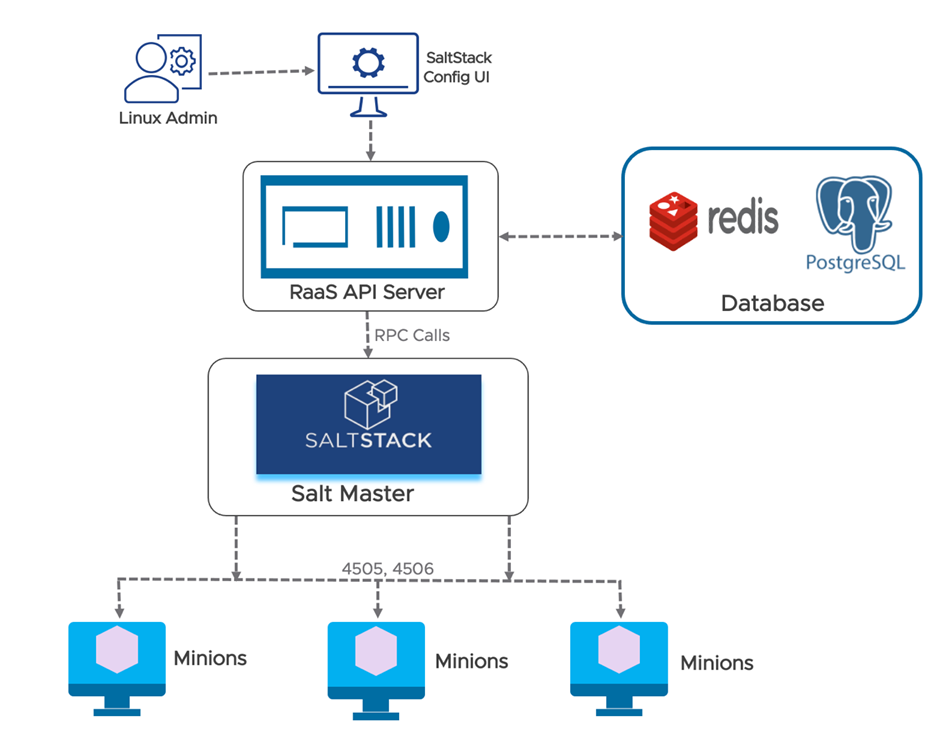
Build four nodes in which you will host four different services (SaltStack Master, RaaS, PostgreSQL DB and Redis Database).
Check the provided details on the system requirements: System architecture requirements. See Figure 1.
SaltStack Config installation steps include:
1. Install these dependencies on all nodes that will host the Salt Master, RaaS, the Redis Database and the PostgreSQL database:
- OpenSSL
- Extra packages for enterprise Linux (EPEL)
- Python cryptography
- Python OpenSSL library
CMD: yum install –y openssl epel-release python36 python36-cryptography python36-pyOpenSSL
2. Configure SaltStack Repo on all the nodes. The command below is for the Red Hat family only.
You can also find the repository information for other OS flavors.
Alternatively, you can use the bootstrap script to install Salt, which automatically installs the correct packages, depending on your OS.
CMD: wget https://repo.saltproject.io/py3/redhat/7/x86_64/latest.repo -P /etc/yum.repos.d/
3. Install Salt-Master and Salt-minion on the Master Node and Salt-minion on the rest of the Nodes.
CMD: yum install salt-master
yum install salt-minion
4. Edit /etc/salt/master in Salt Master and restart Master service.
CMD: sed ‘s/^#interface: 0.0.0.0/interface: <salt-master-ip>/g’ -i /etc/salt/master
systemctl enable salt-master
systemctl restart salt-master
5. Edit /etc/salt/minion in all four nodes and restart Salt Minion.
CMD: sed ‘s/^#master: salt/master: <salt-master-ip>/g’ -i /etc/salt/minion
systemctl enable salt-minion
systemctl restart salt-minion
6. You should see four keys under Unaccepted keys in Salt Master. Accept all four keys. Note all the IP and Minion IDs of all nodes.
CMD: To List the keys: salt-key -L
To Accept all the pending keys: salt-key -A
Confirm keys are accepted: salt-key -L
7. Download the set-up files from VMware Customer Connect portal (requires login credentials) and transfer them to SaltStack Master.
8. Extract the Tar ball setup in /tmp and import the ASC keys in all four nodes.
CMD: tar -xvf vRA_SaltStack_Config-8.X.X.X-X_Installer.tar.gz -C /tmp;
rpmkeys –import /tmp/sse-installer/keys/*.asc
9. Copy Salt and Pillar files from the setup to /srv/salt and /srv/pillar in SaltStack Master.
CMD: mkdir /srv/salt; mkdir /srv/pillar
cp -r /tmp/sse-installer/salt/sse /srv/salt/
cp -r /tmp/sse-installer/pillar/sse /srv/pillar/
cp -r /tmp/sse-installer/salt/top.sls /srv/salt/
cp -r /tmp/sse-installer/pillar/top.sls /srv/pillar/
10. Edit /srv/pillar/top.sls and update the minion-id of all four nodes.
Example:
{# Pillar Top File #}
{# Define SSE Servers #}
{% load_yaml as sse_servers %}
– <Postgresql Node minion-id>
– <Redis Node minion-id>
– <Raas Node minion-id>
– <Master Node minion-id>
{% endload %}
base:
{# Assign Pillar Data to SSE Servers #}
{% for server in sse_servers %}
‘{{ server }}’:
– sse
{% endfor %}
11. Edit /srv/pillar/sse/sse_settings.yaml and only change the places mentioned under <>
Example:
# Section 1: Define servers in the SSE deployment by minion id
servers:
# PostgreSQL Server (Single value)
pg_server: <PostgreSQL Node minion-id>
# Redis Server (Single value)
redis_server: <Redis Node minion-id>
# SaltStack Enterprise Servers (List one or more)
eapi_servers:
– <RaaS Node minion-id>
# Salt Masters (List one or more)
salt_masters:
– <Master Node minion-id>
# Section 2: Define PostgreSQL settings
pg:
# Set the PostgreSQL endpoint and port
# (defines how SaltStack Enterprise services will connect to PostgreSQL)
pg_endpoint: <Postgresql-Node-Ip>
pg_port: 5432
# Section 3: Define Redis settings
redis:
# Set the Redis endpoint and port
# (defines how SaltStack Enterprise services will connect to Redis)
redis_endpoint: <Redis-Node-Ip>
redis_port: 6379
# Section 4: eAPI Server settings
eapi:
# Set the credentials for the SaltStack Enterprise service
# – The default for the username is “root.”
# and the default for the password is “salt.”
# – You will want to change this after a successful deployment
eapi_username: root
eapi_password: salt
# Set the endpoint for the SaltStack Enterprise service
eapi_endpoint: <RaaS-Node-Ip>
12. Refresh the Pillar and Grains after the above changes are made and confirm that the pillar data is correct.
CMD: salt \* saltutil.refresh_grains
salt \* saltutil.refresh_pillar
salt \* pillar.items
13. Apply the highstate, one by one, in the same manner as below.
CMD: salt <postgres-minion-id> state.highstate
salt <redis-minion-id> state.highstate
salt <raas-minion-id> state.highstate
salt <saltmaster-minion-id> state.highstate
14. If the above states are successful, install the license key in RaaS node by entering the license in a file under /etc/raas and open the UI [https://<raas-fqdn>] with default credentials root and salt.
CMD: chown raas:raas /etc/raas/vra_license ; systemctl restart raas
15. Click on Master keys and from the side menu, click Pending to show a list of all pending master keys.
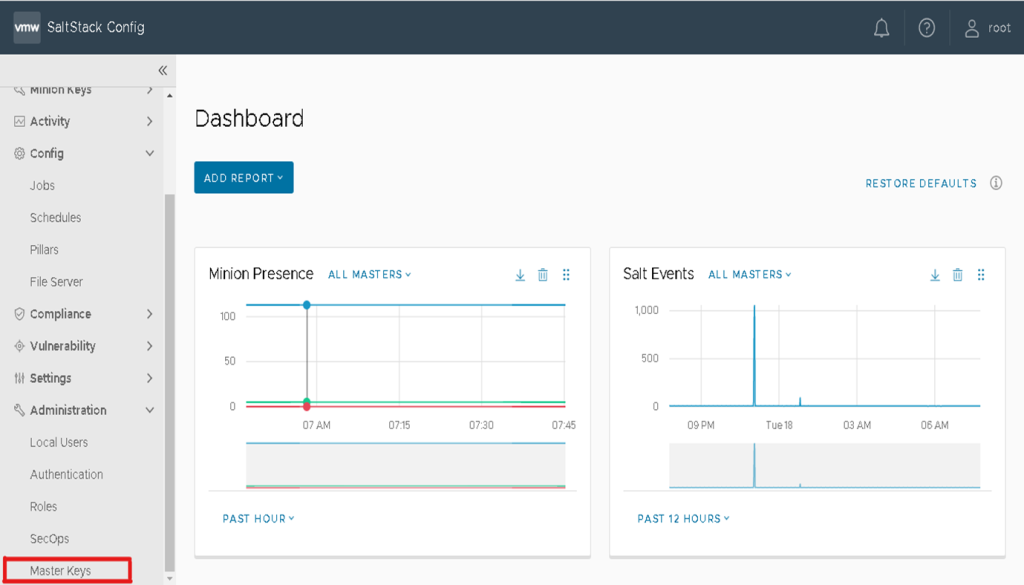
16. Accept the Master key and your RaaS will be able to communicate with Salt Master.
17. Remove the salt and pillar directories created in Step 9.
VMware Aria Automation Config combines the power of Salt with best-in-class infrastructure automation from VMware Aria Automation Config to deliver a complete end-to-end solution for full-stack automation. Our next, and second, of two blogs about VMware Aria Automation Config, will look at Linux OS configuration management of multiple servers.
VMware on VMware blogs are written by IT subject matter experts sharing stories about our digital transformation using VMware products and services in a global production environment. Contact your account manager to schedule a 1:1 briefing on this topic.To learn more about how VMware IT uses VMware products and technology to solve critical challenges, visit our microsite, read our blogs and IT Performance Annual Report and follow us on Twitter. All VMware trademarks and registered marks (including logos and icons) referenced in the document remain the property of VMware, Inc.


