

This is the fourth post in a series about creating a simple 3-tier web application for demo purposes. This updates a series from 2017 to use the latest version of Photon OS at this time. The posts in this new series are as follows:
- Base Template
- db-01a (database tier)
- app-01a (application tier)
- web-01a (web tier) – This post
If you have been following along, you have created the base Photon OS template as well as simple database and application servers.
This section covers the final layer of our stack, the web presentation tier. The configuration of the web server here is really simple, and if you have made it this far, you’re golden.
The Web Server (web-01a)
As you have very well noticed, all hosts in this application run web server software, but this one has the web server designation because it is the one that the user directly accesses. The entire back end could be replaced with real application middleware and an RDBMs, but the user expects this one to present an SSL-encrypted web page on port 443.
This time, I have chosen not to use Apache, and there is no need for Python. There is no CGI, and minimal configuration is required aside from issuing another certificate for SSL.
This tier is mostly interesting because it will support the virtual name of the application in addition to the real name(s) of your web server(s).
The red box in the following diagram highlights the component that we are building in this post.

Once again, the first steps look quite a bit like the steps we performed for the application and database servers as we assign the personality to the template. I will again outline the steps here as a reminder. Details can be found in the post about creating db-01a.
Let’s get started!
- Deploy a copy of the base Photon template you created by following the steps in the Template post.
- Name it something that makes sense to you for your web server. I called mine web-01a
- Power it up and log in as the root user
- Change the hostname in /etc/hostname and in /etc/hosts
- Change the IP address in /etc/systemd/network/99-static-en.network
- Use a SSH client to access the machine as root (this makes pasting possible)
Instead of installing Apache again, we are going to use nginx. You can do the same thing with Apache, but I wanted to try something a little more lightweight and the nginx configuration for this use case is trivial.
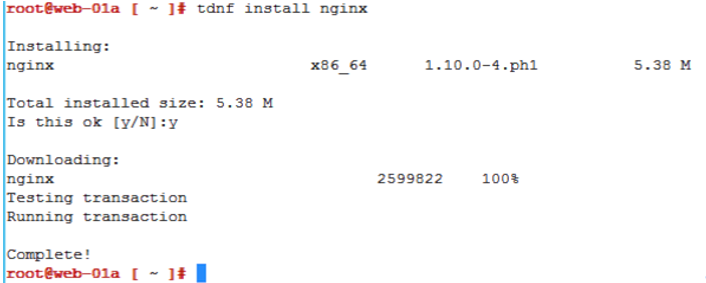
Install nginx to be used as a reverse proxy
The web server machine will function as a reverse proxy, sending user requests bound for port 443 on this server to the application server at https://app-01a.corp.local:8443
# tdnf install nginxThe nginx install is less than 6 MB and takes a few seconds:
Configure the reverse proxy
Edit the configuration file, /etc/nginx/nginx.conf
# vi +116 /etc/nginx/nginx.confAdd the following at the bottom of the file, at line 116, just before the closing “}” in the file.
   # HTTPS server
   #
   server {
      listen 443 ssl;
      server_name webapp.corp.local;

      ssl_certificate     /etc/nginx/ssl/webapp.pem;
      ssl_certificate_key /etc/nginx/ssl/webapp.key;

      ssl_session_cache shared:SSL:1m;
      ssl_session_timeout 2m;

      location / {
         proxy_pass https://app-01a.corp.local:8443/;
         proxy_set_header Host $host;
         proxy_redirect http:// https://;
      }
   }
Many thanks to Gary Hills for catching a change in the nginx configuration file since the original version. In the past, we needed an “ssl on;” directive within the server section. This has since been replaced with the “ssl” text following the port number that is part of the “listen” directive, as above.
UPDATE: September 2023
Notice that we need an SSL certificate and a key to make this work. We have done this before, so let’s create those now.
Create the ssl directory and switch into it
We will just create the certificates in the place that the server expects them to be.
# mkdir -p /etc/nginx/ssl

# cd /etc/nginx/ssl
Build SSL the configuration file
It is common for multiple web servers to be configured in a pool, behind a load balancer. I create the certificate here using a name, webapp.corp.local. If you have a load balancer, this name can be assigned to the load balancer’s VIP. If there is only one web server, as in my example here, this name can also be an alias that resolves to the single web server.
For simplicity, and possibly for other use cases, the certificate configuration we build here includes the names of three web servers: web-01a, web-02a and web-03a.
Create webapp.conf
# vi webapp.confwith the following contents, modified as needed for your environment:
[req]
distinguished_name = req_distinguished_name
x509_extensions = v3_req
default_md = sha256
prompt = no

[req_distinguished_name]
C = US
ST = California
L = Palo Alto
O = VMware
OU = Hands-on Labs
CN = webapp.corp.local

[v3_req]
keyUsage = nonRepudiation, digitalSignature, keyEncipherment
extendedKeyUsage = serverAuth
subjectAltName = @alt_names

[alt_names]
DNS.1 = webapp.corp.local
DNS.2 = web-01a.corp.local
DNS.3 = web-02a.corp.local
DNS.4 = web-03a.corp.local
Save and close the file.
Generate the SSL key and certificate
Note that this is a long command and you may need to scroll to the right to get all of it. Ensure it ends with “webapp.conf”
# openssl req -x509 -nodes -days 1825 -newkey rsa:2048 -keyout webapp.key -out webapp.pem -config webapp.conf(optional) Validate that the PEM file looks correct
I put this command here for those who want to look at the certificate. It is a good command to know in case you have a certificate file and want to know what information it contains. That can help you match the certificate to the proper host without needing to install it and then find out it is not the right one.
# openssl x509 -in webapp.pem -noout -textStart the nginx server and configure it to start when the VM boots
# systemctl start nginx

# systemctl enable nginx
Verify the Configuration
The moment of truth! With the other components (db-01a, app-01a) online, reachable and tested, you can test the whole solution with curl from the console of the web server:
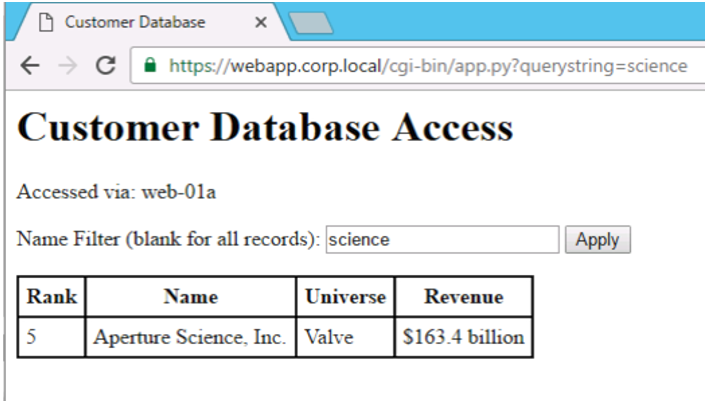
# curl -k https://web-01a/cgi-bin/app.pyThis should return the information from the database in HTML format by executing the script on the application server.
You can filter the results by appending a querystring. Try this one:
# curl -k https://web-01a/cgi-bin/app.py?querystring=scienceThat query should return a single entry with a name containing the word science. It may be difficult to read on the command line since it is HTML. These look nicer via a GUI web browser anyway, and you can modify the filter using the form at the top of the table:
That’s it!
You now have the components of a rudimentary three-tier web application that you can use in your lab. I hope this build has provided some useful tools for you.
In the supplementary posts in the original series, I use this set of VMs and cover a few examples of how to implement a pool of web servers in front of the application and database tier.
Just one more thing
Notice the pretty green lock next to the URL in my web browser in the previous screen shot?
This has gotten a LOT more complicated since 2017 with additional restrictions added by web browsers and operating systems, so your experience may vary and you may need to live with the “broken” SSL connection.
SSL Certificate Trust
In this application, we have a self-signed SSL certificate. It should be created with the name webapp.corp.local, or whatever you selected for your environment. To get rid of the web browser security warnings and have the lovely green lock show up, you need to do two things:
- Configure DNS Records (and use them)
- Explicitly Trust the Self-Signed certificate
Configure DNS Records
The only record you need to create on the client side is one that points to webapp.corp.local, or whatever name you selected to use for accessing your web application.
If you have a Windows-based DNS server, you can create the records using PowerShell.
The following 2 lines create a DNS host (A) record for web-01a.corp.local and then a DNS alias (CNAME) record for webapp.corp.local that points to it. This works if you have an existing corp.local DNS domain
PS> Add-DnsServerResourceRecordA -ComputerName 'dns.corp.local' -ZoneName 'corp.local' -name 'web-01a' -IPv4Address '192.168.120.30' -CreatePtr

PS> Add-DnsServerResourceRecordCName -ComputerName 'dns.corp.local' -ZoneName 'corp.local' -Name 'webapp' -HostNameAlias 'web-01a.corp.local.'
This configuration allows the virtual name webapp to be separate from the web-01a name and enables the addition of other web servers to a pool, followed by the reassignment of the webapp name to a load balancer IP.
[Thank you to Roel San Jose for catching a typo in the above script! – 22 September 2023]
If you don’t have Windows-based DNS server that you want to modify, you can edit your /etc/hosts file on the client(s) or add the DNS records to your nameserver using the procedures required for your environment.
Trust the Self-Signed Certificate
Once you have name resolution knocked out, you need to trust the certificate on your client. You can really trust the certificate, or you can sometimes create an exception in the web browser. Do whichever works for you and makes you happy. Without trust, this is what the connection looks like in Chrome:

In the VMware Hands-on Labs, we download the web server’s certificate to the client machine and add it to the Windows Trusted Root Certification Authorities store or one of the subtrees within Keychain Access on MacOS. That will handle IE and probably Edge on Windows, and Chrome browsers on Windows and MacOS.
If you save the certificate file to your desktop in Windows and double-click it, the bold text pretty much sums up what you need to do.

There are a variety of ways to get this done, and there are some shortcuts, but the process has not changed in many years and this Microsoft Windows Blog article covers a process that works.
Firefox manages its own trust store, so you need to import it separately if you want to use that browser. Check the Mozilla Wiki for detailed instructions about how to do this. Note that newer versions of Firefox have implemented more strict checking. Basically, they refuse to accept a “leaf” certificate that is specified as a Certificate Authority certificate (Excuse me, why is your web server using the CA certificate??) and will not allow a non-CA certificate to be added to its trusted root CA certificate store.
Getting that to look nice in your lab requires additional hoops that are beyond the scope of this article. In the VMware Hands-on Labs, we have a Microsoft CA and issue certificates from there. Since that CA is a “real” CA and trusted by all clients within the environment, it’s all great.
Be sure to check out HOL Three-Tier Application, Part 5 – Use Cases from the original series for some ideas about how to use this app. If you have your own ideas and use cases, I am always interested in hearing about them. You can reach me on Twitter @dobaer or in the comments of this post while commenting is active. If you’d like to fork the project on GitHub, you can find the configuration files for this version up there.
Thanks for reading!


