To help businesses develop generative AI applications securely within their private data centers, VCF Private AI Services is built directly into VMware Cloud Foundation (VCF). This embedded suite of services abstracts away the complexity of AI infrastructure, providing an end-to-end platform that includes a Model Gallery, Model Runtime, Agent Builder, and Data Indexing capabilities for Retrieval-Augmented Generation (RAG), API Gateway, and MCP Tools Registry.
The architectural foundation that powers this platform is the vSphere Supervisor. When configuring the Supervisor for your AI workloads, VCF 9 offers two possible networking stacks: VCF Networking with Virtual Private Cloud (VPC) and vSphere Distributed Switch (VDS).
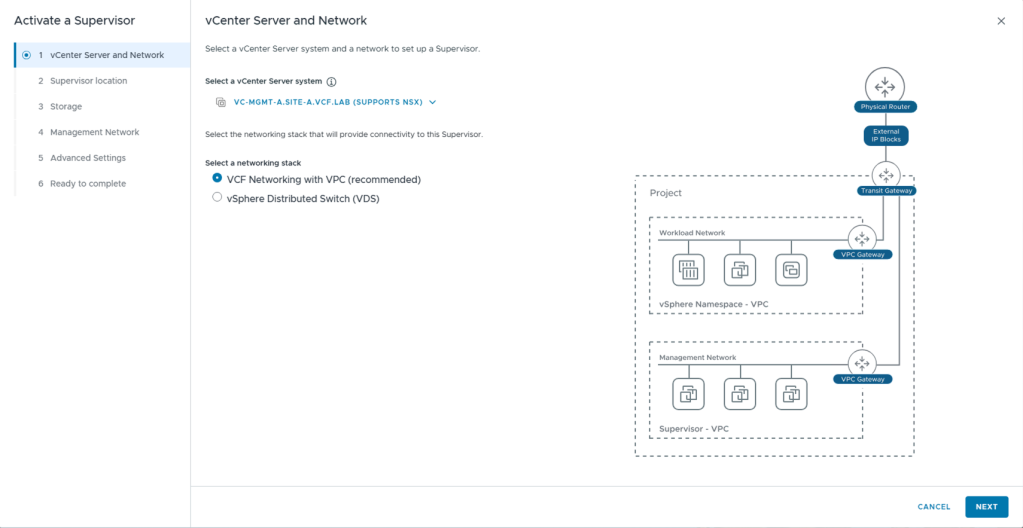
Both approaches provide a robust foundation for VCF Private AI Services, allowing organizations to align their infrastructure with their specific operational readiness. Whether your objective is to launch a streamlined, rapid proof-of-concept or to establish a fully automated, multi-tenant AI cloud for your developers, your networking choice will shape the consumption and scalability of your environment. Let’s explore how the Supervisor enables VCF Private AI Services and the architectural considerations of each model.
The Role of the vSphere Supervisor in VCF Private AI Services
At a technical level, VCF Private AI Services utilizes the vSphere Supervisor to transform your ESXi hypervisors into a native Kubernetes control plane. Activating the Supervisor provides the essential API and resource management layer required to seamlessly install and run your VCF Private AI Services.
(Note: When sizing your Supervisor control plane VMs for Small, Medium, or Large, plan your capacity carefully, as you can only scale the control plane up, never down).
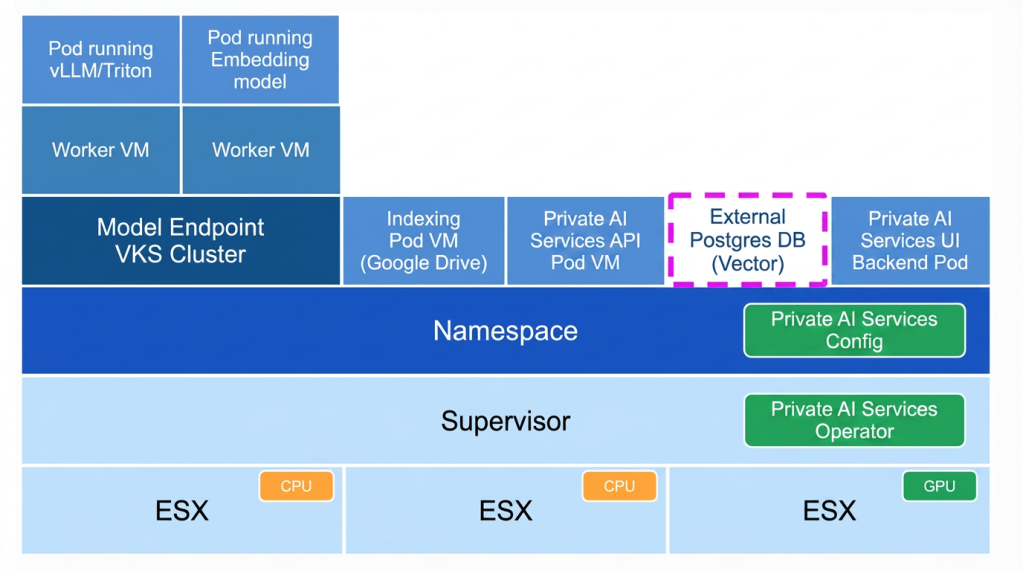
As shown in the architecture diagram above, VCF Private AI Services operates through a declarative Kubernetes model utilizing two key components:
- Kubenertes Operator for the VCF Private AI Services (Supervisor Level): In standard Kubernetes architecture, an “Operator” is a specialized software controller that knows how to manage a complex application. When you install VCF Private AI Services, you are deploying a kubernetes operator for VCF Private AI Services directly onto the Supervisor. It runs continuously in the background, constantly monitoring the environment and acting as the automated intelligence that orchestrates your AI infrastructure.
- Kubernetes Configuration for VCF Private AI Services (Namespace Level): IT administrators carve out secure “vSphere Namespaces” on top of the Supervisor to isolate different AI projects and enforce strict resource quotas. Within a namespace, users apply a kubernetes configuration file, or a “Config,” which is a declarative YAML file that tells the platform exactly what you want the environment to look like. Rather than manually clicking through steps to build a server, you provide this configuration file, and the platform handles the rest.
When the kubernetes operator for the VCF Private AI Services Operator detects a new configuration for VCF Private AI Services, it automatically springs into action to provision the requested architecture within that namespace. It deploys the foundational management pods, such as the VCF Private AI Services API Pod, the UI Backend Pod, and data indexing workers.
For the actual AI inference (shown on the left of the diagram), the operator orchestrates the deployment of underlying vSphere Kubernetes Service (VKS) cluster. The model endpoints run as pods within these VKS Worker VMs, securely attaching to the physical GPUs available on the ESXi hosts below.
(Note the dashed box around the External Postgres DB: This illustrates that while VCF Private AI Services connects to the vector database for RAG workloads, the database itself is provisioned externally as a prerequisite, rather than being spun up by the operator for the VCF Private AI Services).
Supervisor Networking Options
When enabling the Supervisor in VCF 9, administrators must choose a networking stack to provide connectivity to the control plane and your AI model endpoints.
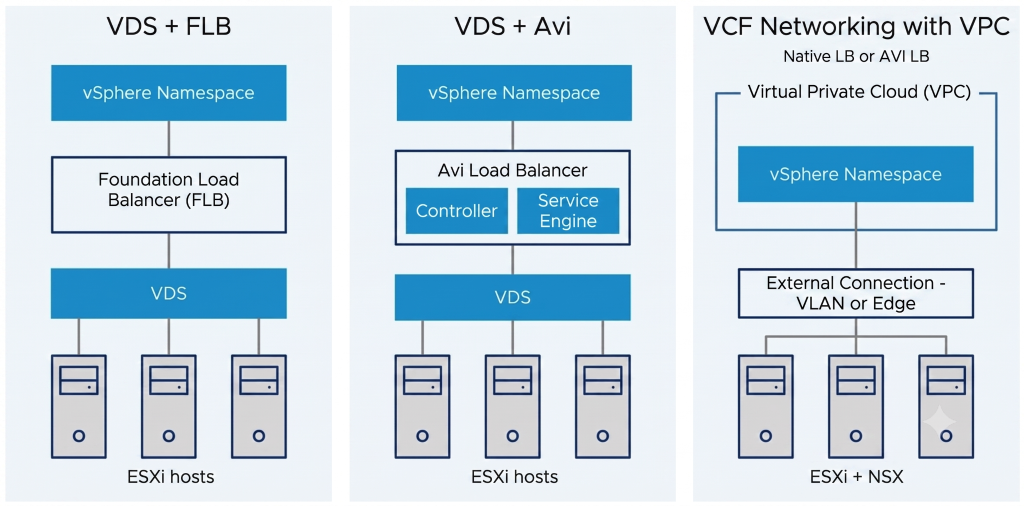
As described above, there are two available networking options:
1. Supervisor Networking with VCF Networking with VPC: This is the most feature-rich topology allowing to consume self-service Virtual Private Clouds (VPCs) for on demand networking and security.
Among other capabilities, it offers self-service networks (both reachable and private), essential network services such as NAT and load balancing, and advanced security features like distributed firewalls. For the Supervisor Cluster, load balancing is provided either natively or through integration with the VMware Avi Load Balancer.
2. Supervisor Networking with VDS: This leverages existing VLAN port groups configured on the vSphere Distributed Switch (VDS) to connect both management components and workloads. Because the Supervisor still requires ingress and egress routing for the Kubernetes API and workload traffic, VCF 9 pairs the VDS with an external load balancer.
For load balancing across these deployments, administrators have options depending on their scale and needs:
- Foundation Load Balancer (FLB): Introduced in VCF 9, FLB is a native, lightweight Layer-4 load balancer that comes packaged directly within the platform. It can be deployed as one or two VMs (in an active/passive high-availability pair). It is designed for simplicity, making it incredibly easy to stand up a Supervisor without deploying external appliances, though it is limited in scale and services.
- VMware Avi Load Balancer: For environments requiring enterprise-grade scale, Avi is the premium option. It requires deploying a separate management control plane (Controller Clusters) and data plane VMs (Service Engines). It provides robust, highly scalable load balancing that can handle heavier AI endpoint traffic and more complex enterprise networking requirements.
(Note: VMware Avi Load Balancer can also be used with VMware VPCs – read more here.)
The Consumption Layer: VCF Automation and Multi-Tenancy
One of the most critical architectural considerations when choosing between the two models (VPC or VDS) is how your users will consume the infrastructure. Both VPC and VDS networking are configurable from vCenter; however, VCF Automation requires Supervisor with VPC networking.
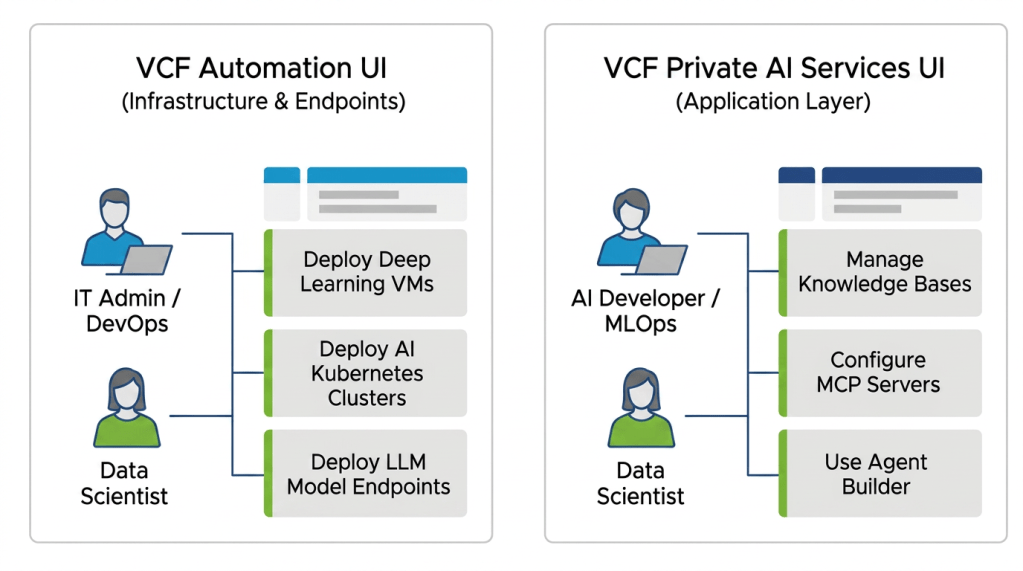
In VCF, VCF Automation is the true consumption layer for the private cloud, delivering robust multi-tenancy, governance, and workflow automation. Through VCF Automation, IT can assign isolated vSphere Namespaces to specific tenants and apply strict resource guardrails (CPU, memory, and GPU quotas). Within these governed environments, data scientists get a self-service catalog to deploy Deep Learning VMs and AI Kubernetes clusters on demand. Furthermore, using the “Build & Deploy” tab in the VCF Automation UI, users can easily deploy LLM model endpoints via a guided wizard.
To enable multi-tenancy and provide IPAM, VCF Automation has a strict dependency on having Supervisor deployed with VCF Networking with VPC. To provide this seamless, multi-tenant self-service experience, it relies heavily on the ability to create multiple Virtual Private Clouds (VPCs) to deploy the applications and define their connectivity.
It is important to understand what this does and does not mean for your users:
- Without VCF Automation (VDS Model): You operate without that overarching multi-tenant consumption layer. Activating VCF Private AI Services on a namespace and deploying the actual model endpoints (the infrastructure layer) must be done manually by administrators using the VCF consumption CLI and YAML manifests (kubectl).
- The VCF Private AI Services UI: Regardless of whether you have VCF Automation, VCF Private AI Services features its own dedicated UI for the application layer. Once the model endpoints are running, users will still use the intuitive VCF Private AI Services UI to add documents for knowledge bases, trigger data indexing jobs, and create agents with Agent Builder.
Architectural Considerations: Pros and Cons
Choosing whether to deploy your Supervisor with VPC or VDS drastically changes your network security, automation capabilities, and infrastructure footprint.
Supervisor with VDS + Foundation Load Balancer
- Pros: This is a simpler, faster path for organizations comfortable with traditional VLANs. The native Foundation Load Balancer makes it incredibly easy to get a non-NSX Supervisor up and running on day zero without deploying heavy third-party appliances.
- Cons: Network provisioning remains highly manual, and the FLB is limited in scale compared to what VPC can provide. Furthermore, this model lacks advanced features like on-demand networks for auto-scaling and micro-segmentation, making it harder to secure sensitive corporate data. Crucially, deploying the Supervisor with the VDS networking stack removes access to VCF Automation, meaning you forgo native multi-tenancy, infrastructure workflow automation, and self-service portals for your users.
Supervisor with VPC Networking
- Pros: This architecture delivers complete automation, robust security, and a premium self-service experience. Consumable from both vCenter and NSX, it provides a modern VPC model that enables self-service networking and deep micro-segmentation to securely isolate training data. It offers advanced features like VPC Connectivity Policy for granular routing control (see blog), cloud consumption via VCF Automation, and native IP Address management integrated with Infoblox (see blog). Ultimately, this model brings true multi-tenancy, robust governance, and an intuitive self-service portal for data scientists to provision their own infrastructure.
- Cons: This model carries a slightly heavier infrastructure footprint because it requires at least one NSX Manager, even if consumption occurs entirely within vCenter. In previous versions, routing through Edge Node VMs introduced an extra network hop and a steep learning curve for teams unaccustomed to advanced network architectures.
However, starting with VCF 9.1, the Supervisor with VPC can leverage a distributed VLAN connection, which removes Edge Node requirements and complex fabric routing. In this updated model, load balancing and network services are provided out-of-band by Virtual Network Appliance VMs (see blog).
Planning for the Future: Evolving Your Network Architecture
VCF is designed to give you choices, allowing you to deploy VCF Private AI Services on the networking stack that best aligns with your current operational readiness.
If you start with the VDS model, you may eventually decide to transition to full VPC networking to unlock the advanced multi-tenancy and self-service capabilities of VCF Automation. As of VCF 9.1, because VDS and VPC utilize fundamentally different networking fabrics (physical VLAN-backed port groups versus software-defined subnets), transitioning between the two involves a planned redeployment of the Supervisor rather than a simple configuration change.
By carefully evaluating your long-term goals for AI automation and security, you can choose the architecture that best sets your teams up for success from day one, ensuring your infrastructure is ready to scale smoothly alongside your AI initiatives.
Conclusion
VCF provides the flexibility to tailor your VCF Private AI Services environment to your organization’s immediate needs and long-term goals. While the VDS and Foundation Load Balancer model offers a streamlined path to get AI endpoints running quickly, deploying the Supervisor with VPC networking unlocks significantly more capabilities. From enabling granular VPC Connectivity Policies directly within vCenter to harnessing the full power of VCF Automation, this advanced model delivers the robust security, multi-tenancy, and self-service experiences required for a mature AI cloud.
As you plan your Private AI deployment, consider not just your current networking footprint, but how your data science teams intend to consume infrastructure in the future. By carefully evaluating these architectural models today, you can build a secure, scalable foundation that empowers your developers to innovate with generative AI.
Useful Links
- VCF Private AI Services Release Notes
- vSphere Supervisor Load Balancer Models
- vSphere Supervisor Detailed Design
- VCF Networking 9.1 – Exploring network services for virtual private clouds
- VCF Networking 9.1 – Simpler VPC Connectivity Control
- From Infrastructure to Agents: A Hands-On Guide to Secure Private AI with Broadcom
Discover more from VMware Cloud Foundation (VCF) Blog
Subscribe to get the latest posts sent to your email.