With the recently-introduced VI/JSON wire protocol, it is now easier to automate vCenter-related workflows via tools supporting REST-like communication. This post presents several basic API calls to get you started.
- Service instance content retrieval
- Login
- Datacenter creation
- Connecting ESXi host
We demonstrate the API calls using simple curl commands. The same can be achieved with any tool supporting HTTP and JSON, like Postman, Python, PowerShell, etc. The API calls are ordered to feed data from one into the next forming a simple script.
The example API calls utilize Managed Object Classes and Managed Object References, integral to VI/JSON API. Please refer to the vSphere Web Services SDK Programming Guide (8.0U1) for more details about interacting with the vSphere API(s). Additionally, check out the VI/JSON API documentation and the OpenAPI specification available at – Virtual Infrastructure JSON OpenAPI Specification 8.0 U1.
Service instance content retrieval
Acquiring the service instance content is necessary for gaining access to vSphere manager entities and to the root folder of the inventory:
|
1 |
curl https://$VC/sdk/vim25/8.0.1.0/ServiceInstance/ServiceInstance/content |
The response contains numerous manager entity references, such as:
|
1 2 3 4 5 |
"sessionManager": { "_typeName": "ManagedObjectReference", "value": "SessionManager", "type": "SessionManager" } |
the root folder is also present:
|
1 2 3 4 5 |
"rootFolder": { "_typeName": "ManagedObjectReference", "value": "group-d1", "type": "Folder" } |
Users should save reference values necessary for their workflows.
Login
Users must pass a valid session ID to invoke privileged (non-anonymous) API operations in the VI/JSON API. The session ID can be obtained using one of the many Login methods in SеssionManager. We use the simplest Login method via username and password. Note that the SessionManager segment is repeated, because the SessionManager’s particular identifier (obtained from the previous step) is also ‘SessionManager’:
|
1 2 3 |
curl https://$VC/sdk/vim25/8.0.1.0/SessionManager/SessionManager/Login \ -H 'Content-Type: application/json' \ -d '{"userName":"placeholder","password":"placeholder"}' -i |
Successful responses will be similar to the following:
|
1 2 3 4 5 6 7 8 9 10 11 12 13 14 15 16 17 18 19 20 |
HTTP/2 200 content-type: application/json date: Mon, 27 Mar 2023 11:45:08 GMT vmware-api-session-id: d8fb77fe50409e4dcf6bcbb2d84b5d37a1b788e9 x-envoy-upstream-service-time: 45 { "_typeName": "UserSession", "key": "52ec03f2-dcce-802f-cac5-5710e1e24ca3", "userName": "VSPHERE.LOCAL\\Administrator", "fullName": "Administrator vsphere.local", "loginTime": "2023-03-27T11:45:08.861224Z", "lastActiveTime": "2023-03-27T11:45:08.861224Z", "locale": "en", "messageLocale": "en", "extensionSession": false, "ipAddress": "placeholder", "userAgent": "curl/7.58.0", "callCount": 0 } |
Please take note of the vmware-api-session-id header, as it will be required for authenticating follow-up requests.
Datacenter creation
Creating datacenter requires providing authentication:
|
1 2 3 4 |
curl https://$VC/sdk/vim25/8.0.1.0/Folder/group-d1/CreateDatacenter \ -H 'Content-Type: application/json' \ -H "vmware-api-session-id: d8fb77fe50409e4dcf6bcbb2d84b5d37a1b788e9" \ -d '{"name": "JSON Datacenter"}' |
Note that the root folder ID, acquired in the service content retrieval step, is utilized as a path param.
Successful responses will be similar to the following:
|
1 2 3 4 5 |
{ "_typeName": "ManagedObjectReference", "value": "datacenter-8", "type": "Datacenter" } |
Connecting ESXi host
Connecting the ESXi host is a 2-step process (or 3, including the Task status retrieval):
Obtaining the newly created data center’s host folder. Note the datacenter ID in the path:
|
1 2 |
curl https://$VC/sdk/vim25/8.0.1.0/Datacenter/datacenter-8/hostFolder \ -H "vmware-api-session-id: d73d5cd7794080ba0014c098575aa1c2b585b894" |
On success, record the host folder ID:
|
1 2 3 4 5 |
{ "_typeName": "ManagedObjectReference", "value": "group-h10", "type": "Folder" } |
Invoke the host folder’s AddStandaloneHost operation. Input to the operation is a HostConnectSpec data object populated with ESX credentials:
|
1 2 3 4 5 6 7 8 9 10 11 12 13 14 |
curl https://$VC/sdk/vim25/8.0.1.0/Folder/group-h10/AddStandaloneHost_Task \ -H 'Content-Type: application/json' \ -H "vmware-api-session-id: d73d5cd7794080ba0014c098575aa1c2b585b894" -d @- << EOF { "addConnected": true, "spec": { "_typeName": "HostConnectSpec", "hostName": "placeholder", "password": "placeholder", "force": false, "userName": "placeholder" } } EOF |
Note the operation has a _Task suffix, meaning it is async and managed via a Task. The return type is a reference to the task object:
|
1 2 3 4 5 |
{ "_typeName": "ManagedObjectReference", "value": "task-198", "type": "Task" } |
Acquiring information about the task is done via its info operation:
|
1 2 |
curl https://$VC/sdk/vim25/8.0.1.0/Task/task-198/info \ -H "vmware-api-session-id: d73d5cd7794080ba0014c098575aa1c2b585b894" |
The "AddStandaloneHost” operation will take some time. Therefore, a busy loop or a timeout is needed to await the task termination. (More on this in the Postman example).
Postman
Setup
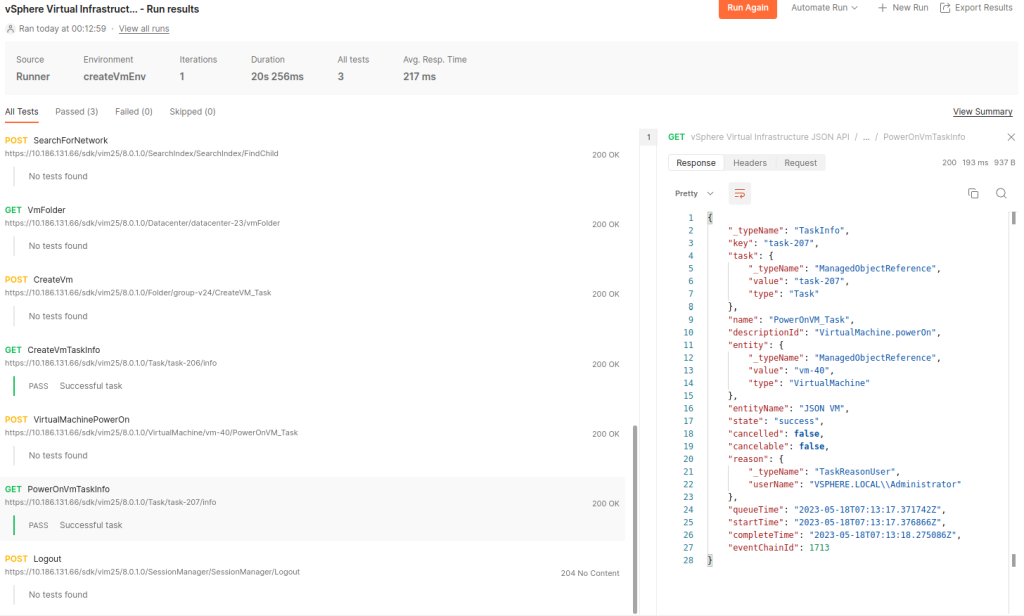
An extended example is available as a Postman collection involving further:
- Virtual machine creation
- Virtual machine power-on
- Logout
Download and import the collection in Postman via the “File > Import” button.
Select it and open the “Variables” tab after importing the collection. Ensure you fill in the “Initial Value” column – prerequisites are a vCenter Server, an ESXi host, and their login credentials.
For further information regarding the collection or its requests, refer to the documentation in the Collection. Documentation is accessible from Postman on both the Collection and Request levels from the UI’s Documentation icon on the top right.
Running the Collection
Once the prerequisite “Initial Value” column is filled in the Variables tab, the collection is ready for execution. Hit on the “Collections > Run” button, and don’t forget to check “Persist responses for a session” to obtain and examine responses. The result should be similar to:

This blog post is part of a series with examples that examine the protocol in depth.
Follow us on Twitter @VMware_API_team and send us any feedback.


