

A year ago, we introduced the vSphere Mobile Client app in this blog post, since then, we have added more features and improved on many of the existing capabilities of the app. Let’s walk through some of the new and exciting features. The app is freely available for download from the Google Play Store and the iOS App Store.
Connect to vCenter on VMware Cloud
One of the goals of VMware’s Multi-Cloud strategy is to enable customers to choose any cloud and have access to a consistent infrastructure for deploying applications. With that goal in mind, we have introduced a new feature which allows the users to choose to connect to both On-Premises and VMware Cloud deployment. Now the users can access and monitor the resource usage statistics and important events happening on both their On-Premises and VMware Cloud environment.
How it works ?
Once you open the app, a vCenter Location Selection screen will be shown.
- Tapping on the
VMware Cloudshows the cloud login page, here the user can enter the email address and password. Once authenticated, the user has to select the Organization and the SDDC (Software Defined Data Center) to view the Dashboard of the cloud vCenter server. - Selecting
On-Premiseshows the usual login screen where the user credentials for on-premises vCenter can be entered. You need a VPN connection to the vCenter Server in order to log in if you are not on the same network as the server.
There is an option to remember the server, so that next time the user opens the app, a vCenter server selection page will be shown where the saved vCenter server can be found. There is also the biometric authentication feature to configure the fingerprint/face-id at first login with the vCenter password and in subsequent logins, the user will be able to login using the fingerprint/face-id without entering the password.
Access to ESXi host
Access to ESXi host is also supported using the On-Premises location selection. The users can login using the host user credentials.
Know your environment
Get a quick summary of your environment using the Dashboard view, the details shown include,
- Summary of the total usage of the CPU, Memory and Storage.
- Number of hosts connected, disconnected and in maintenance mode.
- Number of powered on, powered off and suspended VMs.
- Objects with most alerts section, where you can see the various objects and the number of alerts and warnings on them.
Apart from these information, we have introduced the new Datastores card showing the number of VSAN, VMFS and other types of datastore. You can also tap on an object in the alerts card to directly navigate to that object’s detail page where you have more details on the alerts and warnings.
Interact with the vm console
Tapping on the VM screenshot in the VM list view takes you to the VM console view where the live console is shown, you will see a certificate dialog popup, tap continue to connect to the live console.
We have made it easy to interact with the live console by using the extended keyboard or the built-in OS keyboard. The extended keyboard will have special keys like Function keys (F1, F2,…), control keys, windows key, etc. You can switch the keyboard type by tapping on the keyboard icon at the top right or you have the option to disable the Extended keyboard in the Settings view.
Explore hosts and clusters
Checking about a host’s connection status or maintenance mode status is easy with the Hosts view. It shows the list of hosts, in each host card, you can find details like resource usage, connected or maintenance mode status, issues indicator, related objects with or without issues like the number of VMs with issues shown in red.
We have introduced a new Issues feature in the host details page where you can view the issue description and acknowledge the issue. Tapping on a host card takes you to the details view where you can find more details like ESXi version, processor type, etc.
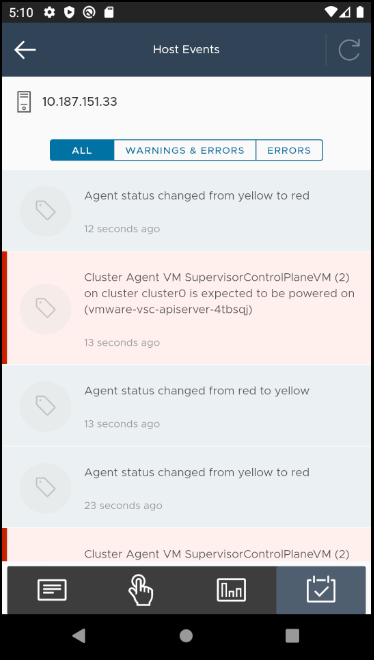
Now you can filter the events based on severity by tapping on the filter at the top in the events tab. Scroll to the bottom to load more events.
You can easily check which clusters have Distributed Resource Scheduling (DRS) or High Availability (HA) enabled in your environment using the Clusters view.
It shows the list of clusters, here in each cluster card, we have important info like vMotion, DRS, HA, etc. Tapping on a cluster card, will show the cluster details like resource usage, vSphere DRS status, Migration automation status and threshold, power management automation, etc. Tap on the issues in the details page to check the issue description and acknowledge the issue.
Datastores
Let’s say there is a triggered alarm warning you about datastore disk usage or a change in datastore capabilities, wouldn’t it be nice if you can check the details of the datastore concerned and the issues ?
Now you can do that with the new Datastores view, you can check the details of the datastore like type, issues, usage, location path and thin provisioning by tapping on a datastore card from the list of datastores. You can also acknowledge the issues in the details page.
Keep tabs on the tasks
You can monitor the status of your long running tasks or scheduled tasks like VM power off using the Tasks view. It shows the list of recent tasks with live refresh of their progress. Tapping on a task shows the details page with more info like initiator, description, start time, completion time, queue time, etc. You can subscribe to any running task and receive a notification on your mobile device upon task completion.
Monitor the events
You can monitor all the events happening in your environment using the Alarms & Events view. Each event is shown with its description and the timestamp. We have introduced a new filter feature using which you can now choose to see only the errors or warnings, apart from all events, by tapping on the severity tabs at the top. Tap the refresh icon to load new events and scroll to the bottom to load past events based on the severity selected.
Set your preferences
On the Settings view, you can configure the notification appliance to get real time notifications. The procedure to install and configure the appliance can be found in the Instructions section in the flings page. You also have the option to switch between extended keyboard and the built in OS keyboard. Finally you can opt in or out of the Customer Experience Improvement Program (CEIP) by toggling the switch.
Let us know your thoughts
We greatly value your feedback. We actually decide on new features and improvements to the app based on your feedback. There is a feedback card at the bottom of the dashboard, you can tap on the emoticons and write to us. You can also reach us through the comments section in the VMware Flings page.


