Planning is essential to successfully react in the event of a disaster or while migrating workloads to a Provider site.
Automating as many steps as possible while lowering the number of manual iterations plus the option to perform a dry run gives customers extra confidence that their workloads are in safe hands.
To cover all that, VMware Cloud Director Availability 4.3 presents the DR and Migration Plans. This new feature will help Providers and their tenants define the exact steps to perform during failover or migration.
There is a new menu called Recovery Plans where both DR and Migration plans can be created. Even though tenants can also access this menu, it is not available in the VMware Cloud Director Availability Plugin for vSphere but only in the VMware Cloud Director Availability Portal.
DR Plans
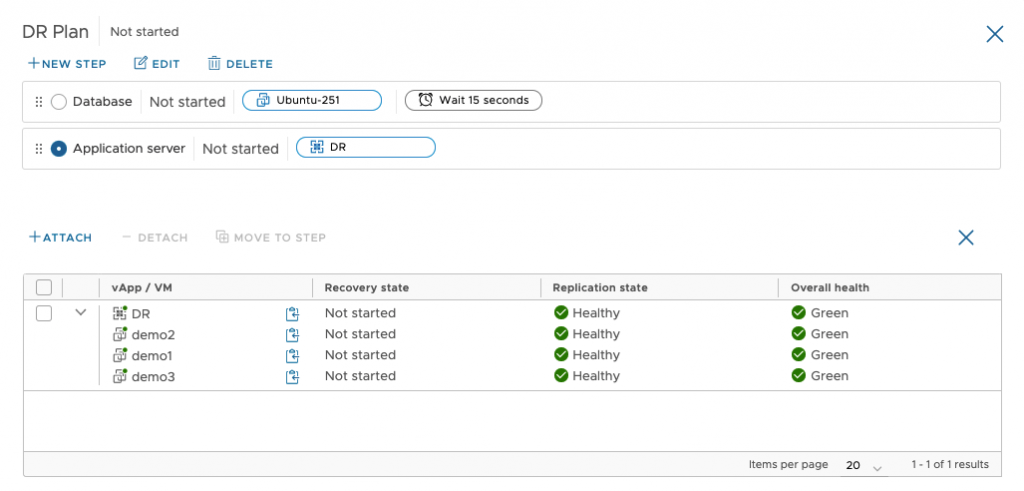
After successfully configuring the workload protections, you can define a DR Plan with their exact failover sequence, waiting times between the different steps, and user confirmation prompts when there is a need for manual validation of the completion of the previous action.
The starting point of building a new DR Plan is navigating to the Recovery Plans menu and clicking on New Recovery Plan. After giving it a name, the plan is created, and we can start adding steps.
At each step, we can select one or many VMs belonging to the same or different vApps. Also, we can pick a vApp that will add all its VMs to the step. VMs and vApps can be included only once within a DR plan, but they can be part of more than one plan.
Before starting the plan, we can change the steps, add/remove VMs/vApps or move them to another step. This cannot be done once the failover operation is started.

Note: If we have selected a vApp within a DR Plan step and later on we add more VMs to this vApp, they will be automatically added to this step. However, the newly added VM will not be included in the step if we select all the VMs from a vApp instead of the vApp itself.

After the plan is defined, the available options are to test it or perform a failover directly.
The test action will simulate the failover, synchronize the workloads with the target Cloud and power them on without affecting the source site. It is highly convenient for verifying that the protections and the plan itself are suitable for failover.

While the test failover is running, its progress can be monitored by clicking the Monitor tasks button. It leads the user to the Replication Tasks menu with a filter pre-applied to show only the relevant tasks for this DR Plan.

There is an option of suspending a running plan which will wait for finishing the currently running step before pausing. When it is suspended, only the not yet executed steps can be modified.
After the test results are confirmed, the workloads can be cleaned-up from the Cloud site with a single click of the Test Cleanup button.

Once the Failover is performed successfully, the plan is no longer available for modifications, testing, or execution. However, it can be cloned to a new DR Plan, which is manageable again.

Migration Plans
The whole process of configuration, testing, and execution described for the DR Plans is also valid for the Migration Plans.
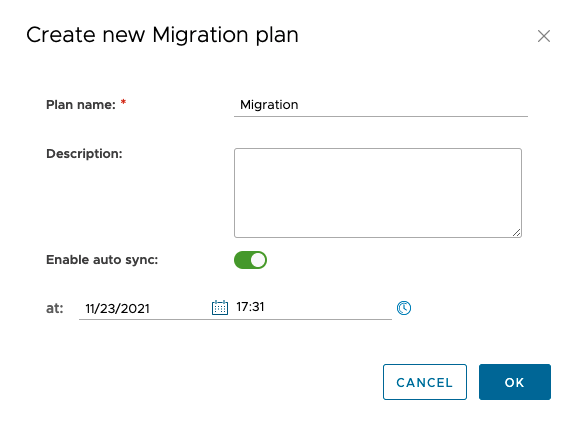
They are created in the same menu – Recovery Plans. The definition is similar with only one slight difference – you can set auto-sync time, which will synchronize the workloads with the Cloud site based on the defined date and time to reduce the actual migration duration when the Migration Plan is started.

Note: For both DR and Migration Plans to run smoothly, at least one synchronization with the Cloud site must have finished already. Otherwise, it will result in an error during the plan execution.
You can see more about the DR and Migration Plans in this video.
Remember, to get the latest updates, check this blog regularly, you also can find us on Slack, Facebook, Twitter, LinkedIn as well as many demo videos and enablement YouTube, especially our Feature Fridays series!


