Nico Vibert cross-post series part 4 | Discover the benefits of VMware Cloud Marketplace and how easy it is to deploy third-party software with VMware Cloud on AWS. Also, learn how the Bitnami acquisition led to the validation and availability of a wide range of new applications on our marketplace.
Original was posted here.
This post will walk through the VMware Cloud Marketplace, Bitnami and VMware Cloud on AWS.
One of the most underrated aspects of the success of AWS EC2 is the ease at which customers can deploy 3rd party software onto their platform via the AWS Marketplace. Based on the latest data I’ve come across, the AWS Marketplace had over 200,000 customers, over 1,400 ISVs and over 650 millions hours of EC2 deployed monthly.
I have actually used it on previous occasions for blog posts, for my Transit VPC tests, to deploy a Splunk instance or to use FlowMon (an IPFIX collector), for the IPFIX section in the VMware Cloud on AWS Networking book.
Unsurprisingly, we (VMware) also recently launched our own marketplace (appropriately called VMware Cloud Marketplace), which will work with VMware Cloud on AWS but also vCloud Director (vCD)-based deployments.
And one of the ideas behind the recent acquisition of Bitnami was to add a ton of validated and packaged applications to our VMware Cloud Marketplace.
Ultimately, as VMware transitions to an As-A-Service model, it should help our customers consume their vSphere infrastructure faster and make it easier for our partners to offer their software.
Let’s have a look at how it works.
First, the VMware Cloud Marketplace is one of the VMware Cloud Services. Go to cloud.vmware.com and log on to the console.

Select VMware Cloud Marketplace and you’ll see a list of applications that you can easily consume:

What about if we deploy the online learning open-source software Moodle:

Once you select the Moodle Virtual Appliance, you can see the couple of options on the top-right corner. “Download” downloads the OVA while “Subscribe” lets you add it to your VMware Cloud on AWS SDDC Content Library.

Once you select “Subscribe”, you are asked to select which version you want to install and for which platform (VCD, VCD on-prem or VMC):

Select the SDDC where you’re going to deploy the Content Library and enter your vCenter credentials:

Select the WorkloadDatastore:

Confirm you’re happy with the configuration:

Accept the EULA and finish the subscription.

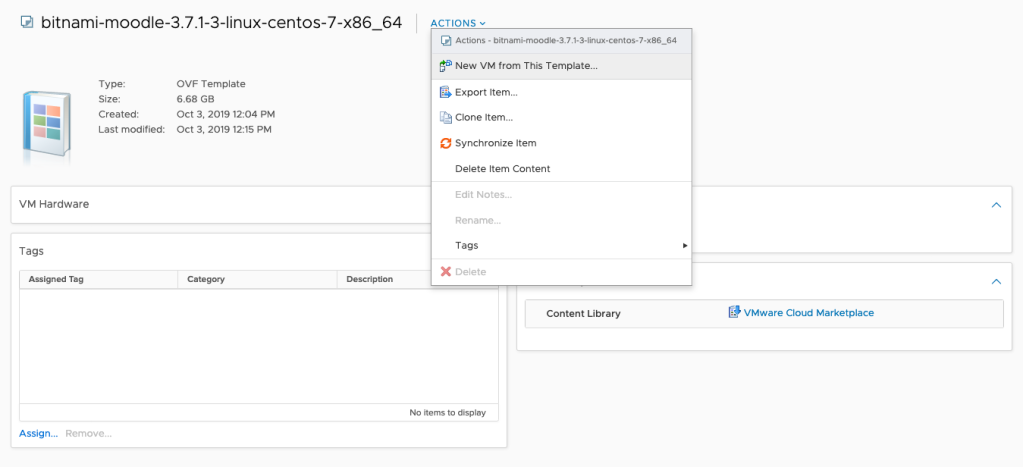
Within seconds, you will see the “VMware Cloud Marketplace” Content Library in your SDDC and you can go ahead and deploy the app.

Deploy a VM from the template as you would do for any OVA template:

Follow the standard deployment steps and boot up the VM. If you’ve never used Bitnami, you need to be aware that the default VM credentials are not always obvious to find. It’s explained in this link. Once you boot up the VM, you can see the default credentials for your app:

As you log on, you’re forced to reset your password. Let’s finish off by showing off very quickly how I can make my Moodle accessible over the Internet.
I’ve covered it before in a couple of posts (this oneand this one) but it’s always worth a reminder.
As you can see in the picture above, the private IP address of the Moodle is 172.30.117.17. Let’s request a public IP (remember – it’s chargeable).
Go to the VMC Networking and Security Console and System / Public IPs:

In a couple of seconds, you’ll get a public IP.

Go to Network / NAT and create the appropriate NAT rule (for me, it’s simply to match HTTP traffic from 3.124.62.184 to 172.30.117.17).

Finally, set up a firewall rule on the Compute Gateway to allow HTTP traffic to the selected VM and you’re good to go.

And we’re connected to our Moodle over the Internet.

Last thing – all my applications subscriptions can be found back on the VMware Cloud Marketplace. Most of the stuff on the marketplace is free but there are also 3rd party applications (Checkpoint, Druva, TrendMicro, Puppet) where you need to bring your own license.

As you can see – the whole application deployment process has been made pretty painless by leveraging the VMware Cloud Marketplace, its packaged open-source applications from Bitnami and the intuitive VMware Cloud on AWS networking configuration.
Thanks for reading.


