

VMware Cloud Foundation (VCF) offers a comprehensive suite of software-defined services, enabling enterprises to build reliable and efficient cloud infrastructure with consistent operations across diverse environments. The latest addition to this platform is VCF Private AI Services, a secure set of services for deploying AI applications using models and data sources.
VCF Private AI Services integrates with VCF Automation to provide a simplified, cloud-like experience that allows users to deploy models into production easily, often within minutes. For instance, the workflow for deploying model endpoints is available in the VCF Automation UI, as shown below.
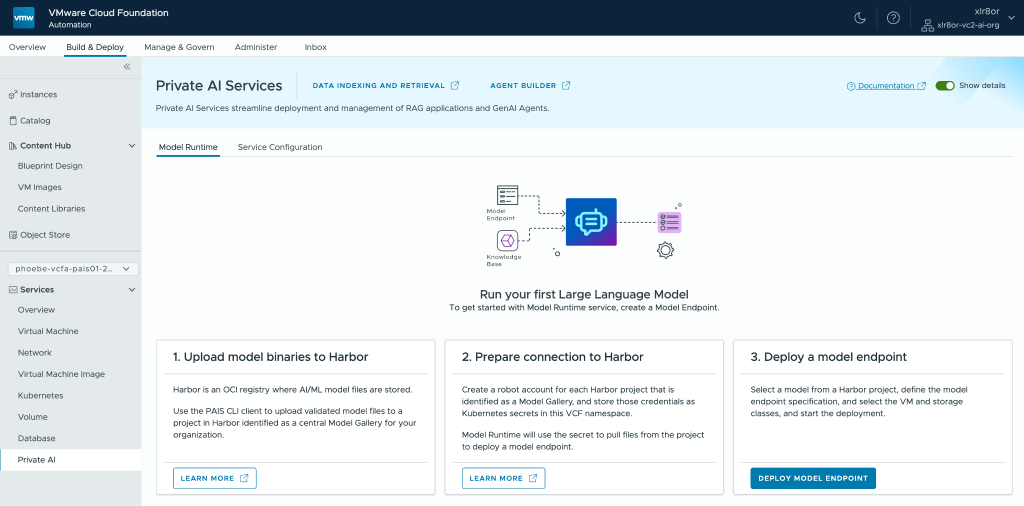
Without VCF Automation, deploying model endpoints to a namespace would require using VCF Consumption Command Line Interface (VCF Consumption CLI) and kubectl.
Although VCF Automation greatly simplifies the user experience for VCF Private AI Services, the platform remains accessible even in environments that have not yet fully adopted VCF Automation. This blog will guide you through how to deploy VCF Private AI Services within a VCF environment where VCF Automation has not yet been configured.
Deployment Workflow Overview
This outlines the deployment process for VCF Private AI Services in a VCF environment where VCF Automation is not yet in use:
- Install Private AI Services on the Supervisor.
- Create a namespace through the vSphere Client.
- Prepare NVIDIA configmap and secret.
- Prepare trust bundles for Private AI Services.
- Prepare Private AI Services configuration YAML file.
- Create a context for the namespace using VCF Consumption CLI.
- Activate Private AI Services on the namespace.
Once VCF Private AI Services is activated on a namespace, you can push models to the Model Store and deploy Model Endpoints via kubectl.
Prerequisites
To follow along with this guide, you will need:
- VMware Cloud Foundation 9.0.0 or later
- GPU-enabled ESX hosts with NVIDIA vGPU host drivers (including appropriate NVIDIA vGPU licensing)
- Single-zone Supervisor enabled for a vSphere cluster with GPU-enabled ESX hosts
- Harbor registry
- Hugging Face CLI
- PostgreSQL Database with pgvector extension
- OpenID Connect Identity Provider (OIDC IdP)
For a more detailed list of prerequisites for deploying VCF Private AI Services, please refer to the official documentation.
Deploy VCF Private AI Services
1. Install Private AI Services on the Supervisor
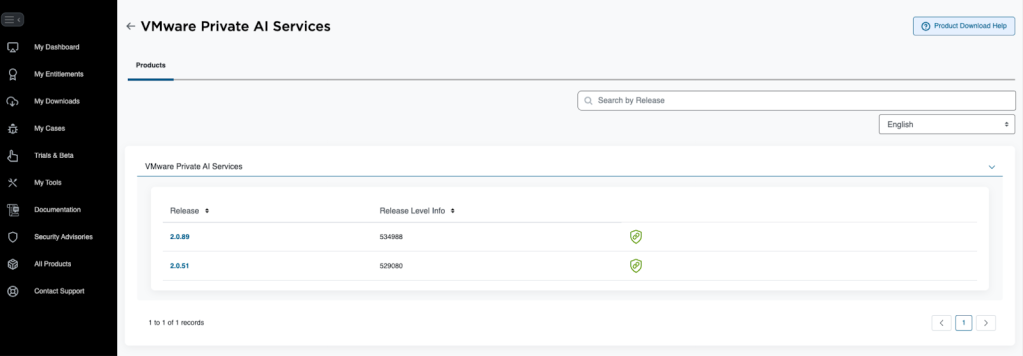
We first need to download the YAML definition file for Private AI Services from the Broadcom Support Portal. Find VMware Private AI Services and click on the release version you want.
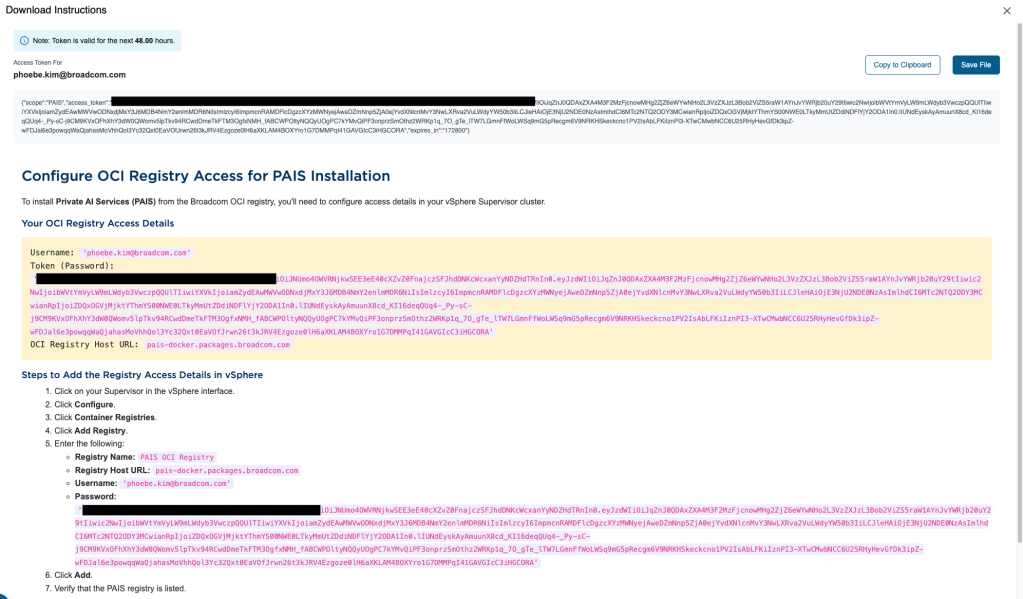
To get your OCI registry credentials, click the green badge icon next to the release version. Follow the instructions given to add the registry to the Supervisor via vSphere Client.
Once the registry is added, you can follow the official documentation to install Private AI Services by leveraging the Private AI Foundation workflow available in the vSphere Client.
Alternatively, you can install Private AI Services directly using Supervisor Management with the following steps:
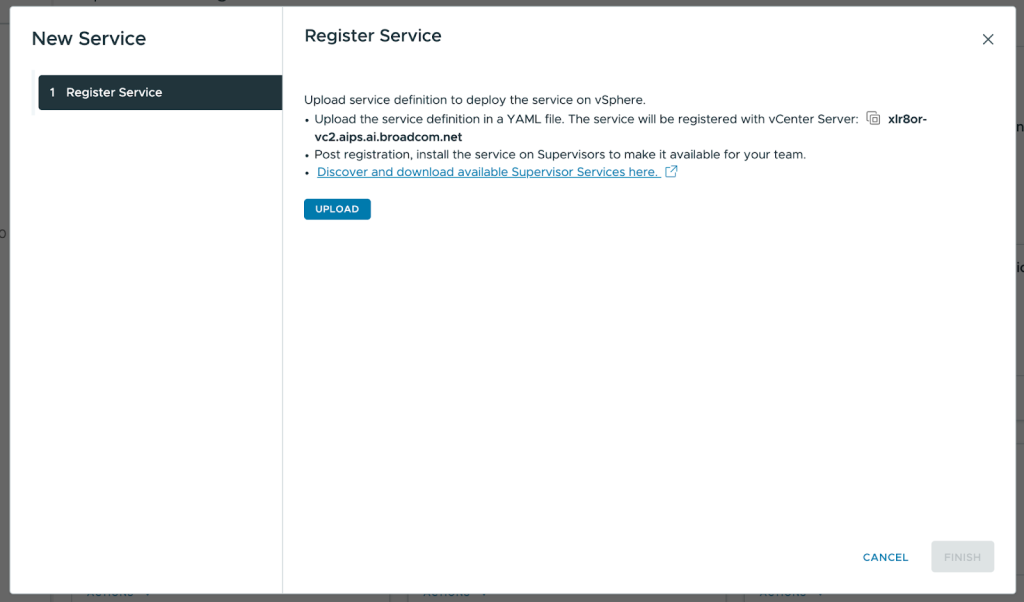
- Navigate to Supervisor Management in the vSphere Client. Under Services, click Add under Add New Service.
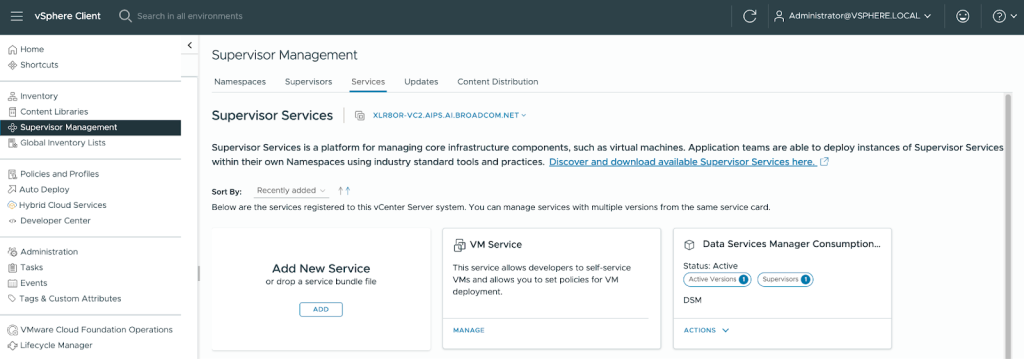
- Upload the Private AI Services YAML file to register the service then click Finish.
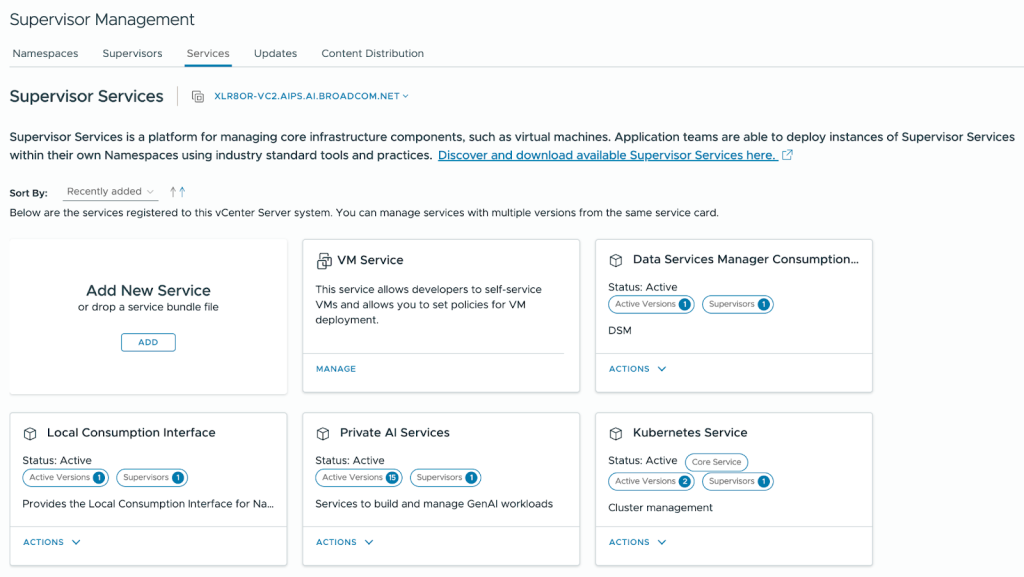
- Once the new Private AI Services card appears, click Actions then Manage Service.
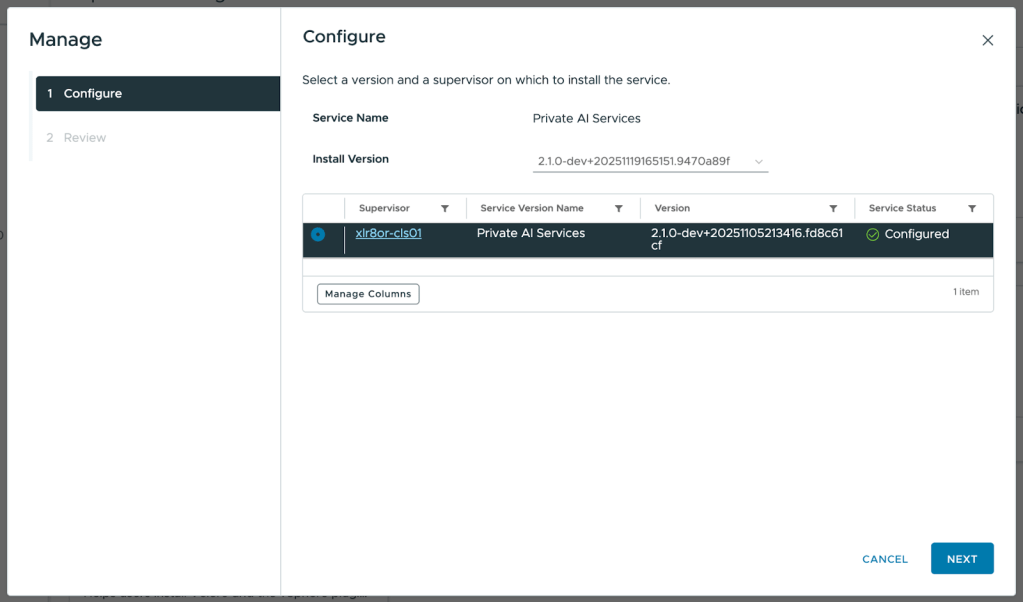
- Select the Supervisor then click Next. Leave the YAML Service Config blank and click Finish.
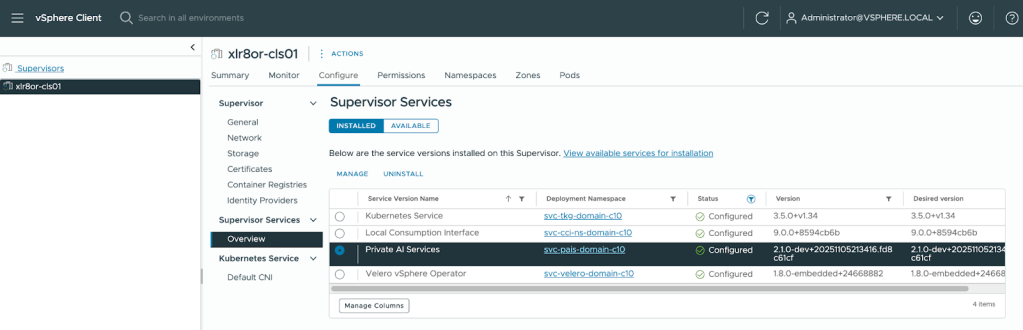
- To check that the installation has been successful, navigate to the Supervisor. Under Configure, select Overview under Supervisor Services. Private AI Services should display “Configured” under the Status.
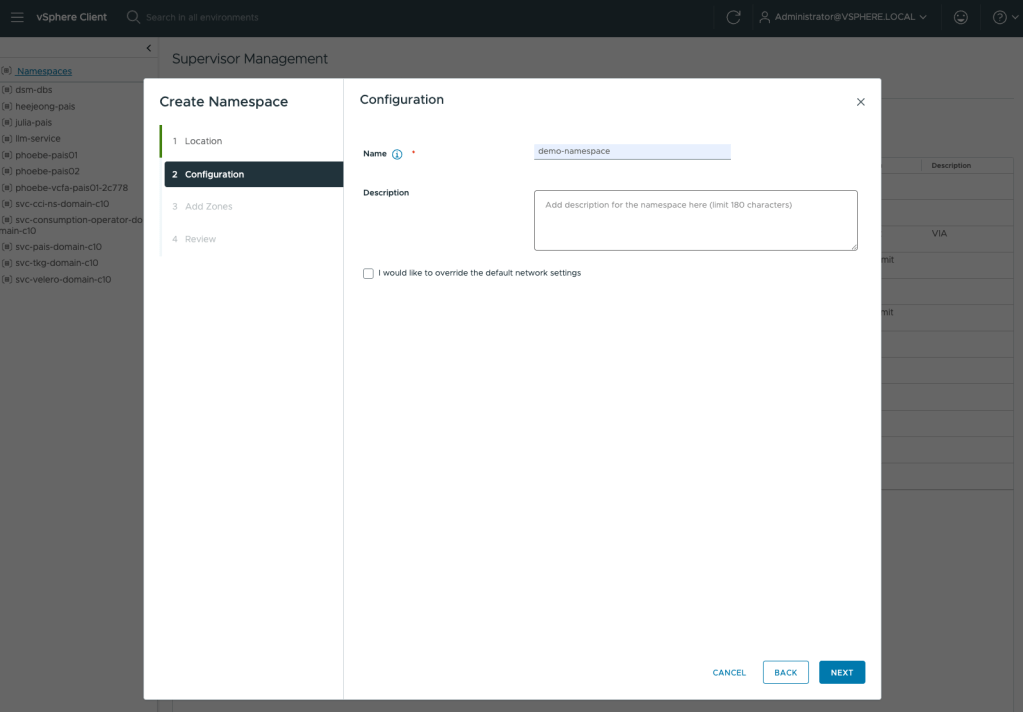
2. Create a namespace through the vSphere Client
VCF Private AI Services are activated at the namespace level. So, let’s create a vSphere namespace by navigating to Supervisor Management > Namespaces and selecting New Namespace. Proceed through the setup wizard. For more details, you can refer to the official documentation.
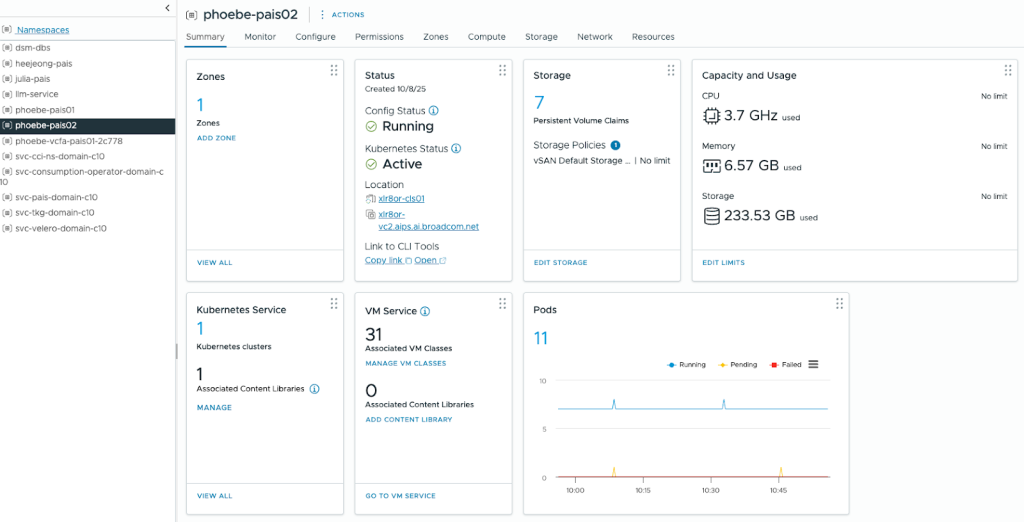
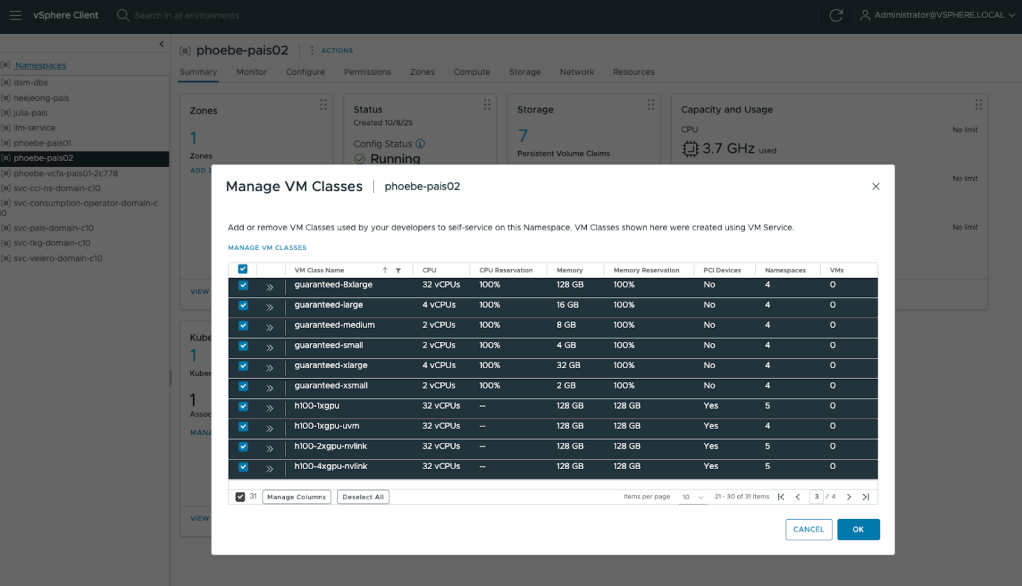
After creating a namespace, you need to add the storage policies and VM classes that will be accessible to the resources within it. You can do this by going to the namespace and using the Storage and VM Service tiles under the Summary tab.
For VM Service, you should include CPU-only VM classes for control plane and worker nodes, and VM classes with GPUs for model endpoints.
3. Prepare NVIDIA configmap and secret
In order to use NVIDIA vGPUs for the Private AI resources, you need to create a ConfigMap for the NVIDIA license and a Secret for the NVIDIA GPU Cloud (NGC) API token for authentication.
The NVIDIA license ConfigMap needs the client_configuration_token.tok in the data.
|
1 2 3 4 5 6 7 8 |
apiVersion: v1 kind: ConfigMap metadata: name: licensing-config data: client_configuration_token.tok: eyJhbGciOiJSUzI1NiIsInR5cCI6IkpXVCJ9.eyJqdGkiOiJkYThkNDc3Yy04ZWFmLTQyMDEtOTljMy0xZWQ5MjkwYTlkNWUiLCJpc3MiOiJOTFMgU2VydmljZSBJbnN0YW5jZSIsImF1ZCI6Ik5MUyBMaWNlbnNlZCBDbGllbnQiLCJpYXQiOjE3NTI2OTUzOTgsIm5iZiI6MTc1MjY5NTM5OCwiZXhwIjoyMTMxNDAxNTk5LCJwcm90b2NvbF92ZXJzaW9uIjoiMi4wIiwidXBkYXRlX21vZGUiOiJBQlNPTFVURSIsInNjb3BlX3JlZl9saXN0IjpbImRhNTI4MzNjLWNiMTktNDZkYy05ZDEwLTZjM2Y5ZjRhYjEwZSJdLCJmdWxmaWxsbWVudF9jbGFzc19yZWZfbGlzdCI6W10sInNlcnZpY2VfaW5zdGFuY2VfY29uZmlndXJhdGlvbiI6eyJubHNfc2VydmljZV9pbnN0YW5jZV9yZWYiOiI5NDcxOTNhNS0wZDU1LTQ5N2MtYWE2ZC04ODZiMWZkZjUyNGQiLCJzdmNfcG9ydF9zZXRfbGlzdCI6W3siaWR4IjowLCJkX25hbWUiOiJDTFMiLCJzdmNfcG9ydF9tYXAiOlt7InNlcnZpY2UiOiJhdXRoIiwicG9ydCI6NDQzfSx7InNlcnZpY2UiOiJsZWFzZSIsInBvcnQiOjQ0M31dfV0sIm5vZGVfdXJsX2xpc3QiOlt7ImlkeCI6MCwidXJsIjoiYXBpLmNscy5saWNlbnNpbmcubnZpZGlhLmNvbSIsInVybF9xciI6ImFwaS5saWNlbnNpbmcubnZpZGlhLmNvbSIsInN2Y19wb3J0X3NldF9pZHgiOjB9XX0sInNlcnZpY2VfaW5zdGFuY2VfcHVibGljX2tleV9jb25maWd1cmF0aW9uIjp7InNlcnZpY2VfaW5zdGFuY2VfcHVibGljX2tleV9tZSI6eyJtb2QiOiI5ZmVkMzExMzdmOWYxMzQ2YWEwNzhkNDdkMDA1ZTA3YTIxZDBiNGVhNmI5OWZlNTM0ZDdmOTE3Y2VlNjU5OGMxMWM4ZDFkY2Q4NzgxZjJhNTZmMjk4OTE2ODU2YTQ0ODYwYTcyNmM5NDhiM2VmMzhkNThkNTM1NWEzNjdiYTFkNzgxOTUxODcxYzQyMmIzNWZiNWRiNzVlOTI1Y2MxMDg0ZmUyYTFlYTJlMDg3Y2YxNDllYzcwMmEyYmI2ZTI0ZmMxN2QyNDFhM2RiZTEwYTZiN2Y4NjEzYjMwMjNiZGE2NmNhMGE2ZGYxN2NkYmZjMDYwOWQ2OTBjMmVhYjM3MTYwMjIxNmU0YmQ0NzNkNjJkNTM5MDk5OWU1Y2M1ZDcxNGMxMjdkYzMyNjk4M2I2Y2I2MThjMWNjM2Q1ODVjYjQxNmUxOGRlMzM2ZDFjZDY5ZDQ4N2IxM2MwMDgzNWY5YzcxNzA4MDdkNjMzYjM1ZjllNTIyYzdmZjZjYjgxMGQ4YTM5Y2QzZTIwMDY3NmUzZGIwNDM3N2Y2ZjQ2MGJiYTBlZTVmOTFjM2E3OTY3Nzg5ZDM3MzlkYjIxY2JlYTNjOGM5MGRlOTE1ZmUyYWM2MmViY2IxOTk2NTk1NmFkNWU3ZGQ2Nzk3YWYzNDgwYzU1OWU4MTlmODBkMjE0YzI4NWRlNyIsImV4cCI6NjU1Mzd9LCJzZXJ2aWNlX2luc3RhbmNlX3B1YmxpY19rZXlfcGVtIjoiLS0tLS1CRUdJTiBQVUJMSUMgS0VZLS0tLS1cbk1JSUJJakFOQmdrcWhraUc5dzBCQVFFRkFBT0NBUThBTUlJQkNnS0NBUUVBbisweEUzK2ZFMGFxQjQxSDBBWGdcbmVpSFF0T3BybWY1VFRYK1JmTzVsbU1FY2pSM05oNEh5cFc4cGlSYUZha1NHQ25Kc2xJcys4NDFZMVRWYU5udWhcbjE0R1CJrZXlfcmV0ZW50aW9uX21vZGUiOiJMQVRFU1RfT05MWSJ9fQ.gNJt6rBtfzGiTftWgT8kJNcQ-PuycmQQBxZ-qPBBG_qe_meUwsQRw0N59ulzJOi1sF0KNbHL0GpjXTt053rraYbxbXubg4dcvuK5-gnRoSNFM4GTBFOgYG0jx0QX4IHRD2MoMDdX0R3l0R9Qcs2JqY4jG8YMhyD9PRUBVXj6LG8WC0O3kmYHw9g6w1ooyg8gOyrB6U6EalPhaPRWrmQOJcZ7TPJjMcI57JYG1NI1IU0cvGN0IQVTm1Ezz5fqzKG4komHIqLTXcJr6-kObh5-3K4gU82xjSmWCaf3M5T0EsKoY2OW2RStLCst-uW4Fp67Gp0boyzc0QmUcL1wFFWAXQ gridd.conf: "" |
The Secret needs the API token in the data.dockerconfigjson.
|
1 2 3 4 5 6 7 |
apiVersion: v1 kind: Secret metadata: name: ngc-secret type: kubernetes.io/dockerconfigjson data: .dockerconfigjson: ewogICJhdXRocyI6IHsKICAgICJudmNyLmlvL252aWRpYS92Z3B1IjogewogICAgICAidXNlcm5hbWUiOiAiJG9hdXRodG9rZW4iLAogICAgICAicGFzc3dvcmQiOiAibnZhcGktRWNzQ2FNM1otQUo4X0p1anA5b2lLcFRscFpqN05XeGJqajc0cGhEQXVyVWNVM1BFckRpaXVsdhaqsdfasdfqdgICJlbWFpbCI6ICJuaWtoaWwtbmQuZGVzaHBhbmRlQGJyb2FkY29tLmNvbSIsCiAgICAgICJhdXRoIjogIkpHOWhkWFJvZEc5clpXNDZiblpoY0drdFJXTnpRMkZOTTFvdFFVbzRYMHAxYW5BNWIybExjRlJzY0ZwcU4wNVhlR0pxYWpjMGNHaEVRWFZ5VldOVk0xQkZja1JwYVhWSWVtdEdNbmxDZURoUVlnPT0iCiAgICB9CiAgfQp9Cg== |
Please note that while I have used licensing-config for the ConfigMap and ngc-secret for the Secret, you are free to choose different names. Just be sure to record these names, as they must be referenced in the Private AI Services configuration YAML file.
You can also find clean YAML templates for the NVIDIA ConfigMap and Secret in the official documentation.
4. Prepare trust bundles for Private AI Services
You need trust bundles, provisioned as ConfigMaps, for VCF Private AI Services to establish secure HTTPS connections with various components, such as the OIDC provider, the Harbor registry, and the PostgreSQL database. The specific trust bundles necessary depend on your environment and the components integrated with Private AI Services. Likely, you will need separate trust bundles for the OIDC provider and the Harbor registry.
I use VMware Data Services Manager in my environment to provision a PostgreSQL database for Private AI Services. Hence, below is an example of a trust bundle for VMware Data Services Manager.
|
1 2 3 4 5 6 7 8 9 10 11 12 13 14 15 16 17 18 19 20 21 22 |
apiVersion: v1 kind: ConfigMap metadata: name: ca-trust-bundle-for-dsm data: ca.crt: | -----BEGIN CERTIFICATE----- MIIC7TCCAdWgAwIBAgIGAZhSNu6iMA0GCSqGSIb3DQEBCwUAMCgxFTATBgNVBAMM DFZNd2FyZS1EQi1DQTEPMA0GA1UECgwGVk13YXJlMB4XDTI1MDcyNTE4MDYyOFoX DTM1MDcyODE4MDYyOFowKDEVMBMGA1UEAwwMVk13YXJlLURCLUNBMQ8wDQYDVQQK rda7fsuaF5vnGUj4bfCmYfE1c2+/pILg84d0Tx2gif6x4MqvyrnNdk4OMUQ4aR/C /30VqVAlAvX36Ppgfn7UJvRjdg/X/0Hh0Qdjcg6z1kQHOMd4JpBJlLY447eo+3pQ d+XhtsPb0sbVCinpWUfSXGSOS+tf3aYCmUCRFcuNM+Mjw3wu9pxwyyL1BH/JEqlj woZu5U967bmHgi7IKM+AwlKDrwOTeVGTx79xp+suUtujSzI1WXMuI8udsrD562vW tk5l+BIcCMP9AgMBAAGjHTAbMAsGA1UdDwQEAwIBBjAMBgNVHRMEBTADAQH/MA0G CSqGSIb3DQEBCwUAA4IBAQCcWteA2wpPDED66JFJqKUBW/UDsrE3BxxYTkA5jR+T YeTX1oW5CI7d+6eohyb3FCyWiixOUW4h0NkO1CpamFqZUeAbCabw0a6/6c+OtaO2 43qdoqJnQpfqlQj+H6HF4ttUcWfC3uVAQ2Uz9I9Hvxwg15d93clDQfZOouYLsn7S rDbMA80WYHP22Zd3vYWN6RRHC5VlmV5FAMFGuCBbvXhlaSVdUQLn0h38t77XXC6q bW99SvCoPp8MH2tqPVlSnv7PyJQa+8aRvQuaOk59P7t32QZxBsEYyjofdvs+j639 i8XBt8qhiR5S2XVVD3v//NGUgsHGqDQQZQuCoIueh5mQ -----END CERTIFICATE----- |
You can refer to the official documentation for additional examples of trust bundles.
5. Prepare Private AI Services configuration YAML file
Finally, we prepare the Private AI Services configuration YAML file. You can refer to the official documentation for the template configuration YAML file that is in compliance with the PAISConfiguration Custom Resource Definition (CRD). Make sure to pay attention to the NVIDIA vGPU host driver version in your environment – you may need to override the gpu-operator version with a configmap, as detailed in the instructions in the template configuration YAML file.
Below is the Private AI Services configuration file for my deployment as an example.
|
1 2 3 4 5 6 7 8 9 10 11 12 13 14 15 16 17 18 19 20 21 22 23 24 25 26 27 28 29 30 31 32 33 34 35 36 37 38 39 40 |
apiVersion: pais.vmware.com/v1alpha1 kind: PAISConfiguration metadata: name: default load_balancer_external_fqdn spec: worker: storageClassName: vsan-default-storage-policy clientTls: caBundleRefs: - name: ca-trust-bundle-for-broadcom - name: ca-trust-bundle-for-dsm database: host: 10.160.64.51 username: pgadmin dbname: pk-postgres02 passwordRef: name: pk-postgres02-secret fieldPath: password auth: oidc: issuerUrl: https://mylogin.broadcom.com/default/ clientId: 98bfc999-e4a5-468d-b18b-3124130a69cd84 scope: - openid - groups - offline_access authorizedGroups: - AH_PK-PAIS groupsClaim: groups ingress: serviceType: LoadBalancer vksControlPlane: virtualMachineClassName: best-effort-large storageClassName: vsan-default-storage-policy nvidiaConfig: licenseConfigRef: name: licensing-config imagePullSecretRef: name: ngc-secret |
6. Create a context for the namespace using VCF Consumption CLI
We now have all the files required to activate Private AI Services, but we first need to gain access to the namespace. You can use any machine that has the VCF Consumption CLI installed; the VCF Consumption CLI can be downloaded from the supervisor cluster (https://<supervisor-cluster-ip>).
- Create a kubernetes context by using basic vSphere authentication with access to the Supervisor. Enter the password when prompted.
vcf context create <supervisor_context_name> --endpoint <supervisor_ip_address> --auth-type 'basic' --username 'administrator@vsphere.local'
Optionally, you can use the --insecure-skip-tls-verify flag to bypass the certificate check, but this is not recommended in production.
- All the namespaces configured on the Supervisor will be listed. Switch to the context where you want to activate PAIS.
vcf context use <namespace_context_name>
7. Activate Private AI Services on the namespace
Once you’ve switched to the context where you want to activate PAIS, navigate to the directory where you have all the files prepared from the previous steps. Apply all the files by using kubectl apply -f <file_name>. Make sure to apply the Private AI Services configuration YAML file last because it is dependent on the Secrets and ConfigMaps.
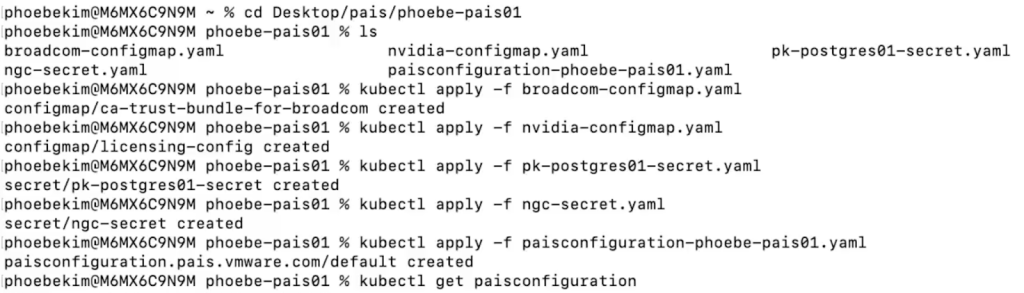
You can verify the PAIS configuration deployment was successful with the following commands:
kubectl describe paisconfiguration <pais_configuration_name>kubectl get paisconfiguration
NAME SERVICE READY REASON
default pais-ingress-default True paisAvailable
You can also refer to the official documentation for more details.
Use VCF Private AI Services
Use Model Store
You can download models from sites such as NVIDIA NGC or HuggingFace locally then use VCF Consumption CLI to push models to the Model Store. You can use any OCI compliant registry as your Model Store, such as Artifactory and Harbor.
Below is an example where Harbor is being used as the Model Store. The sequence of commands demonstrate how to download a model (llama-3.2-1b-instruct) from HuggingFace and uploading it to Harbor:
|
1 2 3 4 5 6 7 8 9 10 11 |
mkdir llama-3.2-1b-instruct cd llama-3.2-1b-instruct huggingface-cli login huggingface-cli download meta-llama/Llama-3.2-1B-Instruct --local-dir . docker login harbor-registry.broadcom.net vcf pais models push --modelName meta-llama/llama-3.2-1b-instruct --modelStore harbor-registry.broadcom.net/model-store -t v1 |
You can refer to the official documentation for detailed instructions.
Deploy Model Endpoints
The UI to deploy model endpoints is available through VCF Automation. Without VCF Automation yet configured, you would deploy the model endpoints using the Kubernetes Resource YAML.
Below is a sample YAML file for a model endpoint that deploys a Mistral completion model.
|
1 2 3 4 5 6 7 8 9 10 11 12 13 14 15 16 17 18 19 20 21 22 23 24 25 26 27 28 29 30 31 32 33 |
apiVersion: pais.vmware.com/v1alpha1 kind: ModelEndpoint metadata: name: mistral-7b-instruct-v0.3--vllm spec: model: ociRef: harbor-registry.broadcom.net/mistralai/mistral-7b-instruct-v0.3:approved # pullSecrets: # - name: harbor-pull-secret-readonly engine: vLLM type: Completions routingName: mistralai/mistral-7b-instruct-v0.3 virtualMachineClassName: h100-1xgpu storageClassName: vsan-default-storage-policy podResourceOverrides: nvidia.com/gpu: "1" inferenceServerCustomization: cliArgs: #! Enable tool-calling support (see https://docs.vllm.ai/en/stable/features/tool_calling.html) - --enable-auto-tool-choice - --tool-call-parser=mistral #! Further example customizations #@ if False: - "--dtype=half" #! Required for V100 (Tesla generation) GPUs, but not for A30s engineImage: dockerhub.packages.vcfd.broadcom.net/vllm/vllm-openai:v0.9.1 #! Override VLLM container engineImageCompressedSize: 15Gi #! may need to increase this when using large engine images like VLLM 0.9 sharedMemoryMountSize: 2Gi #! may need a larger one when using NCCL envVars: - name: SOME_ENV_VAR value: "42" #! note always a string - name: "VLLM_LOGGING_LEVEL" value: "DEBUG" #! The logging level for vLLM inference server can be set by specifying VLLM_LOGGING_LEVEL env variable #@ end |
Once you have a model endpoint YAML file prepared, you deploy the model endpoint by applying this file in the namespace.
You can verify the model endpoint deployments with the following command:
kubectl get modelendpoints
To view a specific model endpoint, you can use the following command:
kubectl get modelendpoints/<model-endpoint-name>
Deliver RAG Applications by Using VCF Private AI Services
VCF Private AI Services has a standalone UI where you can create knowledge bases with linked data sources to automatically collect and index data updates over time. You can also build an agent in Agent Builder in this standalone UI to facilitate prompt tuning and testing. The agent utilizes a completions model running in Model Runtime and for RAG applications, integrates it with a knowledge base from Data Indexing and Retrieval.
To access the UI, you locate the external IP address assigned to the Private AI Services instance by the ingress service (pais-ingress-default) by looking at the services via kubectl get services. Navigate to the external IP address of the pais-ingress-default service via https in a web browser.

Please refer to the official documentation for more details on how to use these Private AI Services through its standalone UI. You can also use the Open AI Compatibility APIs to interact with deployed models using OpenAI-compatible clients.
Discover more from VMware Cloud Foundation (VCF) Blog
Subscribe to get the latest posts sent to your email.


