

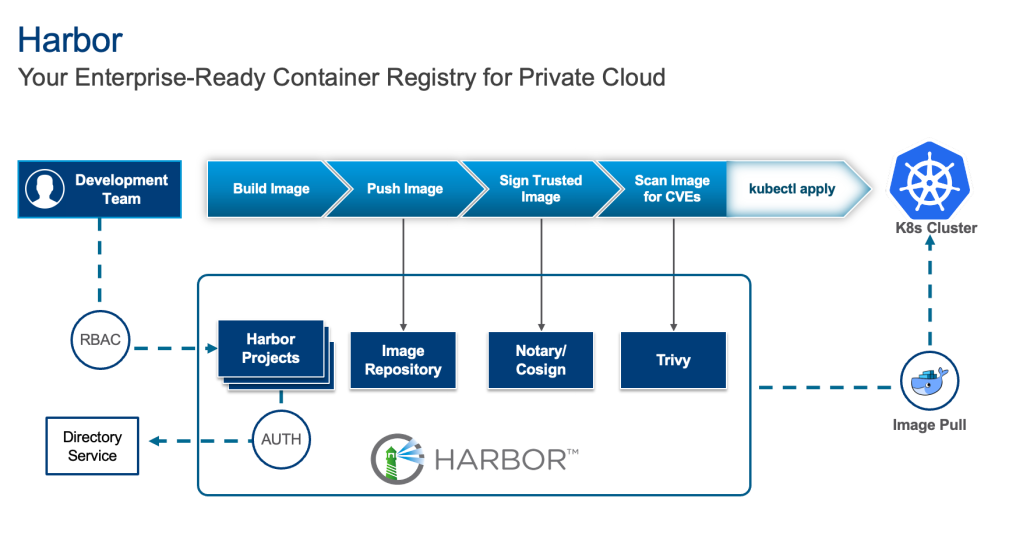
Harbor is an open-source container registry that secures artifacts with policies and role-based access control, ensuring images are scanned for vulnerabilities and signed as trusted. To learn more about Harbor and how to deploy it on a Virtual Machine (VM) and in Kubernetes (K8s), refer to parts 1 and 2 of the series.
While deploying Harbor is straightforward, making it production-ready requires careful consideration of several key aspects. This blog outlines critical factors to ensure your Harbor instance is robust, secure, and scalable for production environments.
For this blog, we will focus on upstream Harbor (v 2.14) deployed on Kubernetes via Helm as our base and provide suggestions for this specific deployment.
1. High Availability (HA) and Scalability
For a production environment, single points of failure are unacceptable. This is especially true for image registries that acts as a central repository for storing and pulling images and artifacts. Therefore, implementing high availability for Harbor is crucial and involves several key considerations:
- Deploy with an Ingress: Configure a Kubernetes Service of type Ingress controller (e.g. Traefik) in front of your Harbor instances to distribute incoming traffic efficiently and provide a unified entry point along with cert-manager for certificate management. You can specify this in your
values.yamlfile under:
|
1 2 3 |
expose: # Available Options: "loadBalancer", "ingress", "clusterIP", "nodePort" type: ingress |
To locate your values.yaml file, refer to the previous blog.
- Utilize Multiple Harbor Instances: Increase the replica count for critical Harbor components (e.g., core, jobservice, portal, registry, trivy) in your
values.yamlto ensure redundancy.
|
1 2 3 4 5 6 7 8 9 10 11 12 13 14 15 16 17 18 |
core: replicas: 3 jobservice: replicas: 3 portal: replicas: 3 registry: replicas: 3 trivy: replicas: 3 # While not strictly for the HA of the registry itself, consider increasing exporter replicas for robust monitoring availability exporter: replicas: 3 # Optionally, if using Ingress, consider increasing the Nginx replicas for improving Ingress availability nginx: replicas: 3 |
- Enable Database HA (PostgreSQL): Harbor includes a built-in PostgreSQL database, but we do not recommend it for production use. Here’s why:
- Lack of High Availability (HA): The default internal PostgreSQL setup within the Harbor Helm chart is typically a single instance. This creates a single point of failure. If that database pod goes down, your entire Harbor instance will be unavailable.
- Limited Scalability: An embedded database is not designed for independent scaling. If your Harbor usage grows, you might hit database performance bottlenecks that are difficult to address without disrupting Harbor itself.
- Complex Lifecycle Management: Managing backups, point-in-time recovery, patching, and upgrades for a stateful database directly within an application’s Helm chart can be significantly more complex and error-prone than with dedicated database solutions.
Thus, it is recommended to deploy a highly available PostgreSQL cluster within Kubernetes (e.g., using a Helm chart for Patroni or CloudNativePG) or leverage a managed database service outside the cluster. Configure Harbor to connect to this HA database by updating the values.yaml:
|
1 2 3 4 5 6 7 8 9 10 11 12 13 14 15 16 17 18 |
database: type: "external" external: host: "192.168.0.1" port: "5432" username: "user" password: "password" coreDatabase: "registry" # If using an existing secret, the key must be "password" existingSecret: "" # "disable" - No SSL # "require" - Always SSL (skip verification) # "verify-ca" - Always SSL (verify that the certificate presented by the # server was signed by a trusted CA) # "verify-full" - Always SSL (verify that the certification presented by the # server was signed by a trusted CA and the server host name matches the one # in the certificate) sslmode: "verify-full" |
- Implement Redis HA: Deploy a highly available Redis cluster in Kubernetes (e.g., using a Helm chart for Redis Sentinel or Redis Cluster) or utilize a managed Redis service. Configure Harbor to connect to this HA Redis instance by updating
redis.typeand connection details invalues.yaml.
|
1 2 3 4 5 6 7 8 9 |
redis: type: external external: addr: "192.168.0.2:6397" sentinelMasterSet: "" tlsOptions: enable: true username: "" password: "" |
2. Security Best Practices
Security is paramount for any production system, especially a container registry.
- Enable TLS/SSL: Always enable TLS/SSL for all Harbor components. For automated certificate management in Kubernetes, integrate with Cert-Manager and configure it within your Harbor Helm
values.yaml:
|
1 2 3 4 5 6 7 8 9 10 11 12 13 14 15 16 17 18 19 20 |
expose: tls: enabled: true certSource: auto # change to manual if using cert-manager auto: commonName: "" internalTLS: enabled: true strong_ssl_ciphers: true certSource: "auto" core: secretName: "" jobService: secretName: "" registry: secretName: "" portal: secretName: "" trivy: secretName: "" |
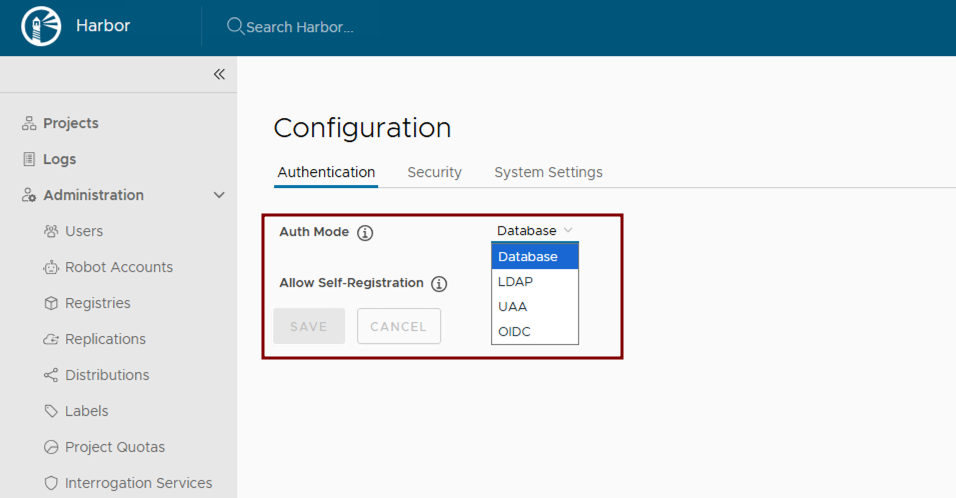
- Configure Role-Based Access Control (RBAC): Leverage Kubernetes RBAC for managing access to Harbor resources. Post-deployment, integrate Harbor with enterprise identity providers such as LDAP or OIDC. Refer to the Harbor configuration guides for detailed steps: Configure LDAP/Active Directory Authentication or Configure OIDC Provider Authentication
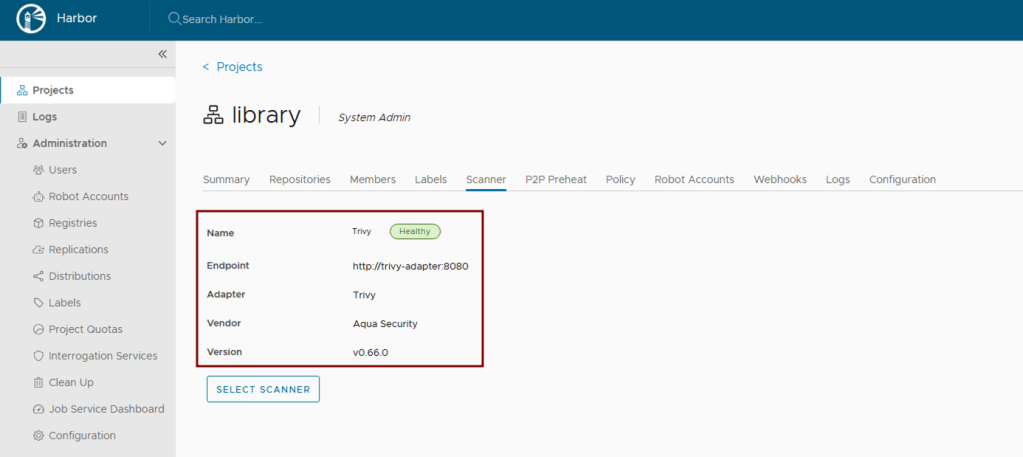
- Implement Vulnerability Scanning: Ensure vulnerability scanning is enabled in values.yaml. Harbor uses Trivy by default. Verify its activation and configuration within the Helm chart.
|
1 2 |
trivy: enabled: true |
- Activate Content Trust: Harbor supports multiple content trust mechanisms to ensure the integrity of your artifacts. For modern OCI artifact signing, Harbor recommends Cosign and Notation. Enforce deployment security at the project level within the Harbor UI or via the Harbor API. This allows only verified, cryptographically signed image deployment.

- Maintain Regular Updates: Regularly update your Harbor Helm chart and underlying Kubernetes components to benefit from the latest security patches and bug fixes. Use helm upgrade for this purpose.
3. Storage Considerations
Efficient and reliable storage is critical for Harbor’s performance and stability.
- Configure Shared Storage: For persistent data, configure Kubernetes StorageClasses and PersistentVolumes to use shared storage solutions like vSAN, NFS, S3-compatible object storage (e.g., MinIO deployed in-cluster or external S3), or a distributed file system. Specify these in your
values.yamlunder:
|
1 2 3 4 5 6 7 8 9 10 11 12 13 14 15 |
persistence: enabled: true resourcePolicy: "keep" persistentVolumeClaim: registry: #If left empty, the kubernetes cluster default storage class will be used storageClass: "your-storage-class" jobservice: storageClass: "your-storage-class" database: storageClass: "your-storage-class" redis: storageClass: "your-storage-class" trivy: storageClass: "your-storage-class" |
- Choose Appropriate Storage Type: Define Kubernetes StorageClasses that align with your underlying infrastructure (e.g., nfs-client, s3). Specify these settings in your
values.yaml:
|
1 2 3 4 5 6 7 |
persistence: enabled: true resourcePolicy: "keep" imageChartStorage: #Specify storage type: "filesystem", "azure", "gcs", "s3", "swift", "oss" type: "" #Configure specific storage type section based on the selected option |
- Estimate Storage Sizing: Carefully calculate your storage needs based on the anticipated number and size of container images, as well as your defined retention policies. Configure the size for your
PersistentVolumeClaimsinvalues.yaml.
- Implement Robust Backup and Recovery: Establish a comprehensive backup strategy for all Harbor data. For Kubernetes-native backups, consider using tools like Velero to back up PersistentVolumes and Kubernetes resources. For object storage, leverage external backup solutions. Regularly test your recovery procedures.
- Configure and Run Garbage Collection: Set up and routinely execute Harbor’s garbage collection. This can be configured through the Harbor UI by defining a schedule for automated runs to remove unused blobs and efficiently reclaim storage space.

4. Monitoring and Alerting
Proactive monitoring and alerting are essential for identifying and addressing issues before they impact users.
- Collect Comprehensive Metrics: Deploy Prometheus and configure it to scrape metrics from Harbor components. The Harbor Helm chart exposes Prometheus-compatible endpoints in the
values.yamlfile. Visualize these metrics using Grafana.
|
1 2 3 4 5 6 7 8 9 10 11 12 13 14 15 16 |
metrics: enabled: true core: path: /metrics port: 8001 registry: path: /metrics port: 8001 jobservice: path: /metrics port: 8001 exporter: path: /metrics port: 8001 serviceMonitor: enabled: true |
- Centralize Logging: Implement a centralized logging solution within Kubernetes, such as the ELK stack (Elasticsearch, Logstash, Kibana) or Grafana with Fluentd/Fluent Bit.
- Configure Critical Alerts: Set up alerting rules in Prometheus (Alertmanager) or Grafana for critical events, such as component failures, high resource utilization (CPU/memory limits), storage nearing capacity, failed vulnerability scans, or unauthorized access attempts. Define these thresholds based on your production requirements.
5. Network Configuration
Proper network configuration ensures smooth communication between Harbor components and external clients.
- Configure Ingress and DNS Resolution: As already mentioned, deploy a Kubernetes Ingress controller or Load Balancer to expose Harbor externally. Ensure proper DNS records are configured to point to your Load Balancer’s IP address.
- Set Up Proxy Settings (if applicable): If Harbor components need to access external resources through a corporate proxy, configure proxy settings within
values.yaml. It’s crucial to note that the proxy.components field explicitly defines which Harbor components (e.g., core, jobservice, trivy) will utilize these proxy settings for their external communications.
|
1 2 3 4 5 6 7 8 |
proxy: httpProxy: httpsProxy: noProxy: 127.0.0.1,localhost,.local,.internal components: - core - jobservice - trivy |
- Allocate Sufficient Bandwidth: Ensure your Kubernetes cluster’s underlying network infrastructure and nodes have sufficient bandwidth to handle peak image pushes and pulls. Monitor network I/O on nodes running Harbor pods.
Conclusion
While this is not an exhaustive list of considerations for making Harbor production-ready, by diligently addressing these considerations, you can transform your basic Harbor deployment into a robust, secure, and highly available production-ready container registry. This approach ensures that Harbor serves as a cornerstone of your cloud-native infrastructure, capable of supporting demanding development and production workflows. From implementing High Availability and stringent security measures to optimizing storage and establishing proactive monitoring, each step contributes to a resilient and efficient artifact management system.
Follow our blog series on Harbor:
- Blog 1 – Harbor: Your Enterprise-Ready Container Registry for a Modern Private Cloud
- Blog 2 – Reducing Harbor Deployment Complexity on Kubernetes
- Blog 3 – Making Harbor Production-Ready: Essential Considerations for Deployment
- Blog 4 – Integrating VMware Data Services Manager with Harbor for a Production-Ready Registry
- Blog 5 – Using Harbor as a Proxy Cache for Cloud-Based Registries
Discover more from VMware Cloud Foundation (VCF) Blog
Subscribe to get the latest posts sent to your email.


