

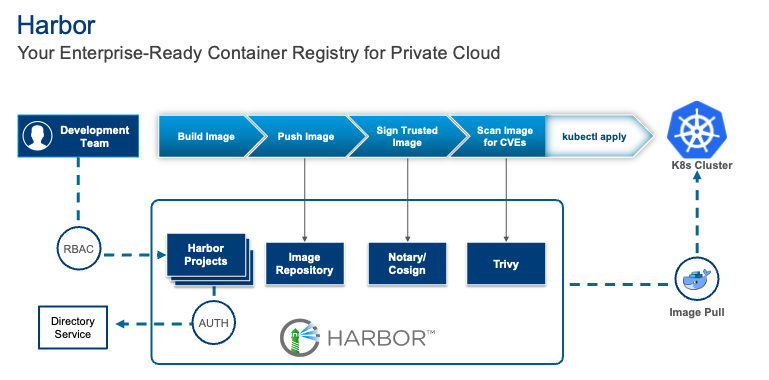
Harbor is an indispensable open-source container image registry, offering robust features like policy-driven security, role-based access control (RBAC), vulnerability scanning, image signing, image replication and distribution. Deploying Harbor is a common and critical step for organizations looking to streamline their containerization workflows. As we discussed in our previous blog post, Harbor offers significant value through its comprehensive features and can be deployed on a virtual machine (VM).
This blog post will pick up where we left off, guiding you through the process of deploying Harbor on an upstream conformant Kubernetes platform using VMware vSphere Kubernetes Service (VKS) as an example first via Helm, then via VKS standard packages, and finally showcasing the simplified deployment as a supervisor service in VMware Cloud Foundation (VCF) 9. This progression highlights how complexity is progressively reduced at each level.
If you are interested to learn more about Harbor and how to deploy it on a VM, check out our previous blog.
Deploying Harbor on Kubernetes using Helm
Before diving into the specifics of VKS, let’s briefly outline the general steps for deploying the bare-minimum components of Harbor on any standard Kubernetes cluster (non production-ready). This foundational understanding will help you grasp the components involved.
Prerequisites
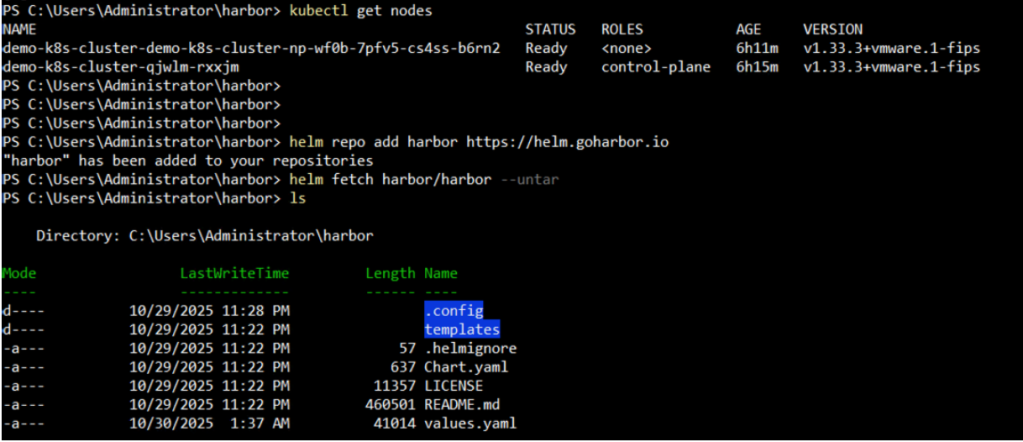
- A running Kubernetes cluster (We will use VMware vSphere Kubernetes Service (VKS) for this, however the process remains the same for any upstream conformant Kubernetes platform).
- Additionally, configure
kubectlto interact with your cluster. - Helm (recommended) for simplified deployment.
- Persistent storage provisioner (e.g., NFS, iSCSI, cloud-provider specific CSI driver. VKS comes with the vSphere CSI driver built-in).
- A load balancer or ingress controller to expose Harbor services (We have deployed VKS with Virtual Private Cloud (VPC) enabled that will provide us the external IP for the load balancer).
Step 1: Download Harbor Deployment Manifests
Obtain the official Harbor Helm charts or raw Kubernetes YAML files. Helm is typically preferred for its ease of configuration and management.
|
1 2 |
helm repo add harbor https://helm.goharbor.io helm fetch harbor/harbor --untar |
Step 2: Configure values.yaml
Customize the values.yaml file (for Helm) to define:
- External URL
- Storage class for persistent volumes
- Database configuration (internal or external PostgreSQL)
- Redis configuration
- Security settings (TLS/SSL certificates)
- Administrator credentials
For our particular scenario, we’ll update the following settings:
- We’ll set
expose.typetoloadBalancer - Next, set
expose.tls.auto.commonName(Needed when expose.type is not ingress) - Then set
expose.ingress.hosts.coreto the External URL FQDN - If there is no default storage class set on your cluster, then configure the
storageClassfor all the pods in thepersistencesection. - Finally, set the
externalURLFQDN
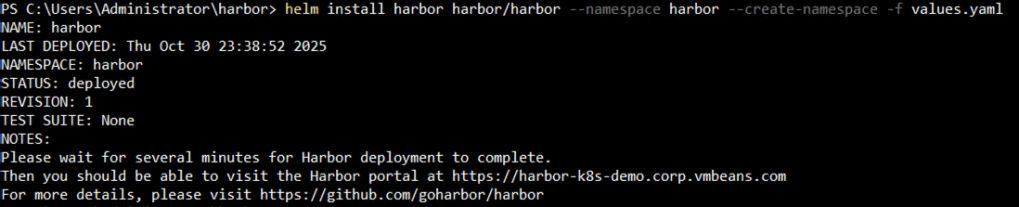
Step 3: Deploy Harbor
Use Helm to deploy Harbor into your cluster.
|
1 |
helm install harbor harbor/harbor --namespace harbor --create-namespace -f values.yaml |
This command creates the necessary deployments, services, stateful sets, and persistent volume claims for Harbor.
Optionally, there is a manual step to setup the load balancer that Harbor uses for external IP. In our case, VPC in VMware vSphere and NSX automates this process.
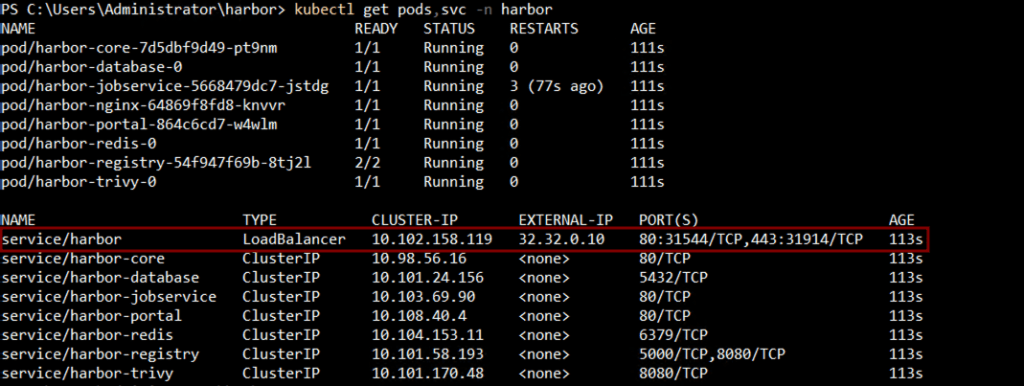
Step 4: Verify Harbor Installation
Check the status of Harbor pods, access the UI, and perform a test push/pull of an image.

This concludes the deployment of Harbor on a kubernetes cluster using Helm. While this approach gets Harbor up and running, it does not make it production-ready as you’ll need to set up and manage SSL certificates manually, as well as the load balancer that fronts the Harbor service. Since we are using VKS integrated with VPCs as the sample kubernetes deployment, VKS automatically sets up the load balancer IP for us. However, you would also need to handle this manually in any other kubernetes deployment.
Now let’s take a look at how we can leverage VKS standard packages to deploy Harbor for a more production-ready experience.
Leveraging VKS Standard Packages for Harbor setup
VMware vSphere Kubernetes Service (VKS) significantly simplifies the deployment and management of Kubernetes clusters within your vSphere environment. By providing a curated set of standard packages, VKS enables the easy installation of common services and applications. To deploy Harbor within VKS, we leverage these packages for a smoother, more integrated experience, reducing much of the manual configuration required in a generic Kubernetes setup.
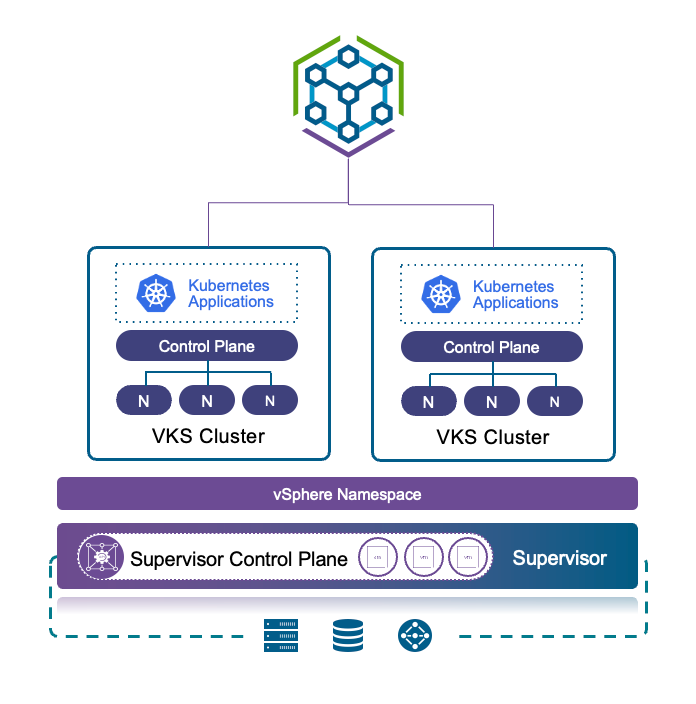
The VKS standard packages offer pre-configured and validated deployments for various essential components. By utilizing these standard packages, you can quickly provision the necessary infrastructure for Harbor without deep manual configuration of each component, thus making the deployment process more efficient and less error-prone compared to a generic Kubernetes setup.
Here are the steps to deploy Harbor as a VKS standard package using the VCF CLI:
Prerequisites:
- VKS cluster deployed
- VCF CLI installed on the jumphost
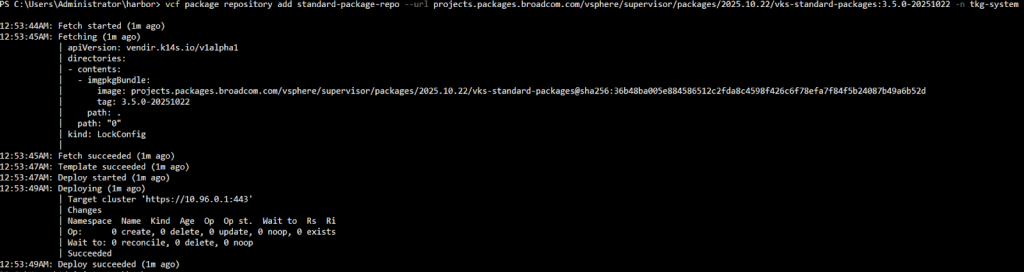
Step 1: Associate a VKS Standard Package Repository
Get the latest VKS standard package repository compatible with your VKS cluster and add it to our VKS cluster:
|
1 |
vcf package repository add standard-package-repo --url projects.packages.broadcom.com/vsphere/supervisor/packages/2025.10.22/vks-standard-packages:3.5.0-20251022 -n tkg-system |

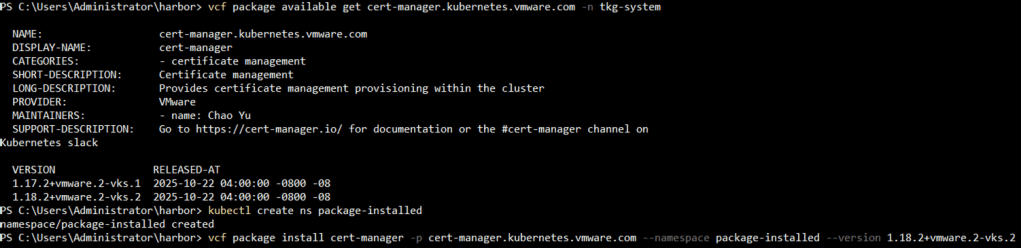
Step 2: Deploy Prerequisites (For Production-Ready Harbor)
We deploy Cert Manager and Contour with Envoy as prerequisite for a production-ready Harbor instance:
- First, deploy cert manager using the Cert Manager Deployment Broadcom guide:
|
1 2 3 4 5 |
vcf package available get cert-manager.kubernetes.vmware.com -n tkg-system kubectl create ns package-installed vcf package install cert-manager -p cert-manager.kubernetes.vmware.com --namespace package-installed --version 1.18.2+vmware.2-vks.2 vcf package installed list -n package-installed |

- Similarly deploy Contour using the Contour deployment Broadcom guide:
|
1 2 3 |
vcf package available get contour.kubernetes.vmware.com -n tkg-system vcf package available get contour.kubernetes.vmware.com/1.33.0+vmware.1-vks.1 --default-values-file-output contour-data-values.yaml -n tkg-system kubectl create ns contour |
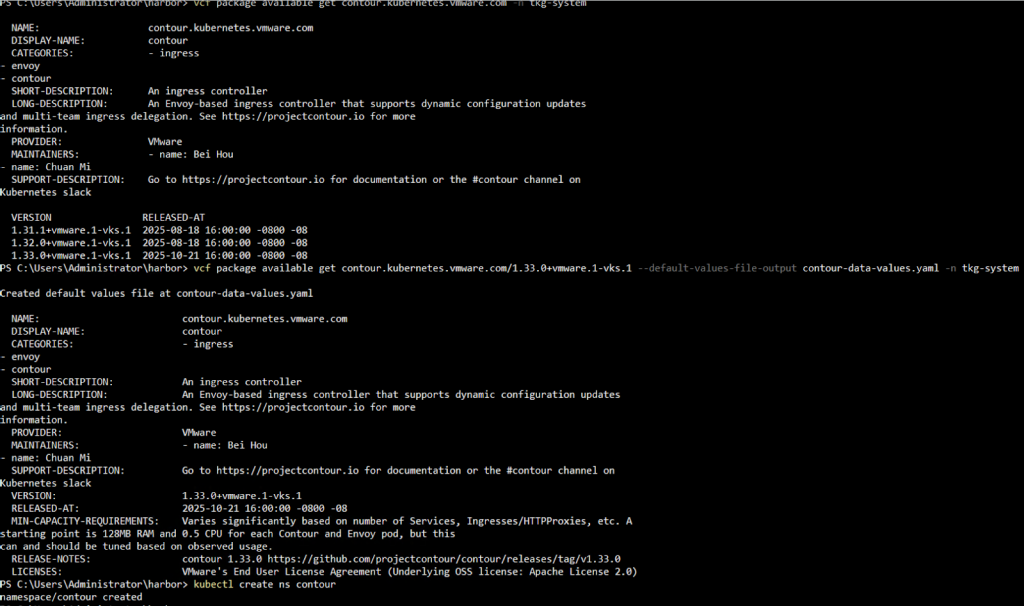
- Next, edit the contour-data-values.yaml as per the documentation and deploy Contour.
|
1 2 |
vcf package install contour -p contour.kubernetes.vmware.com -v 1.33.0+vmware.1-vks.1 --values-file contour-data-values.yaml -n contour vcf package installed list -n contour |

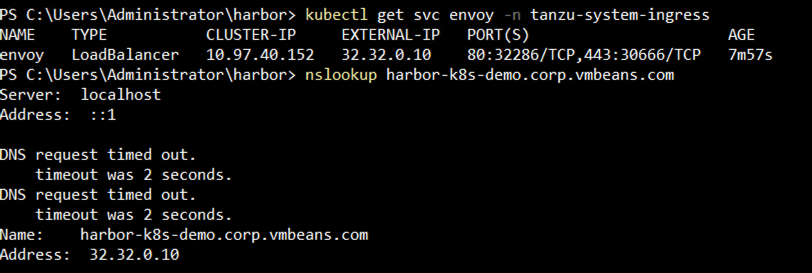
- After deployment, check the envoy service external IP and add the DNS entry for Harbor to map the envoy service external IP.
Step 3: Deploy Harbor
Now we can deploy Harbor using the Harbor Deployment Broadcom guide:
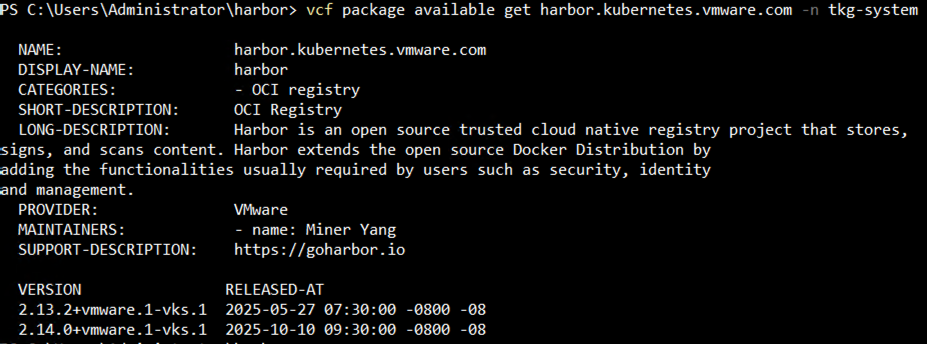
First, get the latest Harbor package version for your repository using:
|
1 |
vcf package available get harbor.kubernetes.vmware.com -n tkg-system |
Then, generate the harbor-data-values.yaml file using:
|
1 |
vcf package available get harbor.kubernetes.vmware.com/ 2.14.0+vmware.1-vks.1 -n tkg-system --default-values-file-output harbor-data-values.yaml |
Next, edit the harbor-data-values.yaml file and update the values for the following mandatory parameters. Configure additional parameters as needed. See Harbor 2.14.0 Package Reference:
| Field | Description |
|---|---|
hostname | The FQDN for accessing the Harbor UI and referencing the registry in client applications. The domain should resolve to the Envoy Service IP created by Contour in an external DNS server. |
harborAdminPassword | Change the password to something strong and unique (can also be changed in the UI after install). |
secretKey | Provide the secret key for encryption (must be a string of 16 characters). |
database.password | Input the initial password of the Postgres database. |
core.secret | Specify the secret used for core server communication with other components. |
core.xsrfKey | Define the XSRF key (must be a string of 32 characters). |
jobservice.secret | Supply the secret used for job service communication with other components. |
registry.secret | Enter the secret used to secure the upload state from the client and registry storage backend. |
Note that since we have set a default storage CSI for our VKS cluster, we do not need to set the storage class related variables in the yaml file.
|
1 2 |
vcf package install harbor --package harbor.kubernetes.vmware.com --version 2.14.0+vmware.1-vks.1 --values-file .\harbor-data-values.yaml --namespace tkg-system vcf package installed get harbor -n tkg-system |

Step 4: Verify Harbor Installation
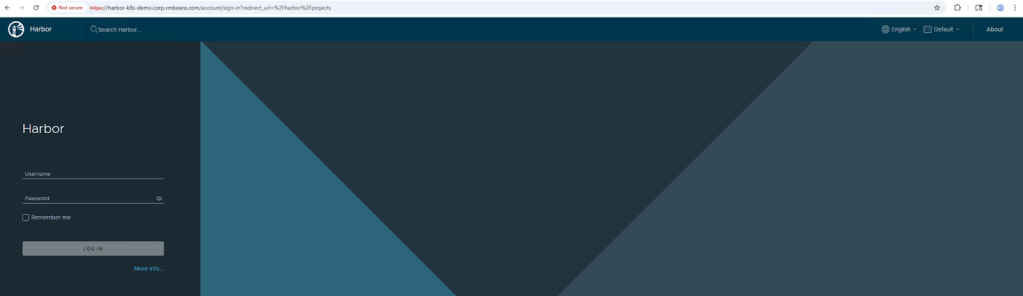
Check the Harbor UI by navigating to the Harbor FQDN.
This concludes Harbor deployment on VKS using VKS standard packages. While the number of commands executed in this section may seem more than the number of commands executed in the previous section, we also deployed Contour with Envoy proxy and Cert Manager. These components provide centralized TLS management, a robust API gateway, automated certificate lifecycle and sophisticated traffic management for Harbor, thus bringing it closer to a production-ready instance.
Now let’s take a look at deploying Harbor as a Supervisor Service in VCF 9 as the most simple of the three options for setting up a production-ready Harbor instance.
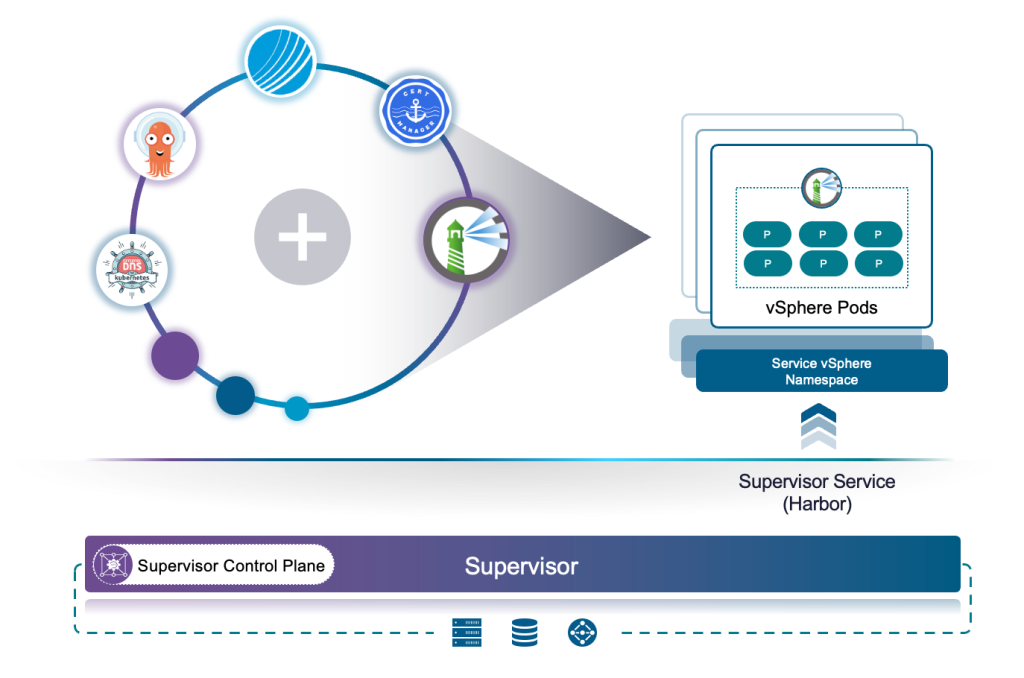
Deploying Harbor as a Supervisor Service in VCF 9
Within VCF, deploying Harbor as a supervisor service takes simplicity to the next level. This approach integrates Harbor directly into the VCF management plane, allowing for easier lifecycle management, resource allocation, and a more integral role within your VCF environment. Consequently, this significantly streamlines the operational aspects of Harbor, making it a more native part of your VCF ecosystem.
Here’s a general outline of the process, assuming you have a VCF 9 workload domain with supervisor set up and running:
Prerequisites
- An account on the Broadcom Support Portal with the appropriate entitlement to download the Harbor supervisor service YAML files
- VCF 9 Workload Domain with Supervisor deployed
- A DNS entry we intend to use for the Harbor FQDN corresponding to the nginx load balancer external IP.
Step 1: Download and Update the Harbor Supervisor Service YAML
Download the Harbor Supervisor Service and Data Values YAML file from the Broadcom Support Portal for the specific Harbor version you wish to install.
Then, update the harbor-data-values.yaml file with the hostname, set the storage class if no default storage class is set, and optionally change the passwords for the various components.
Below is a sample of the changes made to our file (rest of the entries are left as the default values):
|
1 2 3 4 5 6 7 8 9 10 11 12 13 14 15 16 17 18 19 20 21 |
core: secret: Harbor12345 xsrfKey: abcdefghijklmnopqrstuvqxyzabcdef database: type: internal password: Harbor12345 enableContourHttpProxy: false enableNginxLoadBalancer: true harborAdminPassword: Harbor12345 hostname: harbor-k8s-demo.corp.vmbeans.com jobservice: replicas: 1 secret: Harbor12345 registry: replicas: 1 secret: Harbor12345 secretKey: abcdefghijklmnop trivy: #! By default, for Supervisor Service set the tmpdir to a mount point of a PersistentVolume. #! This is to fix the issue that the disk of a vSphere pod has not enough space for trivy's CVE Database tmpdir: /home/scanner/.cache |
Step 2: Deploy the Harbor Supervisor Service
- Navigate to VMware vCenter 9 > Menu > Supervisors > Services and click on Add a New Service > Upload and upload the harbor service yaml file downloaded from the Broadcom Support Portal.
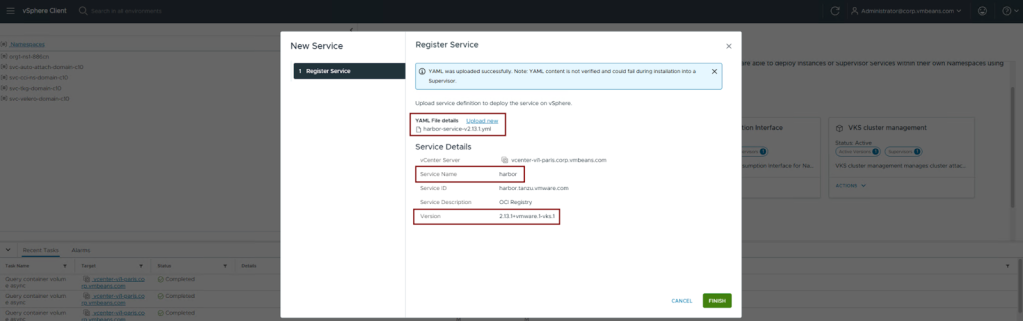
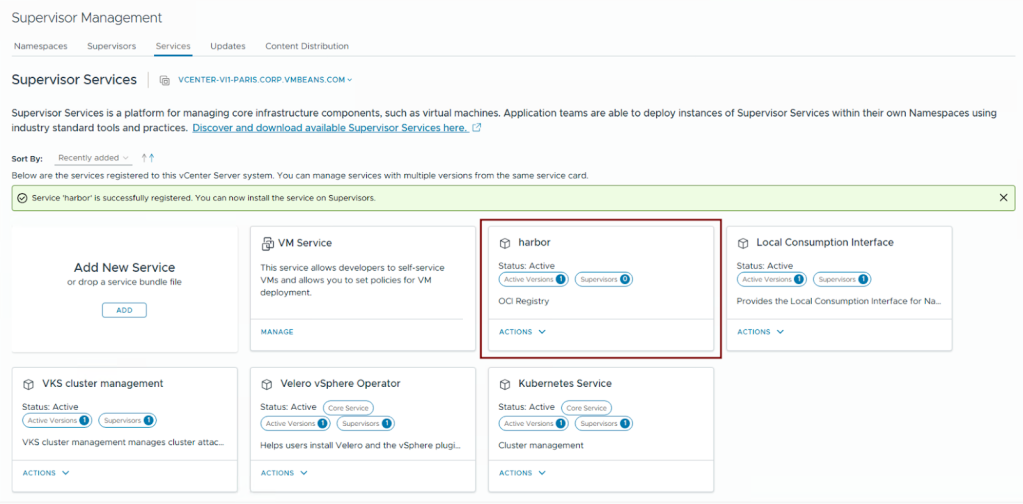
- Click on Finish. Harbor service is now available to be deployed on supervisors:
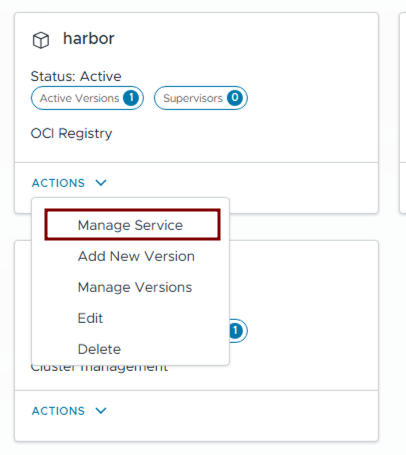
- On the Harbor pane, click on Actions > Manage Service:
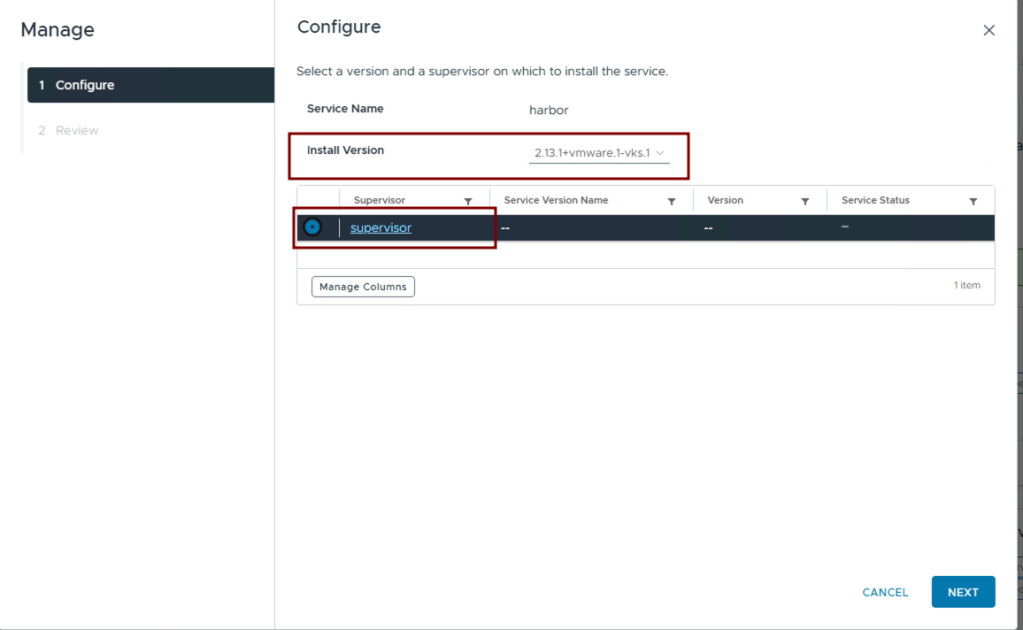
- Select the Supervisor to deploy to and click on Next:
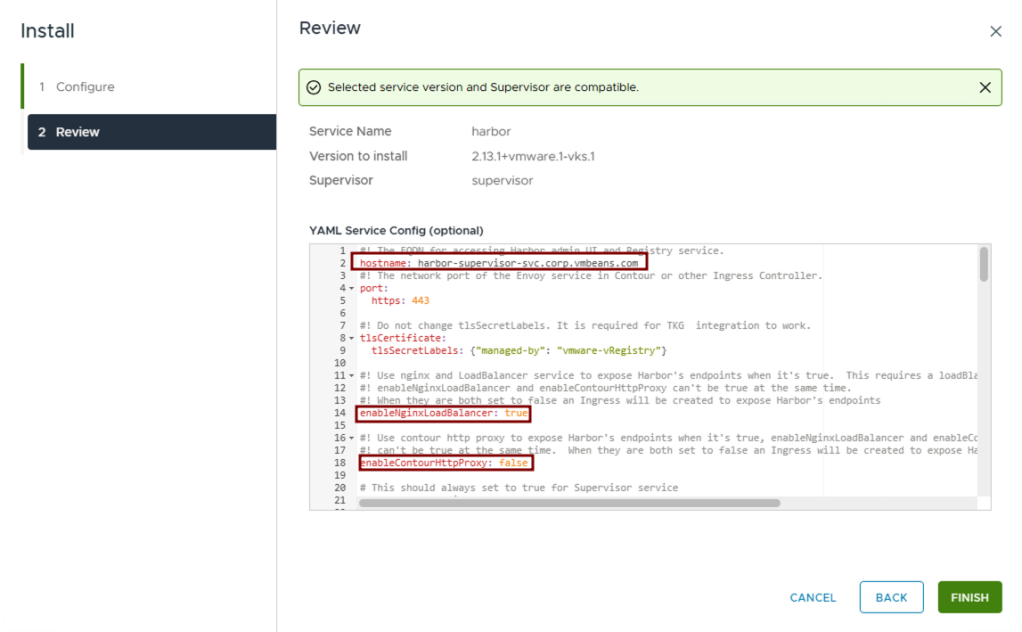
- Paste the updated contents of the
harbor-data-values.yamlfile into the YAML Service Config text box and click on Finish:
Step 3: Monitor the Harbor Supervisor Service Deployment
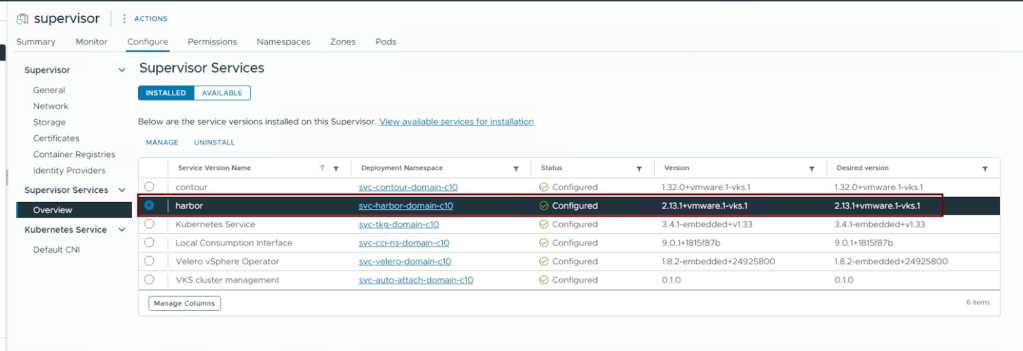
- Navigate to Supervisors > Supervisor > Configure > Supervisor Services > Overview section and check the status of Harbor:
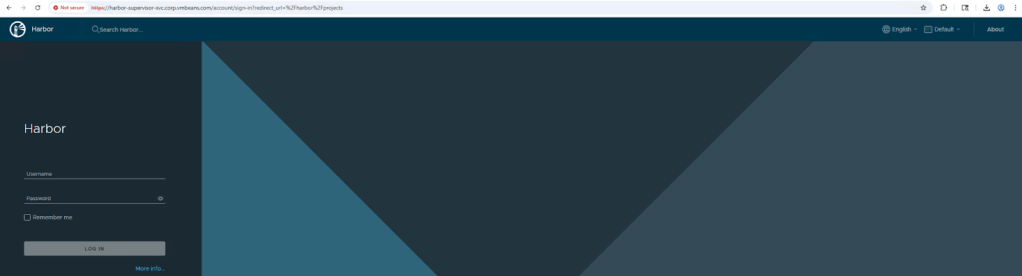
- Verify Harbor deployment by navigating to the Harbor FQDN:
By following these streamlined steps, you can successfully deploy Harbor as a supervisor service. This approach fully leverages the power of VCF, offering a highly efficient and deeply integrated container image management solution within your VCF ecosystem.
Conclusion
In conclusion, deploying Harbor, a critical component for modern containerization workflows, can be approached with varying levels of complexity. We’ve journeyed through three distinct deployment methods: from the foundational Helm-based installation on a generic Kubernetes cluster, to the more integrated VKS standard packages, and finally, the highly streamlined deployment as a supervisor service within VMware Cloud Foundation 9. Each progression demonstrates a significant reduction in operational overhead and an increase in automation, culminating in a deeply integrated and efficiently managed Harbor instance within the VCF ecosystem. By understanding these options, organizations can choose the deployment strategy that best aligns with their infrastructure, expertise, and desired level of automation, ultimately accelerating their container image management capabilities.
In the next blog, we will discuss the design considerations for making Harbor production-ready to allow using it effectively in an enterprise environment – Stay tuned!
Follow our Harbor Blog Series:
- Blog 1 – Harbor: Your Enterprise-Ready Container Registry for a Modern Private Cloud
- Blog 2 – Reducing Harbor Deployment Complexity on Kubernetes
- Blog 3 – Making Harbor Production-Ready: Essential Considerations for Deployment
- Blog 4 – Integrating VMware Data Services Manager with Harbor for a Production-Ready Registry
- Blog 5 – Using Harbor as a Proxy Cache for Cloud-Based Registries
Discover more from VMware Cloud Foundation (VCF) Blog
Subscribe to get the latest posts sent to your email.


