
This is part two of six in a multi-blog series providing a practitioner’s guide to VMware Private AI Foundation with NVIDIA.
Overview
This blog provides a comprehensive guide to using JupyterLab as a powerful interface for downloading NVIDIA NIMTM (NVIDIA Inference Microservice) Large Language Models (LLMs) and integrating them into a local Harbor registry. By establishing a local repository for these sophisticated AI models, organizations can unlock numerous benefits, including enhanced security and privacy, accelerated development cycles, and optimized resource utilization.
The decision to host LLMs within a local Harbor registry offers significant strategic advantages for enterprises, particularly those dealing with sensitive data or operating in environments with strict regulatory compliance requirements:
- Enhanced Security and Privacy: Although public cloud-based LLM services are convenient, they introduce inherent risks related to data privacy and intellectual property. By downloading LLMs to a local Harbor instance, organizations maintain complete control over their models and the data they process. This significantly reduces the attack surface and mitigates concerns about data exfiltration, unauthorized access, malicious code downloads, and compliance breaches. In industries such as healthcare, finance, or defense, where data sovereignty is paramount, local LLM deployment is often a non-negotiable requirement.
- Reduced Latency and Improved Performance: Accessing LLMs from a local Harbor registry reduces network latency when retrieving models from remote cloud servers, thereby improving performance. This results in significantly faster inference times, particularly for high-throughput applications or real-time processing scenarios. Developers can experience a more responsive and efficient workflow, leading to quicker iteration and deployment of AI-powered solutions.
- Offline Capability and Air-Gapped Environments: For organizations operating in air-gapped environments or those with limited or unreliable internet connectivity, deploying a local LLM is essential. Once downloaded to Harbor, these models can be accessed and utilized without an internet connection, ensuring the continuous operation of AI applications even in isolated networks. This is crucial for critical infrastructure, government applications, or remote deployments.
- Version Control and Reproducibility: Harbor provides robust version control, enabling organizations to effectively manage multiple iterations of their LLMs. This ensures that specific model versions can be easily identified, deployed, and rolled back if necessary. This level of control is vital for maintaining reproducibility in AI development and ensuring consistency across various deployments.
- Customization and Fine-Tuning: While the initial download from NVIDIA NIM provides pre-trained models, hosting them locally in Harbor makes customization and fine-tuning easier. Data scientists and ML engineers can readily access these models, apply their proprietary datasets for fine-tuning, and then store the customized versions back into Harbor. This allows for the creation of highly specialized LLMs tailored to specific business needs and domain expertise.
- Simplified Model Governance and Compliance: Centralizing LLMs within Harbor streamlines model governance and compliance efforts. Organizations can implement access controls, audit trails, and policy enforcement directly within their local registry, ensuring adherence to internal guidelines and external regulations. This simplifies demonstrating compliance to auditors and stakeholders.
- Integration with Existing MLOps Workflows: Harbor seamlessly integrates with popular Machine Learning Operations (MLOps) tools and platforms. By having LLMs readily available in a local registry, organizations can easily incorporate them into their automated model training, deployment, and monitoring pipelines, thereby fostering a more efficient, streamlined AI lifecycle.
In essence, leveraging JupyterLab to download NVIDIA NIM LLMs to Harbor transforms these powerful AI models into managed, secure, and highly available assets within an organization’s internal infrastructure. This strategic move enables businesses to fully leverage the potential of large language models while maintaining control, optimizing resources, and ensuring compliance. The following sections outline the step-by-step process for achieving this integration.
Requirements
- VMware Cloud Foundation 9.0.
- VMware Private AI Foundation is configured.
- Harbor is deployed, and the NVIDIA proxy cache is configured.
- A personal API key for NVIDIA has been generated. Click here to learn how to generate a key.
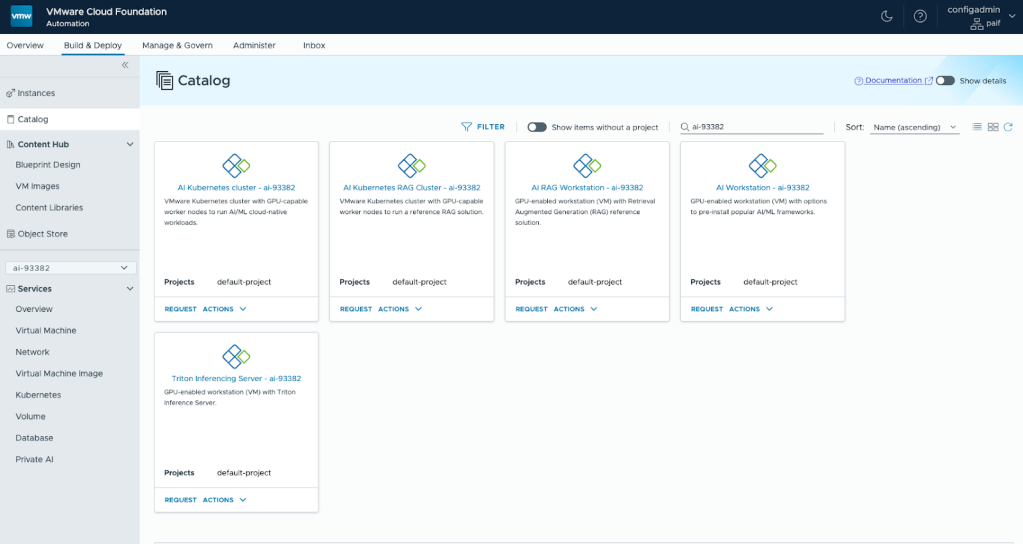
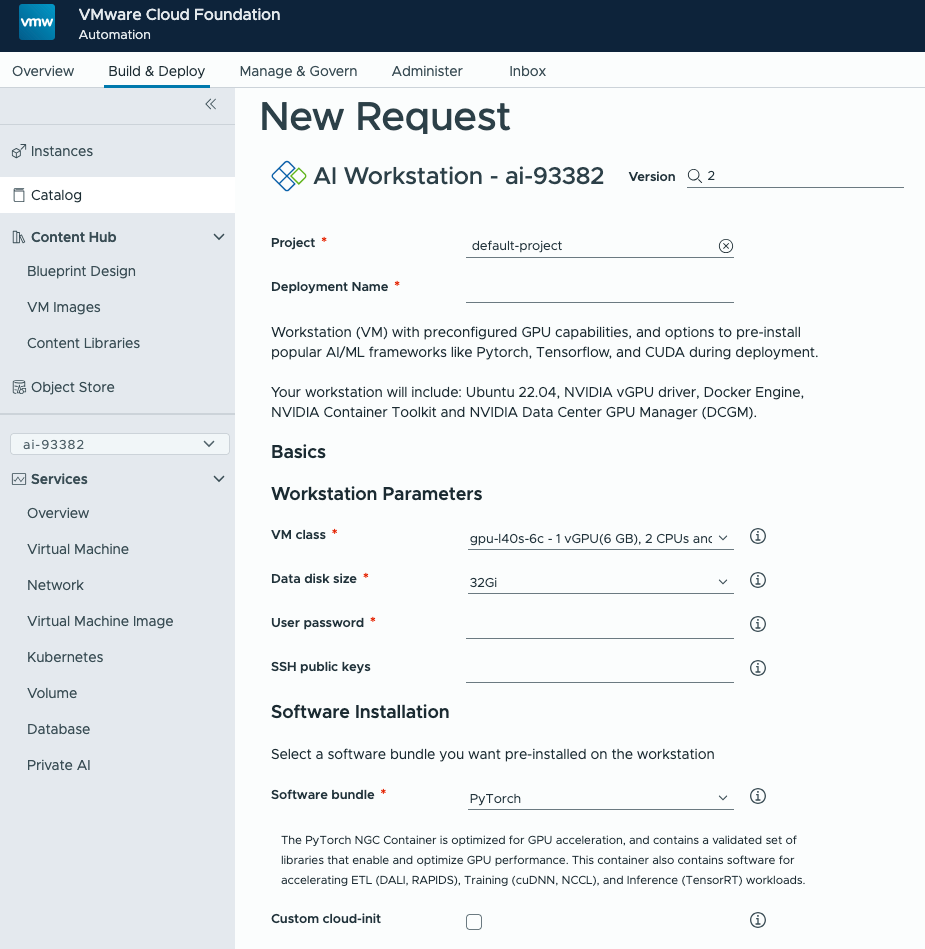
Deploy an AI Workstation
From VCF Automation, Build & Deploy, Catalog, deploy an AI Workstation with the smallest GPU (not required for downloading models) and the largest data disk size for large models. DCGM metrics and JupyterLab authentication are optional.
Once deployed, SSH into the DLVM (Deep Learning VM). The SSH details can be found in the deployment overview.
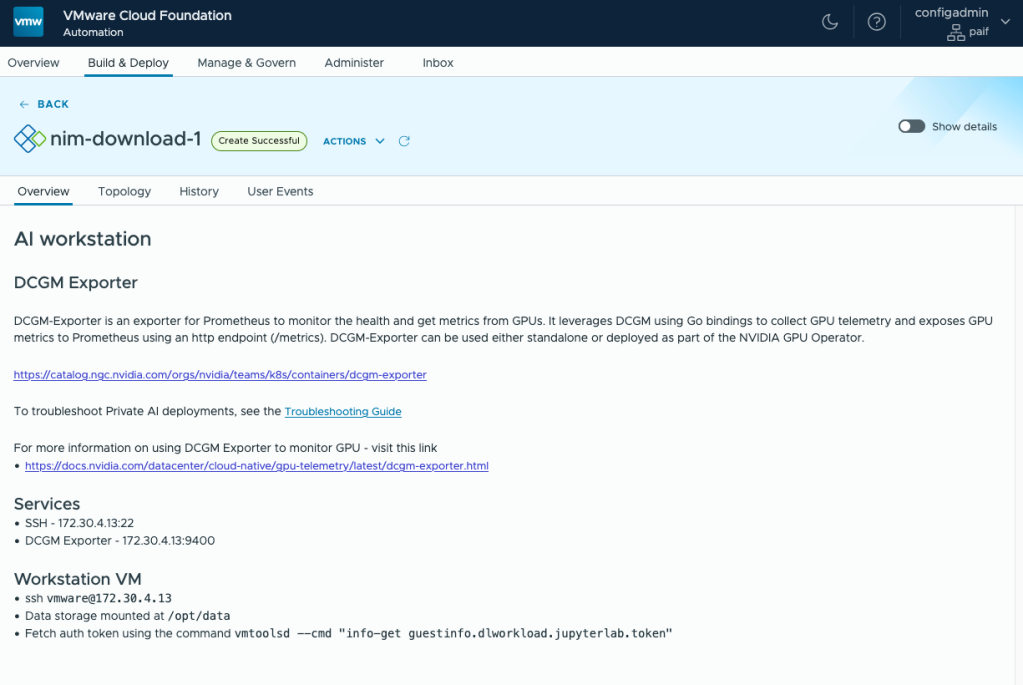
ssh vmware@172.30.4.13
Using JupyterLab Notebooks
Install JupyterLab using Conda. The DLVM includes Conda and provides templates for deploying PyTorch and TensorFlow modules.
Update Conda:
conda update -q -n base -c conda-forge conda
Install PyTorch with JupyterLab:
conda env update -n jupyter --file /home/vmware/conda_envs/pytorch2.3.0_py3.12.yml
Set the owner of the data directory:
sudo chown -R vmware /opt/data
Start JupyterLab:
jupyter lab --ip=0.0.0.0 --notebook-dir=/opt/data --no-browser --port=8888 --NotebookApp.token=’’ &
Before accessing JupyterLab from a browser, the port must be opened in the Automation Services Network. Within the Build & Deploy section, click on Network under Services, then select the VM Load Balancers tab and the deployment name you recently created.
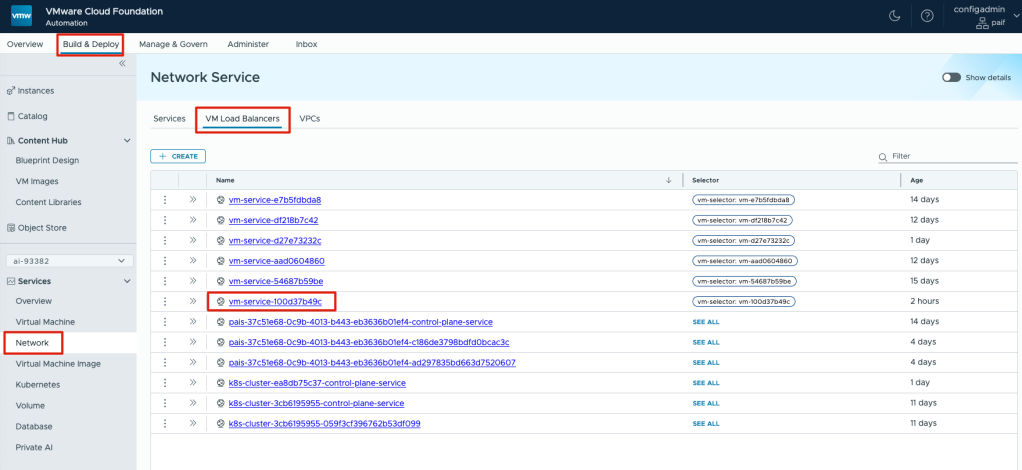
Note: The vm-service name can be referenced by the unique identifier in the name from the Virtual Machines tab in the Instances page.
Next to the vm-service, click on the ellipsis button and click on Edit.
By default, JupyterLab uses port 8888. For the Name, Port, and Target fields, enter 8888 and click the Add button. Then, Save.

Accessing JupyterLab
A JupyterLab notebook is a web-based interactive computational environment for creating and sharing documents with live code, equations, visualizations, and text, integral to data science, scientific computing, and machine learning.
Its core components include:
- Notebook Document (.ipynb file): A JSON file storing cells, metadata (e.g., kernel, language), and embedded output, serving as a self-contained record.
- Cells: Individual blocks with specific purposes:
- Code Cells: For writing and executing code via the notebook’s kernel. They have an input area and an output area for results (text, errors, plots). Execution is sequential; a running cell indicates the kernel is busy.
- Markdown Cells: For narrative text, formatted with GitHub-flavored Markdown.
- Kernel: A background process executing code, language-specific (e.g.,
ipykernelfor Python, or Bash), maintaining execution state (variables, functions), and communicating with JupyterLab via WebSocket. - User Interface (JupyterLab): A flexible, extensible web interface combining notebooks with tools like file browsers, terminals, and text editors in a tabbed environment, supporting extensions.
This structure enables an iterative, exploratory workflow, offering reproducibility, interactive exploration, effective communication, and version control. In essence, a JupyterLab notebook is a dynamic document powered by a backend kernel, encapsulating an interactive session for data analysis and scientific computing.
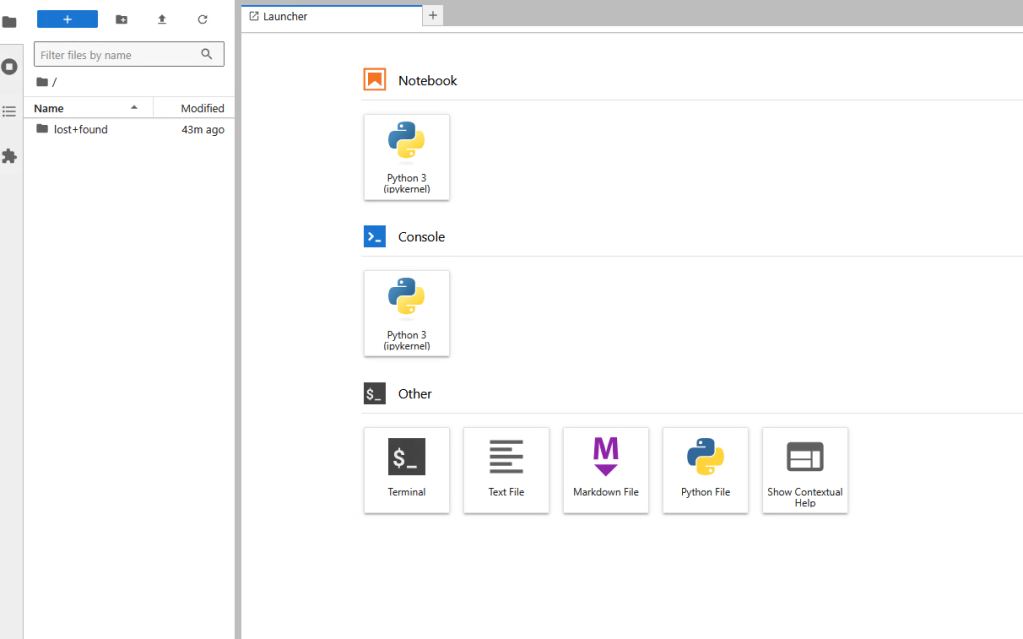
Open a browser and connect to your JupyterLab instance, http://<dlvm-ip>:8888
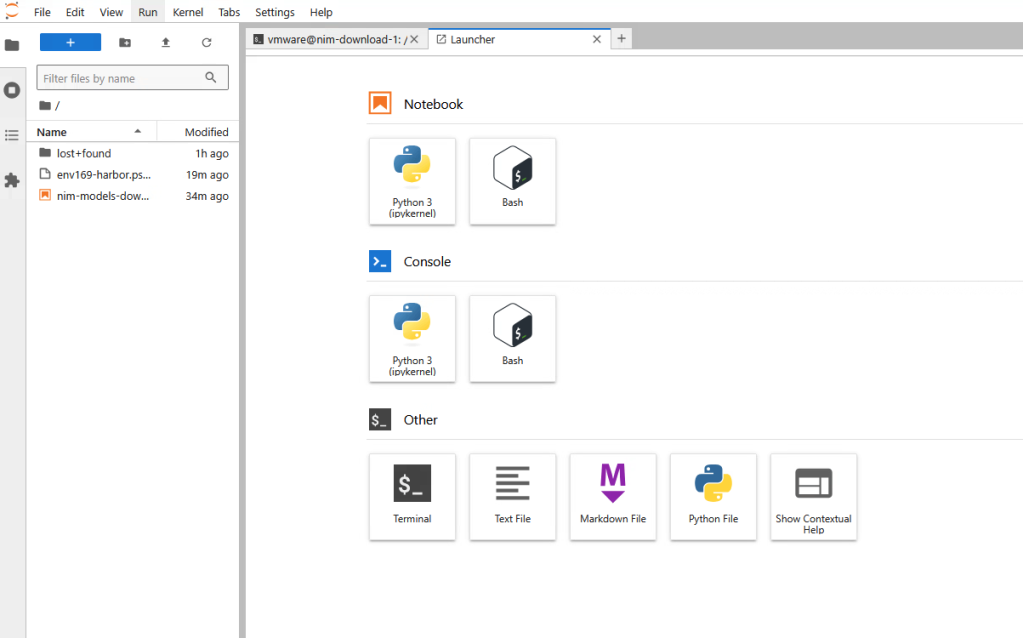
Before downloading and running the notebook, we need to install Bash.
Click on the terminal box:
pip install bash_kernelpython-m bash_kernel.install
Grab the notebook to download NIM containers and models.
wget https://raw.githubusercontent.com/vcf-asa-team/asa-vpaif-n/refs/heads/main/workshop/notebooks/nim-models-download.ipynb
Refresh your browser, and you should see a new notebook on the left and Bash in the Launcher.
Open the nim-models-download notebook by double-clicking. The first cell will be used for defining the variables throughout the notebook.

Update the parameters needed to download the NIM container and Model.
- image_name: Name of the NIM model to download from NGC.
- harbor: The FQDN of your Harbor instance.
- harbor_login: Harbor account to be used to push containers and models.
- harbor_pwd: Harbor account password.
- uri: path to NIM container to download, including the Harbor Proxy Cache created in the previous blog.
- NGC_API_KEY: Your NGC personal key. Click here to learn how to generate a key.
- resource_path: Path to download models to.
Once updated, click the![]() button in the menu section or press Shift+Enter.
button in the menu section or press Shift+Enter.
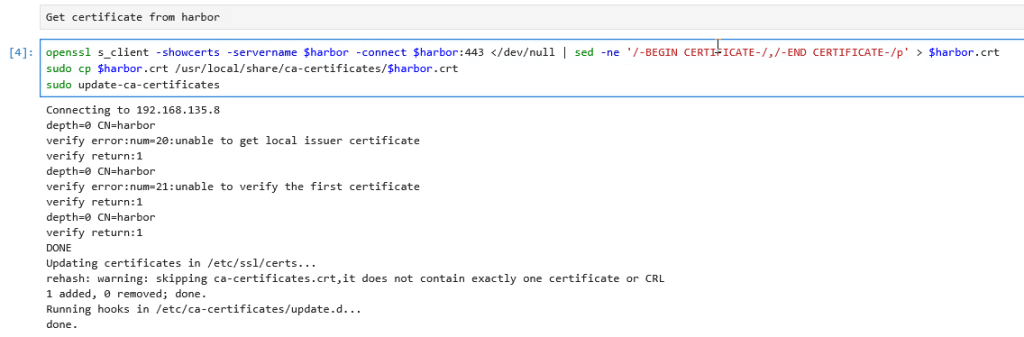
Next, click on the code section and run it to retrieve the certificate from Harbor. Then, follow the code section to download the container from NGC.
Once the container has finished downloading, run the next section of code to list the model profiles, which will show available models, classified according to their compatibility with your system.

In this example, we will select the vllm-bf16-tp1 generic profile, which can run on most NVIDIA GPUs. Highlight the profile ID, copy, and paste it into the next section of code.

Ensure the profile_id has been updated according to your previous selection. Based on the selected profile, update the profile_name to be used when uploading the model to Harbor.
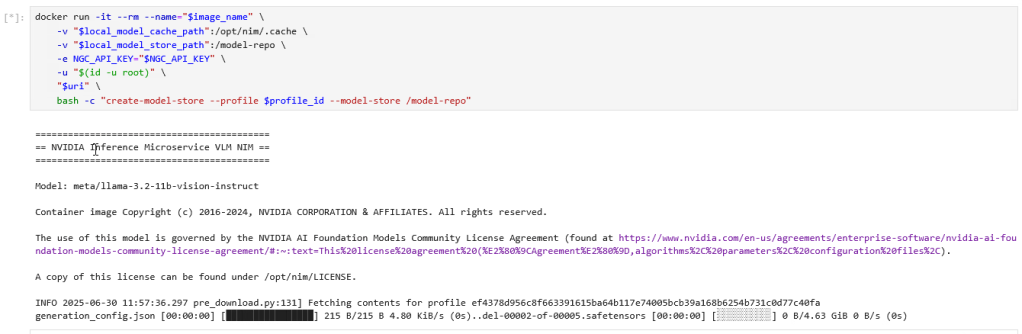
Run the following command to download the model to the DLVM. Depending on the model you are downloading, the time may vary.
Use Docker to authenticate Harbor:

Upload the model to Harbor:

The output provides the pais command to pull the model into your VCF Automation blueprint or scripts.
Example of the pais command to pull the model from Harbor:
pais models pull --modelstore <harbor-fqdn>/model-store --modelName llama-3.2-11b-vision-instruct/vlm-fp16-tp1 -t v1
Repeat this process to download additional models from NVIDIA by modifying the model name and container name in the first step of the Jupyter notebook.
Conclusion
This blog has provided a comprehensive guide to leveraging JupyterLab notebooks for the seamless deployment and management of NVIDIA NIM LLMs within a local Harbor registry. By adopting this strategic approach, organizations can significantly bolster security and privacy, optimize resource utilization, reduce latency, and achieve substantial cost savings. The ability to operate in air-gapped environments, coupled with robust version control and simplified model governance, empowers enterprises to maintain complete control over their AI assets. Furthermore, local hosting facilitates crucial customization and fine-tuning, allowing businesses to tailor LLMs to their specific needs. This integration transforms powerful AI models into secure, managed, and highly available assets within an organization’s infrastructure, enabling businesses to fully realize the potential of large language models while ensuring compliance and operational efficiency.
References
For further reading, see the resources below.
- Visit NVIDIA Build Site
- Interest Request form
- VMware Private AI Foundation webpage
- NVIDIA NIM for Large Language Models (LLMs)
- Visit NVIDIA NGC Catalog
Discover more from VMware Cloud Foundation (VCF) Blog
Subscribe to get the latest posts sent to your email.


