

Image created using NVIDIA FLUX.1-dev NIM
This is part one of six in a multi-blog series providing a practitioner’s guide to VMware Private AI Foundation with NVIDIA.
As more customers embark on their AI journey with the VMware Private AI Foundation with NVIDIA , we are seeing a common thread: a desire for knowledge and insights into the solution’s key capabilities and the AI ecosystem. In response, we’ve curated topics from our conversations with customers over the last couple of years.
We’ll cover these topics in a new 6-part blog series, starting with today’s discussion on the benefits of storing NVIDIA NIM™ containers in Harbor. This blog series aims to provide insight into the key capabilities of VMware Private AI Foundation and the AI ecosystem our customers use.
The remaining topics in this series are as follows:
- The Benefits of Governing NVIDIA Inference Microservice (NIM) and Hugging Face Models in a Private Registry: Exploring why using a private registry is a good fit for NVIDIA NIM™ containers and Hugging Face Models, and the specifics of setting it up.
- Model Gallery: How to Use Jupyter Notebooks to Simplify Model Deployment and Management: Jupyter notebooks are a powerful tool in the AI space. Start using them to help with your tasks, too.
- Day 2 Operations for AI Blueprints in VCF Automation: Gain a deeper understanding of how Private AI Blueprints function within VCF Automation.
- Leveraging Property Groups in Automation Blueprints: Unlock the secrets of automation blueprints by leveraging property groups.
- Unlock AI’s Potential with Open WebUI & NVIDIA NIMs: Get expert guidance on implementing Open-WebUI, the popular open-source chat interface for powerful Retrieval-Augmented Generation. Or focus on vLLM running on a DLVM.
- Seamless AI Integration: OpenWebUI with Private AI Services: Unlock the full potential of your AI with Open WebUI, seamlessly integrated with VCF Private AI Services Retrieval-Augmented Generation.
Stay tuned for new blog posts coming out on a regular basis!
The Benefits of Governing NVIDIA Inference Microservice (NIM) Containers in a Private Registry
As the demand for containerized applications grows, a secure, scalable, and compliant container registry has become increasingly important. In this blog post, we’ll explore the benefits of storing NVIDIA containers in Harbor, a cloud-native registry designed for large-scale container deployments.
NVIDIA NIMs provide optimized, prebuilt inference microservices, facilitating the swift deployment of the latest AI models. These models can be deployed using VMware Private AI Foundation with NVIDIA.
What is Harbor?
Harbor is an open-source container registry that secures Docker container storage, management, and distribution. It’s designed for large-scale container deployments and features high availability, scalability, and compliance. Harbor is built on the Docker Registry and provides several additional features and enhancements.
Why Store NVIDIA NIMs in Harbor?
1. Security
Harbor provides a secure way to store and manage Docker containers. It supports features like:
- Authentication and Authorization: Harbor supports multiple authentication protocols, including LDAP, Active Directory, and OAuth. It also provides role-based access control (RBAC) to restrict access to containers.
- Encryption: Harbor supports REST and transit encryption to protect sensitive data.
- Vulnerability Scanning: Harbor integrates with vulnerability scanning tools, such as Clair, to provide real-time detection and remediation of vulnerabilities.
2. Scalability
Harbor is designed to handle large volumes of Docker containers, making it an ideal choice for large-scale deployments. It supports:
- High Availability: Harbor provides load balancing, replication, and failover, ensuring containers remain consistently available.
- Horizontal Scaling: Harbor can scale horizontally to handle increased traffic and container storage.
3. Compliance
Harbor provides features to ensure compliance with regulatory requirements, such as:
- Audit Logging: Harbor provides detailed audit logs that track all container-related activities.
- Compliance Reporting: Harbor generates compliance reports, making it easier to meet regulatory requirements.
4. Integration
Harbor integrates seamlessly with popular CI/CD tools, making container deployment and management easier to automate. It supports:
- CI/CD Pipeline Integration: Harbor integrates with popular CI/CD tools, including Jenkins, GitLab CI/CD, and Travis CI.
- Kubernetes Integration: Harbor provides a Kubernetes-native registry, enabling easy container deployment and management across Kubernetes clusters.
Real-World Example: Storing NVIDIA Containers in Harbor
Suppose you’re an AI engineer working on a large-scale GenAI initiative. Your team uses NVIDIA NIM containers to deploy and train data. You want to securely store your containers, ensure regulatory compliance, and automate container deployment and management. In this scenario, we will walk you through setting up Harbor as a local mirror for NVIDIA’s registry.
Getting Started with Harbor
There are two methods of deploying Harbor, via VMware vSphere Kubernetes Service or as a virtual machine:
Once Harbor is deployed, we can set up a proxy cache to pull directly from NVIDIA and store containers and models locally within Harbor.
The proxy cache acts as an intermediary, saving local copies of images from upstream registries. Its advantages include improved performance, reduced bandwidth usage, enhanced reliability, centralized control, and simplified management. Considerations are initial pull time, storage needs, and cache invalidation.
The manual process of pulling, tagging, and pushing involves explicitly moving images into a Harbor project. Benefits include clear control, true isolation, simpler version management, and better security for air-gapped environments. Drawbacks include manual effort, higher bandwidth usage, inflexible updates, and no automatic caching.
Overall, the proxy cache is generally more efficient for frequent access to various NVIDIA containers in connected environments, whereas the manual method is better suited for highly regulated or air-gapped settings that require strict control and versioning. A hybrid approach could also work.
Proxy Cache Method
Create a new Registry:
- Log in to Harbor.
- Under Administration, click on Registries.
- Click on New Endpoint.
- Select Docker Registry for the Provider.
- Name the new endpoint.
- The Endpoint URL will be https://nvcr.io
- Access ID will be $oauthtoken.
- Access Secret will be your NGC API key, typically starting with nvapi-****.
- Select Verify Remote Cert.
- Click Test Connection to validate the login credentials you provided.
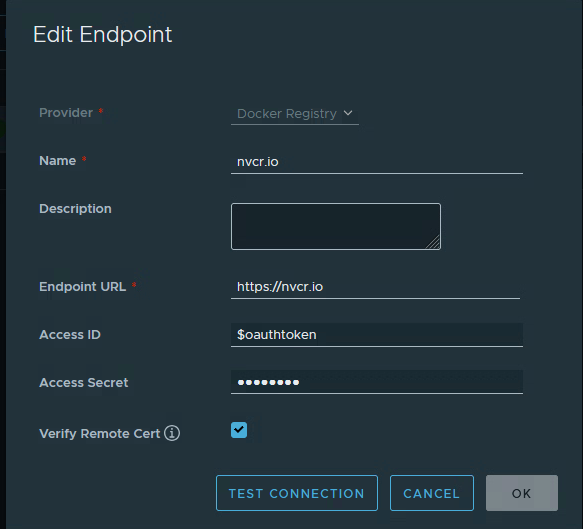
11. Click OK to save.
Create a new Project:
- Click on Projects to show a list of available projects.
- Click on New Project.
- Provide a Project Name.
- Select Public if you do not require users to log in with credentials.
- Enable the Proxy Cache and select the endpoint you created previously.
- Click Ok to save the project.

Test the new Project:
Now that we have a new endpoint registry and proxy-cached project, we can test pulling from the Harbor instance. This example will download an NVIDIA Inference Microservice (llama-3.2-1b-instruct) container from NGC.
Note: This requires Docker to be installed.
The command to pull a container from NVIDIA would be:
docker pull nvcr.io/nim/meta/llama-3.2-1b-instruct:1.12.0
To pull the same container via Harbor, you would replace the nvcr.io with your Harbor FQDN and project name:
docker pull harbor.pse.lab/proxy-cache/nim/meta/llama-3.2-1b-instruct:1.12.0
If the container doesn’t exist in Harbor, it will pull from NVIDIA using the provided credentials. If it does exist, it will pull locally instead.
Push containers without using Proxy Cache
This method requires running multiple Docker commands to accomplish the same task as the proxy cache method.
We will use the same container to pull from NVIDIA, Meta Llama 3.2 1B Instruct. Depending on which container you download from NVIDIA, you may need to log in to NGC first.
docker login -u ‘$oauthtoken’ -p nvapi-****** nvcr.io
Pull the container you want to deploy:
docker pull nvcr.io/nim/meta/llama-3.2-1b-instruct:1.12.0

Tag the container with the new path to the harbor instance:
docker tag nvcr.io/nim/meta/llama-3.2-1b-instruct:1.12.0
harbor.pse.lab/<project-name>/meta/llama-3.2-1b-instruct:1.12.0
Run docker images to confirm the name change using the tag.

The last step is to push the newly tagged container:
docker push harbor.pse.lab/<project-name>/meta/llama-3.2-1b-instruct:1.12.0

Note: Ensure a project has been created in Harbor to store your new container and replace <project-name> in the command above.
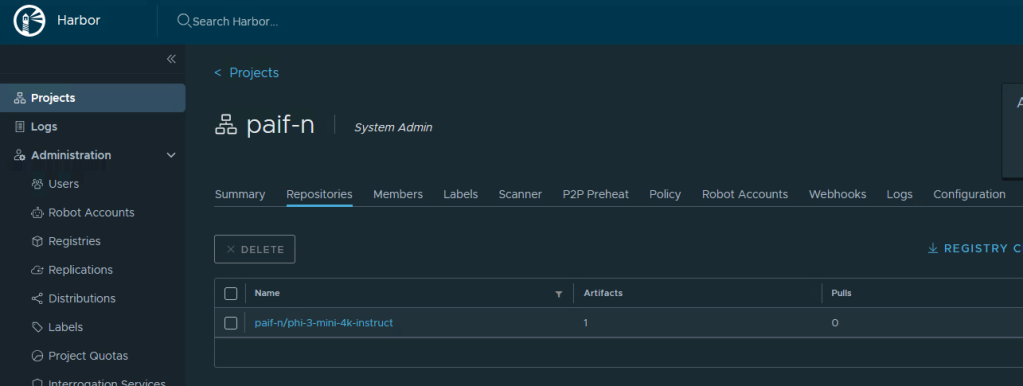
Here is the result of the newly uploaded container in Harbor.
Conclusion
Storing NVIDIA containers in Harbor offers numerous benefits, including enhanced security, scalability, compliance, customization, and seamless integration. AI engineers can use Harbor to ensure their containers are stored and managed securely, meet regulatory requirements, and automate container deployment and management.
Resources
For further reading, see the resources below.
- Harbor Documentation: https://github.com/goharbor/harbor
- Harbor Tutorials: https://goharbor.io/docs/
- Harbor Community: https://goharbor.io/community/
Discover more from VMware Cloud Foundation (VCF) Blog
Subscribe to get the latest posts sent to your email.


