

Note: this blog is about mapping VLAN tags to NSX segments. The same functionality is described for VPC subnets in this post.
Guest VLAN Tagging alone… not great with NSX
By default, a virtual machine sends traffic to its vNIC untagged. The virtual switch then receives that traffic into a single VLAN or NSX segment. This model limits a VM to connecting to at most 10 networks directly. But what if we need to connect the VM to more than 10 networks?
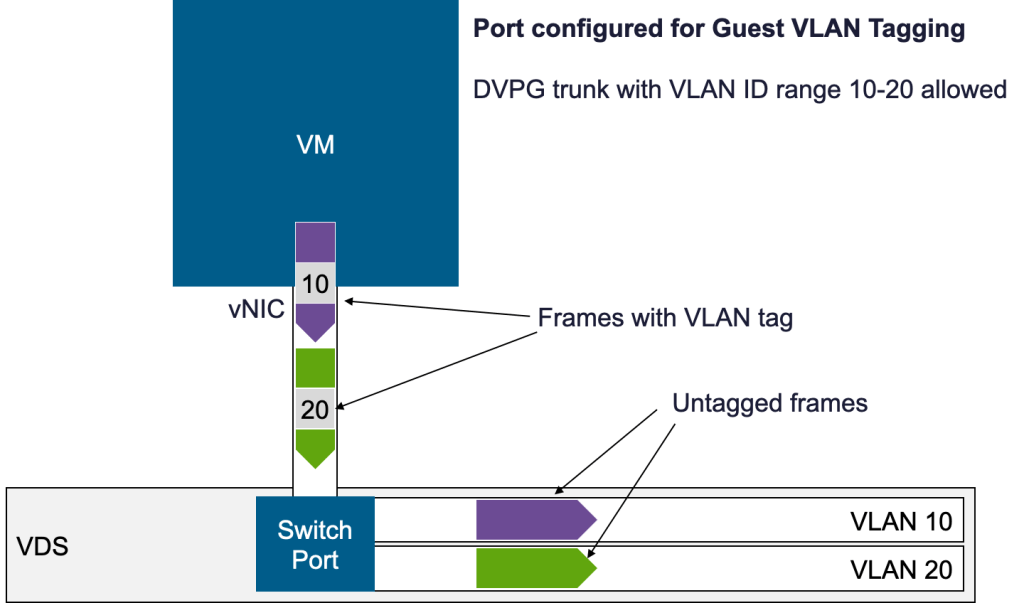
With VLAN-backed networking, this is where Guest VLAN Tagging (GVT) comes in. When Guest VLAN Tagging is enabled on a port group, the VM itself is responsible for inserting VLAN tags (802.1Q C-TAGs) into the frames it transmits. The virtual switch then uses the tag to direct the frame to the correct VLAN. With this approach, a single vNIC can access up to 4,094 VLAN-backed networks, dramatically increasing connectivity without adding more virtual NICs.
Guest VLAN Tagging is enabled by specifying a VLAN ID range on the port group. For example, if you configure a range of 10–20, the vNIC will accept traffic tagged with VLAN IDs from 10 to 20, while dropping traffic tagged with IDs outside that range. The VM’s operating system must, of course, be configured to generate the appropriate VLAN-tagged subinterfaces.
Guest VLAN Tagging can also be configured on NSX segments in a similar way, but there is an important difference: NSX segments are not identified by VLAN IDs. When a tagged frame enters an NSX segment, the virtual switch does not interpret the tag—it simply keeps it as part of the frame payload.
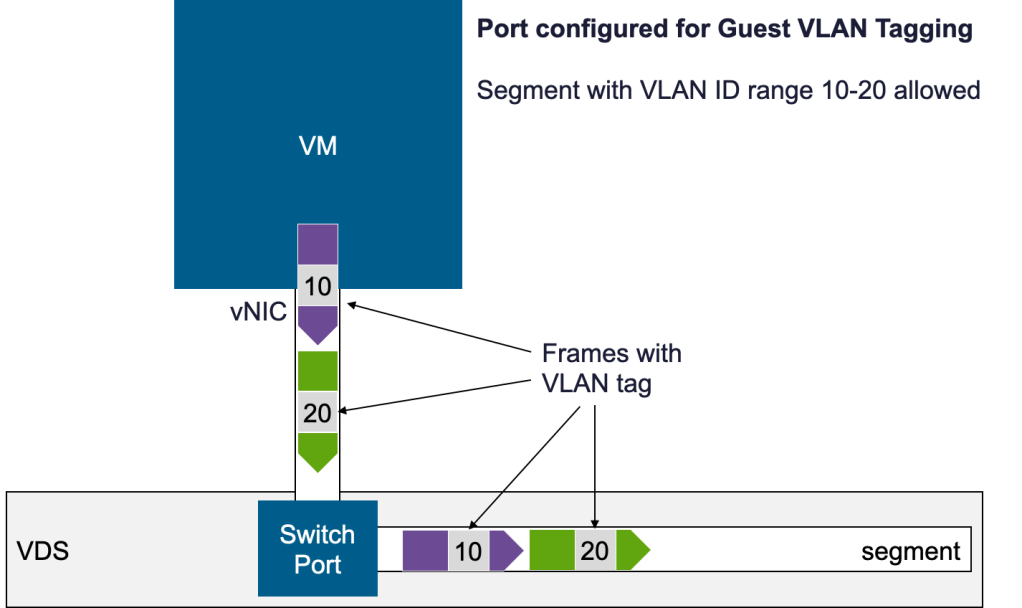
Those tagged frames are handled as raw Layer 2 frames by NSX and as a result:
- They cannot be routed by NSX Gateways.
- They cannot benefit from NAT, or other IP services.
- They can only be switched between transport nodes, and can only be filtered with basic Layer 2 firewall rules.
To bridge this gap, NSX provides a mechanism to map tagged frames to specific segments. This requires explicit configuration to indicate which VLAN tag corresponds to which NSX segment. Interestingly, the feature is documented as “Configure Guest Inter-VLAN Routing”, even though its function is not truly about routing—it’s about defining the mapping of VLAN tags to segments.
Mapping VLAN Tags to NSX Segments
The easiest way to understand the configuration process is through an example.
Imagine a virtual machine with a single vNIC and two IP addresses:
- 10.0.0.1/24, which should be sent on VLAN 10
- 11.0.0.1/24, which should be sent on VLAN 20
Our goal is to ensure that traffic tagged with VLAN 10 is delivered to NSX segment-10, while traffic tagged with VLAN 20 is delivered to NSX segment-20.
Step 1 – Attach the VM to a segment
First, connect the VM to an arbitrary NSX segment—let’s call it segment-default. At this point, the vNIC is not yet associated with segment-10 or segment-20.
Step 2 – Convert the VM’s port into a parent port
Identify the NSX port for the VM on segment-default and designate it as a parent port. The key characteristic of a parent port is that it can spawn child ports, which will be used for VLAN mapping.
Step 3 – Create child ports for each VLAN
Next, create child ports that link back to the parent port:
- A child port on segment-10, configured to capture VLAN-10 traffic arriving on the parent port.
- A child port on segment-20, configured to capture VLAN-20 traffic arriving on the parent port.
Each child port extracts the traffic for its VLAN ID and forwards it untagged to the appropriate segment.
The diagram below illustrates this flow: VLAN-tagged frames leave the VM, are received on the parent port, and then sorted by VLAN ID into the corresponding child ports, which deliver them into their respective segments.
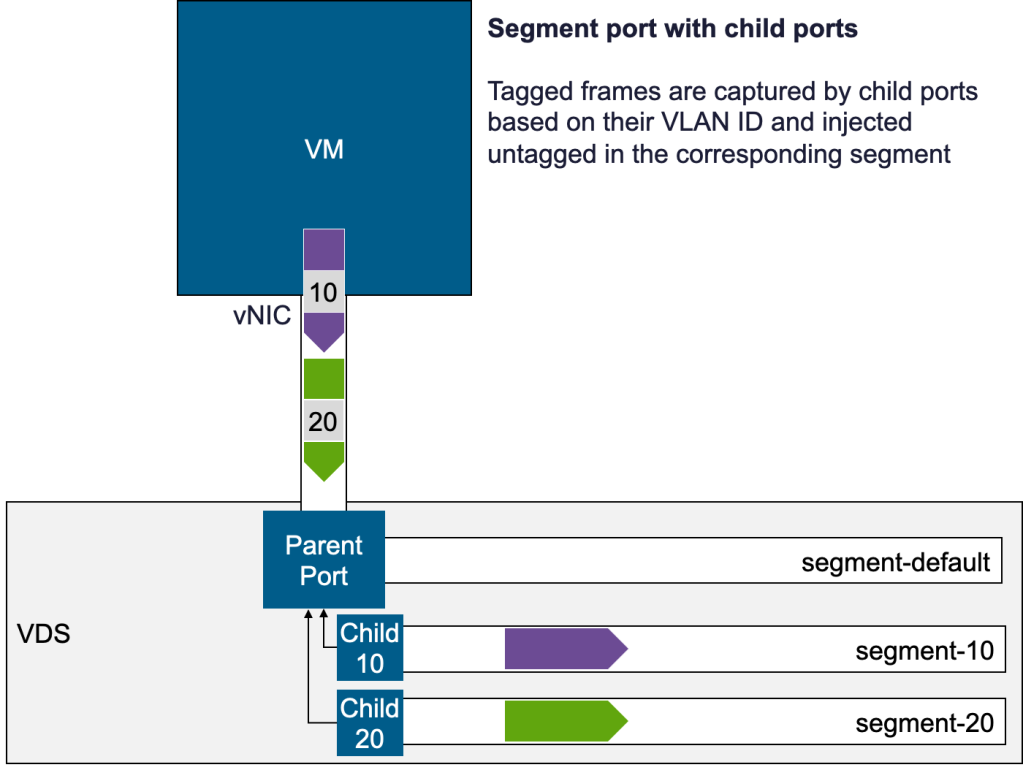
Because the frames are now forwarded untagged in their segments, they can benefit from the full NSX feature set.
Notes
- Parent segment behavior
The segment where the vNIC is initially attached (segment-default) behaves like a regular segment: it only accepts untagged traffic unless Guest VLAN Tagging is enabled. When Guest VLAN Tagging is configured, it accepts tagged frames within the specified VLAN ID range, which could include the infamous VLAN 0 (I have a hard time with this VLAN 0 wording… a topic for another blog.) - Child port behavior
Child ports consistently capture traffic for their assigned VLAN ID, independent of the parent port’s configuration. In practice, this means:- They receive frames for their VLAN ID even when Guest VLAN Tagging is disabled on the parent port.
- They also receive frames for their VLAN ID when Guest VLAN Tagging is enabled on the parent port—regardless of whether that VLAN ID is included in the parent’s allowed VLAN range.
- The official documentation describes this feature under “Configure Guest Inter-VLAN Routing” in the Enhanced Datapath (EDP) section. However, the feature does not require EDP—it works with standard VDS as well.
- Redirecting VLANs
Child ports can also be created on VLAN-backed segments. This allows you to remap traffic—for example, redirecting frames tagged with VLAN X into a VLAN segment configured with VLAN Y.
Configuration steps
To make the discussion more concrete, let’s walk through the steps required to configure child ports on segment-10 and segment-20 for a VM with VLAN-tagged interfaces.
VM Configuration
Our VM (web1) is configured with subinterfaces for VLAN 10 and VLAN 20:
root@web1:~# ip route
default via 172.16.10.1 dev ens192 onlink
10.0.0.0/24 dev ens192.10 proto kernel scope link src 10.0.0.1
20.0.0.0/24 dev ens192.20 proto kernel scope link src 20.0.0.1
172.16.10.0/24 dev ens192 proto kernel scope link src 172.16.10.11
192.168.110.0/24 dev ens160 proto kernel scope link src 192.168.110.13
And the VLAN subinterfaces are defined as follows:
root@web1:~# ip -d link
<…>
4: ens192.10@ens192: …
vlan protocol 802.1Q id 10 addrgenmode eui64
5: ens192.20@ens192: …
vlan protocol 802.1Q id 20 addrgenmode eui64
This ensures traffic to 10.0.0.0/24 leaves with VLAN tag 10, and traffic to 20.0.0.0/24 leaves with VLAN tag 20.
Creation of a child port using API
Step 1 – Retrieve the VM’s Port
The VM is attached to segment-default. Retrieve its NSX port with:
GET https://nsxmgr-01a.corp.vmbeans.com/api/v1/infra/segments/segment-default/ports/
(Where nsxmgr-01a.corp.vmbeans.com is the NSX manager in our lab.)
From the API response, we need to extract the path of the port where our VM is connected on segment-default. In this example, only a single port is returned. If multiple ports are listed, you can identify the correct one by checking its display_name field.
For our case, the path we obtain is:
/infra/segments/segment-default/ports/default:fcb519db-555d-4898-86fe-b4e2dfb88448
For reference, here is the full output the response, with this path and the display_name for the port highlighted:
{
“results”: [
{
“attachment”: {
“id”: “33458788-40a0-4704-8190-40229eb23dc3”,
“traffic_tag”: 0,
“hyperbus_mode”: “DISABLE”
},
“admin_state”: “UP”,
“resource_type”: “SegmentPort”,
“id”: “default:fcb519db-555d-4898-86fe-b4e2dfb88448”,
“display_name”: “web1.vmx@33458788-40a0-4704-8190-40229eb23dc3“,
“path”: “/infra/segments/segment-default/ports/default:fcb519db-555d-4898-86fe-b4e2dfb88448“,
“relative_path”: “default:fcb519db-555d-4898-86fe-b4e2dfb88448”,
“parent_path”: “/infra/segments/segment-default”,
“remote_path”: “”,
“unique_id”: “fcb519db-555d-4898-86fe-b4e2dfb88448”,
“realization_id”: “fcb519db-555d-4898-86fe-b4e2dfb88448”,
“owner_id”: “2ec8aa62-30fe-4384-a9a5-3ef1bccd986d”,
“marked_for_delete”: false,
“overridden”: false,
“_system_owned”: false,
“_protection”: “NOT_PROTECTED”,
“_create_time”: 1755807527078,
“_create_user”: “system”,
“_last_modified_time”: 1755807672400,
“_last_modified_user”: “admin”,
“_revision”: 1
}
],
“result_count”: 1,
“sort_by”: “display_name”,
“sort_ascending”: true
}
Step 2 – Convert the Port into a Parent Port
Next, let’s configure this port as a parent port. We’re directly patching the port using its path, retrieved in the previous step:
PATCH https://nsxmgr-01a.corp.vmbeans.com/api/v1/infra/segments/segment-default/ports/
default:fcb519db-555d-4898-86fe-b4e2dfb88448
{
“attachment”: {
“type”: “PARENT”
}
}
This enables us to create child ports that reference it.
Step 3 – Create a Child Port for VLAN 10
Now we create a child port on segment-10. We’ll need:
- The path representing segment-10 (/infra/segments/segment-10). This can be retrieved from the UI, clicking on the 3-dots menu close to the segment name (Copy Path to Clipboard).
- A unique ID for the child port. Pick a sensible string, and append it to /segments/ports. Here, we picked /segments/ports/child-10 for example.
- Traffic tag: this is the VLAN ID we want our child port to track.
- The context_id is the parent port path (from Step 1)
- Finally, we’ll need to create a static binding using the VM’s IP and MAC for VLAN 10 (10.0.0.1 and 00:50:56:9f:f3:e2). Note: it’s important to provide a static binding for the API call to succeed, however it looks like it does not really matter whether the IP address or the mac address provided match the VM interface characteristics (meaning: dummy values work.)
- The display_name is a string of your choice, describing the port. Here, we picked “child port for vlan 10“.
The API call is:
PUT https://nsxmgr-01a.corp.vmbeans.com/api/v1/infra/segments/segment-10/ports/child-10
{
“attachment”: {
“id”: “/segments/ports/child-10“,
“traffic_tag”: 10,
“context_id”: “/infra/segments/segment-default/ports/default:fcb519db-555d-4898-86fe-b4e2dfb88448“,
“hyperbus_mode”: “DISABLE”,
“type”: “CHILD”,
“app_id”: “appid”
},
“address_bindings”: [
{
“ip_address”: “10.0.0.1“,
“mac_address”: “00:50:56:9f:f3:e2“,
“vlan_id”: 10
}
],
“admin_state”: “UP”,
“resource_type”: “SegmentPort”,
“display_name”: “child port for vlan 10“
}
At this point, VLAN 10 traffic from the VM is mapped into segment-10.
Creation of a Child Port for via UI
Let’s do the same for VLAN 20, but this time using the NSX UI:
- Make sure segment-20 already exists.
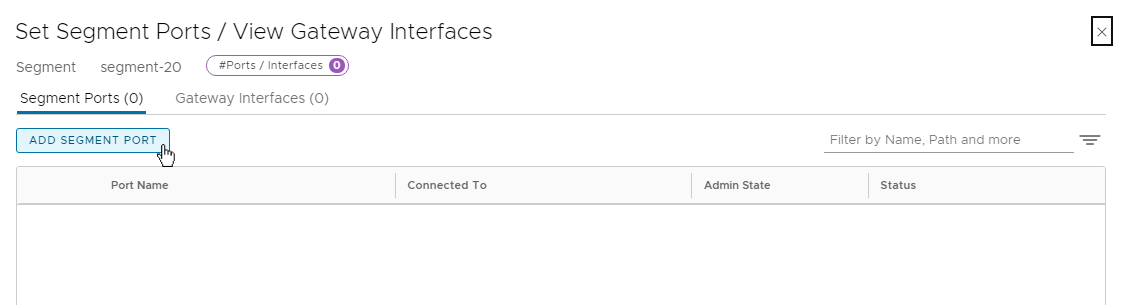
- In the NSX Manager UI, open the entry for segment-20.
- Under Ports / Interfaces, click Set
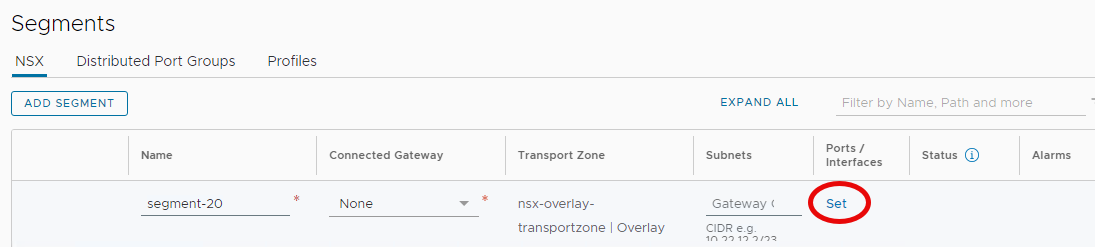
- then Add Segment Port.
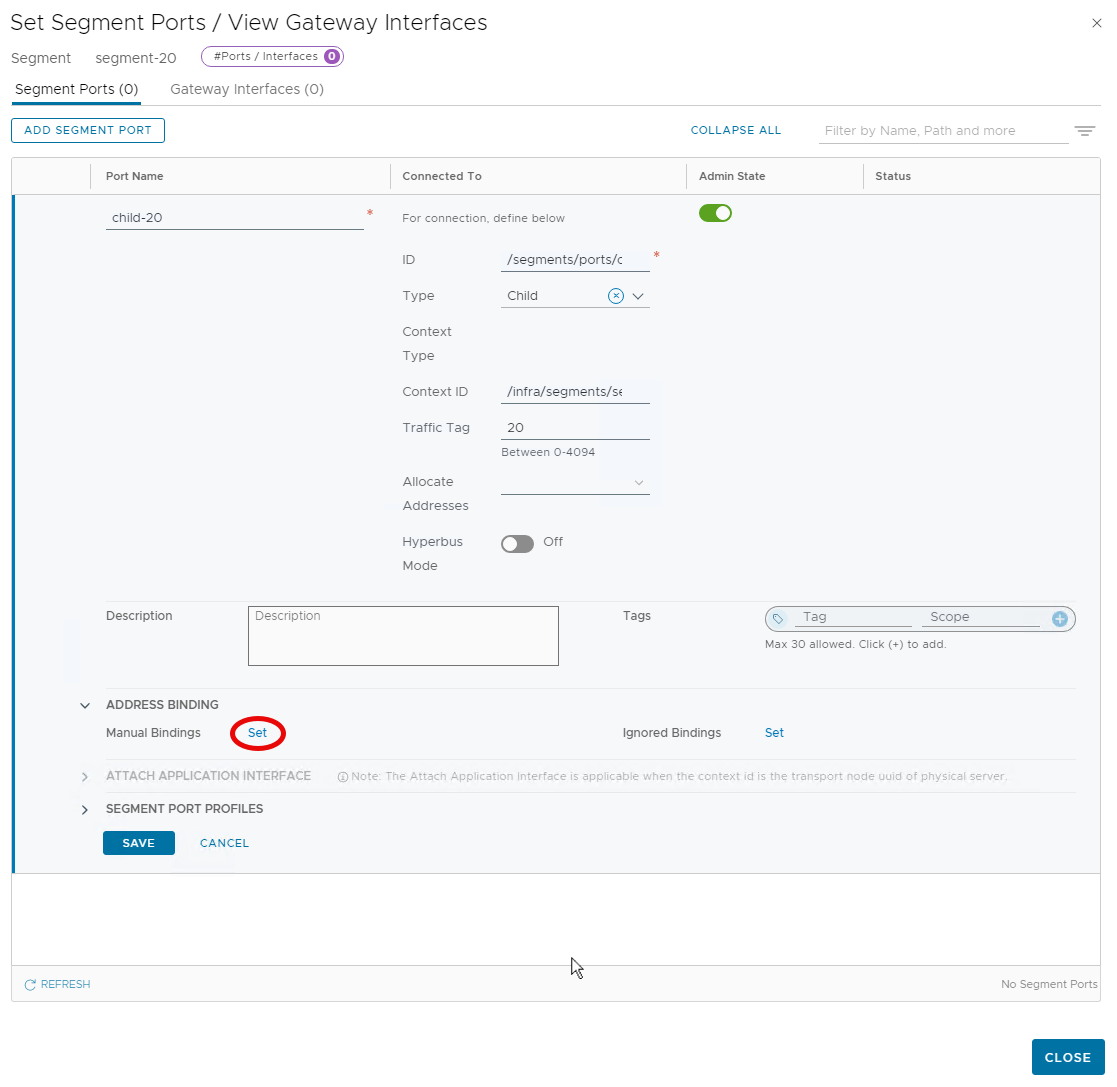
- Finally, provide:
- a name for the port (child-20)
- An ID (/segments/ports/child-20) for this new port
- Select Child for the type
- The parent port path is the context ID, same value as before /infra/segments/segment-default/ports/default:fcb519db-555d-4898-86fe-b4e2dfb88448
- The VLAN ID (Traffic Tag 20)
- Then click on “Set” next to Manual Bindings
- Add a Manual Binding for the VM’s interface (IP/MAC).
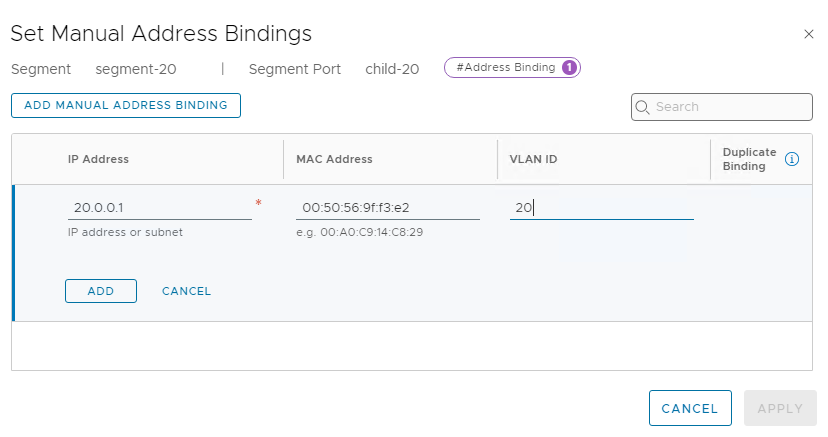
- Click Add then Save.
Now VLAN 20 traffic from the VM is mapped into segment-20.
Discover more from VMware Cloud Foundation (VCF) Blog
Subscribe to get the latest posts sent to your email.


