

This article was written by Vincent La, Senior R&D Engineer in the Broadcom engineering team on VMware Private AI and edited by Justin Murray, Marketing Product Engineer in the VMware Cloud Foundation business unit within Broadcom.
Goals
Our overall goal with VMware Private AI Foundation with NVIDIA is to make the development and deployment of AI applications easier for everyone on the VCF platform. We do this by giving you (1) a Model Store for governance of your on-premises models, (2) a Model Runtime Service for bringing one or more of those models to life, (3) a Data Indexing and Retrieval Service for placing your private data into a knowledge base accessing a vector database, and finally (4) an Agent Builder Service that ties all of these together into a running Agent that is called by separate application logic to get the AI part of the application done. Once you have built your agent, using Private AI services, the next question is how to use that agent via its APIs. This last question is the subject we go through in this article at the code level.
Pre-requisites
- Your supervisor has Private AI Services (PAIS) installed
- Your supervisor namespace has the PAISConfiguration Custom Resource Definition (CRD) running, and the API Server & UI are reachable from your network.
- Your supervisor namespace has a completions Model Endpoint deployed. This is done using the Model Runtime service within the set of Private AI Services.
Creating an Agent
We’ll start by creating an agent in the Private AI Services Agent Builder UI. Here we can specify the underlying model supporting the agent, setting system instructions, enable tooling such as RAG, and define session information. For purposes of this demo, we will be creating a simple agent that will respond as if he were William Shakespeare.
First navigate to Agents in your Agent Builder and click on Create Agent.
Provide a Name and select the completion Model Endpoint from the Model endpoint dropdown. This will be the underlying model generating the responses.
Next toggle Add Instructions, and add this following instruction to the agent:
“Respond to all requests as if you were the second coming of William Shakespeare”
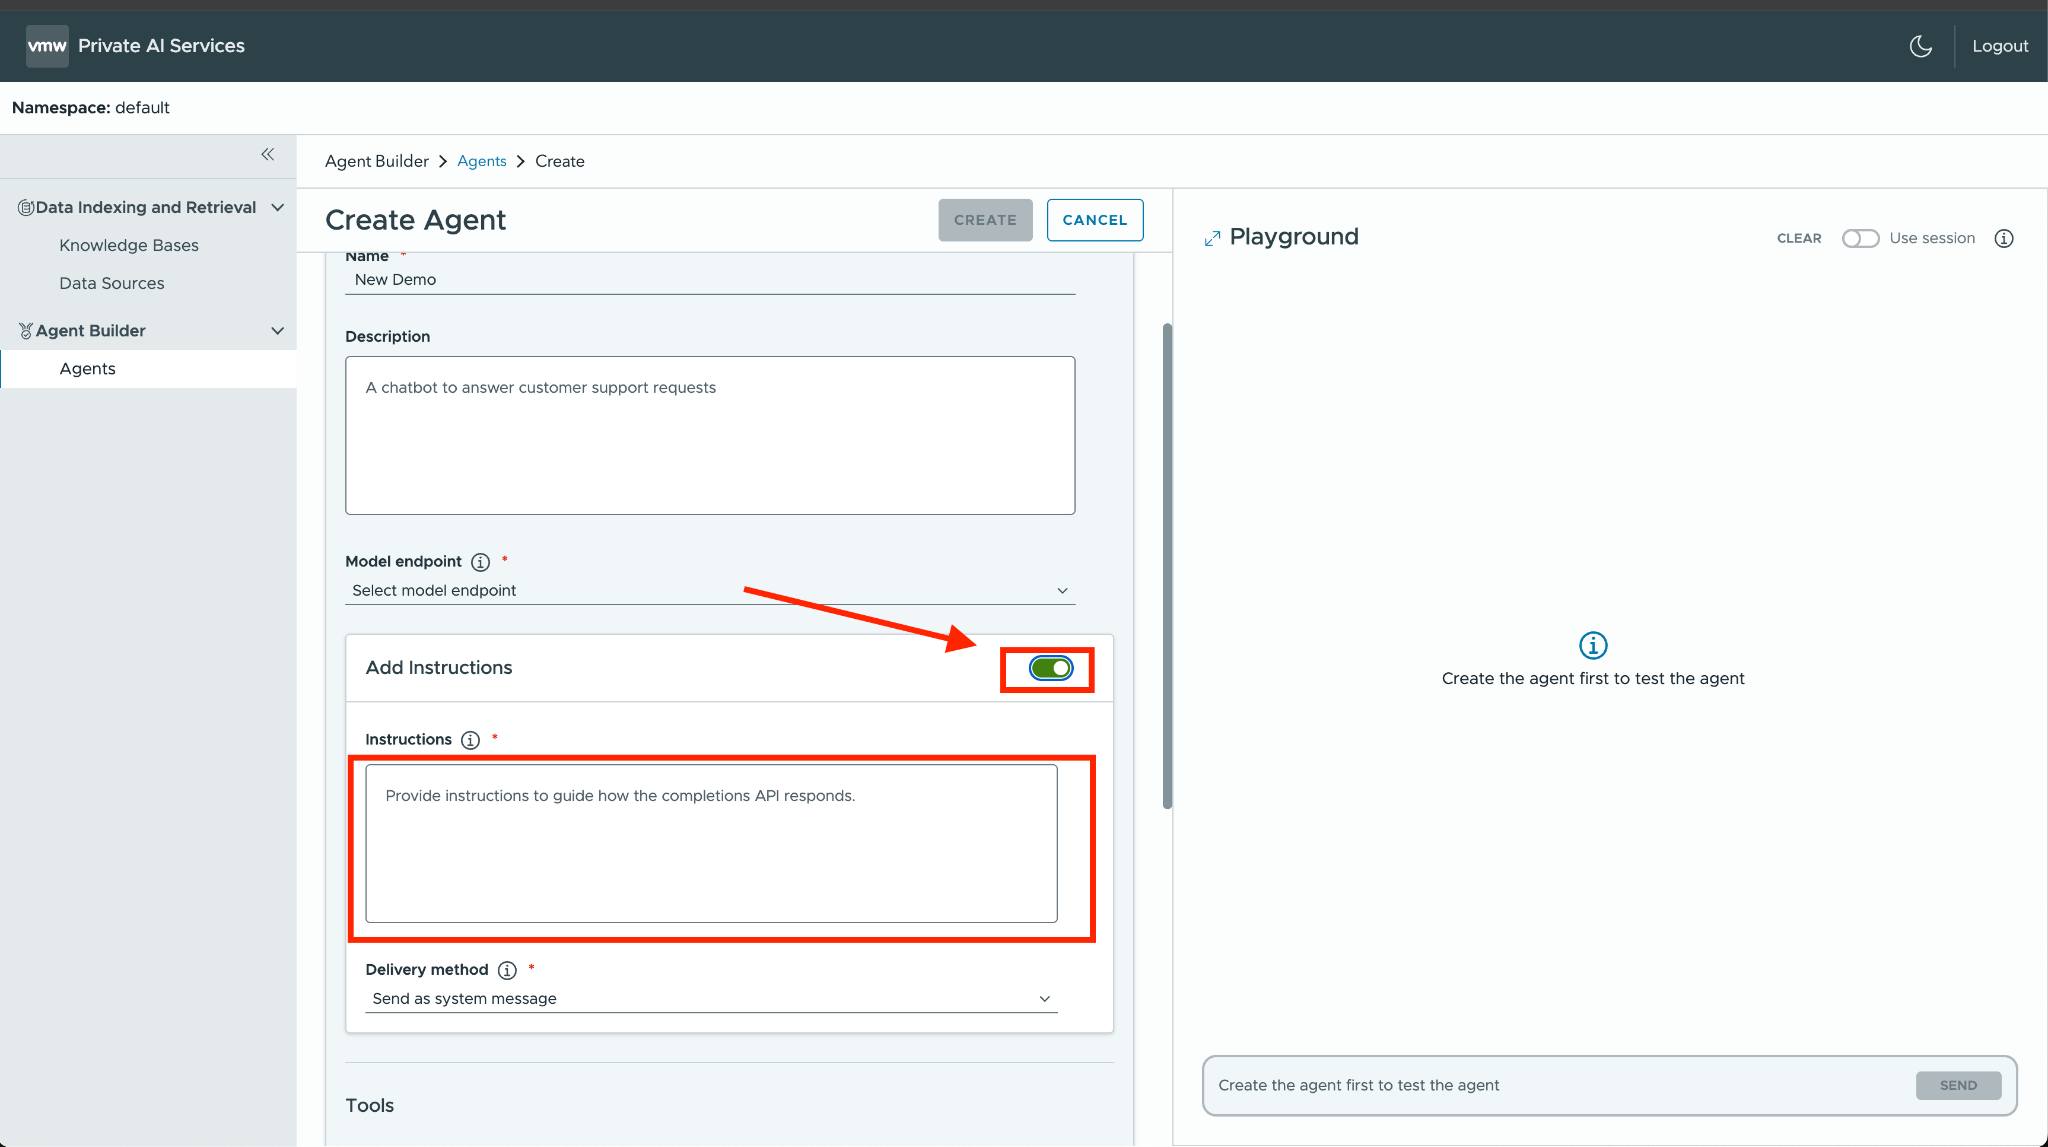
Add a Chat history max length of 10000 and click on Create.
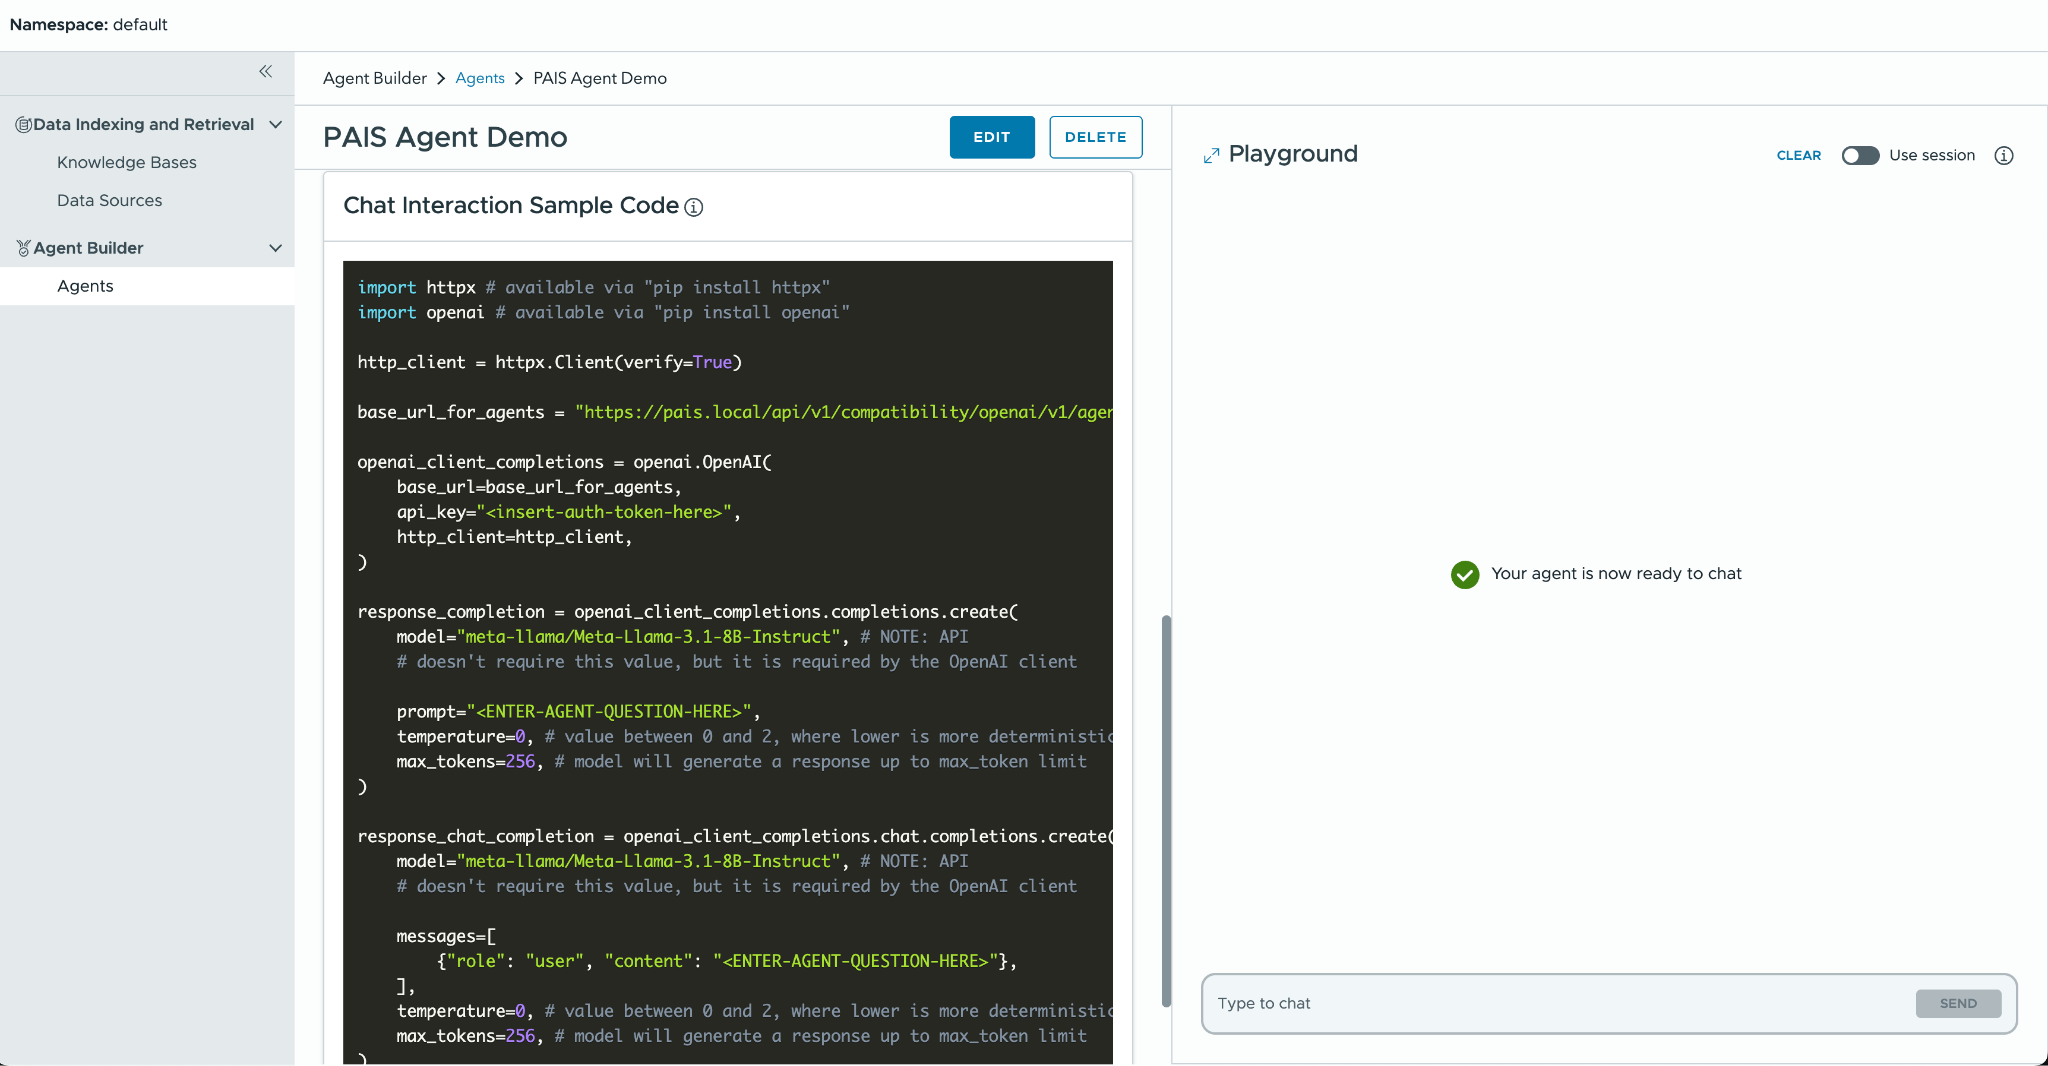
After saving, you can test out your agent responses on the right chat window before deciding to deploy this to an upstream service. Once you’re satisfied with the results, scroll to the bottom and you’ll see a Chat Interaction Sample Code which can be used by the upstream service.
Connecting your Agent to an Upstream Service
We will be leveraging Openweb UI, an open source framework for interacting with local or externally hosted models, as our upstream service. This will be installed as a pod in our namespace with an nginx proxy to the Private AI OpenAI API endpoints.
Setting up Openweb UI
Note: Before proceeding, you will need access to the internal PAIS Services and certificate secrets.
Here we first set some environment variables and then generate two yaml files.
export PAIS_NAME=$(kubectl get paisconfiguration -o jsonpath='{.items[0].metadata.name}’)
export PAIS_UID=$(kubectl get paisconfiguration -o jsonpath='{.items[0].metadata.uid}’)
export PAIS_NGINX_IMAGE=$(kubectl get deployment pais-api-$PAIS_UID -o jsonpath='{.spec.template.spec.containers[1].image}’)
export PAIS_SERVICE_TYPE=ClusterIP
export PAIS_STORAGE_CLASS_NAME=$(kubectl get storageclass -o jsonpath='{.items[0].metadata.name}’)
The first file contains a deployment with Openweb UI running along with the nginx proxy. The second file contains an ingress yaml that will expose the deployed service via ingress.
|
1 2 3 4 5 6 7 8 9 10 11 12 13 14 15 16 17 18 19 20 21 22 23 24 25 26 27 28 29 30 31 32 33 34 35 36 37 38 39 40 41 42 43 44 45 46 47 48 49 50 51 52 53 54 55 56 57 58 59 60 61 62 63 64 65 66 67 68 69 70 71 72 73 74 75 76 77 78 79 80 81 82 83 84 85 86 87 88 89 90 91 92 93 94 95 96 97 98 99 100 101 102 103 104 105 106 107 108 109 110 111 112 113 114 115 116 117 118 119 120 121 122 123 124 125 126 127 128 129 130 131 132 133 134 135 136 137 138 139 140 141 142 143 144 145 146 147 148 149 150 151 152 153 154 155 156 157 158 159 160 161 162 163 164 165 166 167 168 169 170 171 172 173 174 175 176 177 178 179 180 181 182 183 184 185 186 187 188 189 190 191 192 193 194 195 196 197 198 199 200 201 202 203 204 205 206 207 208 209 210 211 212 213 214 215 216 217 218 219 220 221 222 223 224 225 226 227 228 229 230 231 232 233 234 235 236 237 238 239 240 241 242 243 244 245 246 247 248 249 250 251 252 253 254 255 256 257 258 259 260 261 262 263 264 265 266 267 268 269 270 271 272 273 274 275 276 277 278 279 280 281 282 283 284 285 286 287 288 289 290 291 292 293 294 295 296 297 298 299 300 301 302 303 304 305 306 |
apiVersion: v1 kind: ConfigMap metadata: name: open-webui data: nginx.conf: | worker_processes auto; error_log /dev/stderr debug; pid /tmp/nginx.pid; events { worker_connections 1024; } http { include /etc/nginx/mime.types; default_type application/octet-stream; # Unprivileged user runtime env: only /tmp is writable proxy_temp_path /tmp/proxy_temp; client_body_temp_path /tmp/client_temp; fastcgi_temp_path /tmp/fastcgi_temp; uwsgi_temp_path /tmp/uwsgi_temp; scgi_temp_path /tmp/scgi_temp; log_format main '$remote_addr:$server_port - $remote_user [$time_local] "$request" ' '$status $body_bytes_sent "$http_referer" ' '"$http_user_agent" "$http_x_forwarded_for"'; access_log /dev/stdout main; sendfile on; keepalive_timeout 65; include /etc/pais/conf.d/*.conf; client_max_body_size 10M; # all inference requests should be way below this proxy_buffer_size 128k; proxy_buffers 4 256k; proxy_busy_buffers_size 256k; # non-streaming completions can take a LONG time to generate. We need to bump # timeouts a bit to avoid closing the connection before the upstream starts # sending us data or if we receive some data but then it takes a bit to receive # more (e.g., if an Agent first serves static REX data and then starts streaming # from the LLM) proxy_read_timeout 300; proxy_send_timeout 300; } nginx-conf.d-server.conf: | # server block uptime checks and (outgoing) mTLS traffic # # NOTE: This is never exposed to the outside (it woudld become an open # proxy bypassing the open-webUI API tokens!) server { listen 1080; server_name open-webui; location ~ ^/(ready|health)$ { if ($request_method != GET) { return 405; } return 200 "UP"; } # configure the mTLS certificate to use to authenticate to the backend services # used by any of the proxy locations below proxy_ssl_certificate /mtls-cert/tls.crt; proxy_ssl_certificate_key /mtls-cert/tls.key; proxy_ssl_trusted_certificate /mtls-cert/ca.crt; proxy_ssl_protocols TLSv1.2 TLSv1.3; proxy_ssl_ciphers HIGH:!aNULL:!MD5; proxy_ssl_verify on; proxy_ssl_verify_depth 2; # common settings across all proxy locations # # NOTE: Preserving request headers is important at the very least for the # X-Forwarded-Host header, so that backend API or oauth2-proxy can infer the # FQDN when building redirects. proxy_pass_request_headers on; proxy_http_version 1.1; location /mtls-proxy/ { # we use mTLS - ensure we don't forward the dummy header inserted by open-webUI proxy_set_header Authorization ""; # if the client requests a model listing while talking to the Assistants # sub-API, we just return the top-level model listing. A client should # not do this, but the UI does (because we just claim that the Assistant # base-path is the root of the OpenAI URL) rewrite ^/mtls-proxy/(assistants|agents)//[^/]+/models$ /mtls-proxy/models last; # NOTE : The &#91 characters above should be the left square bracket character proxy_pass https://pais-api$PAIS_UID:2443/api/v1/compatibility/openai/v1/; # The PAIS_UID variable value is found when you kubectl apply -f paisconfiguration.yaml } # Anything that is not an API location is not found location / { return 404; } } # server block for user traffic (incoming) server { listen 1443 ssl; server_name open-webui; ssl_certificate /tmp/ingress-cert-merged.crt; ssl_certificate_key /ingress-cert/tls.key; ssl_protocols TLSv1 TLSv1.1 TLSv1.2 TLSv1.3; ssl_ciphers HIGH:!aNULL:!MD5; # common settings across all proxy locations # # NOTE: Preserving request headers is important at the very least for the # X-Forwarded-Host header, so that backend API or oauth2-proxy can infer the # FQDN when building redirects. proxy_pass_request_headers on; proxy_http_version 1.1; # after terminating TLS, forward everything to the open-webui sidecar location / { proxy_pass http://127.0.0.1:8080; } } --- apiVersion: v1 kind: PersistentVolumeClaim metadata: name: open-webui spec: accessModes: [ "ReadWriteOnce" ] storageClassName: standard # storageclassname is user defined - it must exist in your namespace resources: requests: storage: 1Gi --- apiVersion: apps/v1 kind: Deployment metadata: name: open-webui spec: selector: matchLabels: app: open-webui template: metadata: labels: app: open-webui spec: containers: - command: - bash - -c - | cat /ingress-cert/tls.crt /ingress-cert/ca.crt > /tmp/ingress-cert-merged.crt; nginx -g 'daemon off;' -c /etc/pais/nginx.conf image: ${PAIS_NGINX_IMAGE}:5000/dev-sup-svc/pais/components/nginx@sha256:730xxxxxxxx # Above, we re-use the nginx image from the api-server deployment imagePullPolicy: IfNotPresent livenessProbe: failureThreshold: 1 httpGet: path: /health?probe=liveness port: 1080 scheme: HTTP periodSeconds: 15 successThreshold: 1 timeoutSeconds: 1 name: nginx ports: - containerPort: 1443 name: https protocol: TCP readinessProbe: failureThreshold: 1 httpGet: path: /ready?probe=readiness port: 1080 scheme: HTTP periodSeconds: 15 successThreshold: 1 timeoutSeconds: 1 resources: limits: cpu: 100m memory: 100Mi requests: cpu: 100m memory: 100Mi securityContext: allowPrivilegeEscalation: false capabilities: drop: - ALL readOnlyRootFilesystem: true runAsGroup: 101 runAsNonRoot: true runAsUser: 101 seccompProfile: type: RuntimeDefault startupProbe: failureThreshold: 3 httpGet: path: /ready?probe=startup port: 1080 scheme: HTTP periodSeconds: 1 successThreshold: 1 timeoutSeconds: 1 volumeMounts: - mountPath: /etc/pais name: config-volume readOnly: true - mountPath: /ingress-cert name: ingress-cert-volume readOnly: true - mountPath: /mtls-cert name: mtls-cert-volume readOnly: true - mountPath: /tmp name: writable-tmp - env: # Configuration options defined here: # # https://docs.openwebui.com/getting-started/env-configuration # - name: ENABLE_SIGNUP value: "True" - name: ENABLE_DIRECT_CONNECTIONS value: "False" - name: WEBUI_URL value: "https://open-webui.local" - name: ENABLE_OPENAI_API value: "True" - name: OPENAI_API_BASE_URL value: http://127.0.0.1:1080/mtls-proxy/ - name: OPENAI_API_KEY value: dummy-we-use-mtls - name: ENABLE_OLLAMA_API value: "False" - name: ENABLE_WEBSOCKET_SUPPORT value: "False" image: ghcr.io/open-webui/open-webui:main imagePullPolicy: IfNotPresent name: open-webui volumeMounts: - mountPath: /app/backend/data name: open-webui-data imagePullSecrets: - name: pais-pais-reg-creds-864ebff6-c905-4c5e-a5ce-76615b806543 # Above value is retrieved from ${PAIS_UID} after kubectl apply -f paisconfiguration.yaml securityContext: {} volumes: - name: open-webui-data persistentVolumeClaim: claimName: open-webui - configMap: defaultMode: 420 items: - key: nginx.conf path: nginx.conf - key: nginx-conf.d-server.conf path: conf.d/server.conf name: open-webui name: config-volume - name: ingress-cert-volume secret: defaultMode: 420 items: - key: ca.crt path: ca.crt - key: tls.crt path: tls.crt - key: tls.key path: tls.key secretName: pais-ingress-default - name: mtls-cert-volume secret: defaultMode: 420 items: - key: ca.crt path: ca.crt - key: tls.crt path: tls.crt - key: tls.key path: tls.key secretName: pais-mtls-${PAIS_UID} # Above value is retrieved from ${PAIS_UID} after kubectl apply -f paisconfiguration.yaml - emptyDir: {} name: writable-tmp --- apiVersion: v1 kind: Service metadata: annotations: # Necessary for telling contour that this is an TLS service projectcontour.io/upstream-protocol.tls: "1443" name: open-webui spec: ports: - appProtocol: https port: 443 protocol: TCP targetPort: 1443 selector: app: open-webui type: ClusterIP |
Take the above file that you create at /tmp/open-webui-components.yaml and apply it to your namespace.
Next, you can expose the service via ingress by creating the yaml below. Create a file named /tmp/open-webui-ingress.yaml with the following contents.
|
1 2 3 4 5 6 7 8 9 10 11 12 13 14 15 16 17 18 19 20 21 22 23 24 25 26 27 28 29 30 31 32 33 34 35 36 37 38 39 40 41 42 43 44 45 46 47 48 49 50 51 52 53 |
apiVersion: cert-manager.io/v1 kind: Issuer metadata: name: open-webui spec: selfSigned: {} --- apiVersion: cert-manager.io/v1 kind: Certificate metadata: name: open-webui spec: secretName: open-webui-tls-cert issuerRef: name: open-webui commonName: open-webui.local dnsNames: - open-webui.local --- apiVersion: projectcontour.io/v1 kind: HTTPProxy metadata: name: open-webui spec: routes: - services: - name: open-webui port: 443 protocol: tls validation: caSecret: pais-ingress-${PAIS_NAME} subjectName: pais-ingress-${PAIS_NAME} requestHeadersPolicy: set: # ensure we tell the backend the host at which requests are received, so we # can build redirects (e.g., to the OIDC provider) URIs using this information - name: X-Forwarded-Host value: "%REQ(Host)%" timeoutPolicy: # non-streaming completions can take a LONG time to generate. We need to bump # timeouts a bit to avoid closing the connection before the upstream starts # sending us data or if we receive some data but then it takes a bit to receive # more (e.g., if an Agent first serves static REX data and then starts streaming # from the LLM) response: 360s retryPolicy: # disable retries - it would hide bugs in the system while testing count: 0 virtualhost: fqdn: open-webui.local tls: secretName: open-webui-tls-cert |
Now you use “kubectl apply filename” with the created file at /tmp/open-webui-ingress.yaml to apply it to your namespace.
Your Openweb UI should now be reachable at the defined ingress https://open-webui.local.
Proceed with creating an administrator account in Openweb UI, and now you have Openweb UI deployed in your namespace with a proxy at /mtls-proxy/ pointing to the Private AI Services OpenAI API endpoints.
Setting up the Pipe Function to work with Private AI Service Agent
Note: If you don’t want to customize your pipe, you can download a prebuilt one here.
Out of the box, Openweb UI doesn’t work with the OpenAI Assistants API, it works directly with the model. However you can extend Openweb UI’s capabilities through Functions which are plugins for Openweb UI. These Functions are built-in and run within the Openweb UI environment. We’ll be writing a Pipe Function to direct our completion requests to our Private AI Agent.
From Openweb UI’s website:
“A Pipe Function is how you create custom agents/models or integrations, which then appear in the interface as if they were standalone models.”
We will start off by creating a Pipe Function. Login as the administrator to your Openweb UI. Click the user icon on the left corner and select “Admin Panel”.

From the Admin Panel screen, select the “Functions” tab.

Click the “+” Icon and select “New Function”

It will generate a python file for you which you can modify from the browser. It’ll look like this:
|
1 2 3 4 5 6 7 8 9 10 11 12 13 14 15 16 17 18 19 20 21 22 23 24 25 26 27 28 29 30 |
""" title: Example Filter author: open-webui author_url: https://github.com/open-webui funding_url: https://github.com/open-webui version: 0.1 """ from pydantic import BaseModel, Field from typing import Optional class Filter: class Valves(BaseModel): priority: int = Field( default=0, description="Priority level for the filter operations." ) max_turns: int = Field( default=8, description="Maximum allowable conversation turns for a user." ) pass class UserValves(BaseModel): max_turns: int = Field( default=4, description="Maximum allowable conversation turns for a user." ) pass ... |
The generated example is for a Filter Function, but what we need is a Pipe Function. So we will need to make a few modifications to this Filter Function so it’ll suit our needs.
Start by defining the python packages we need. You can define the packages you need in your Pipe function by adding a “requirements” line inside of the multi-line comment at the top of the file. Packages are comma separated. For example, to install numpy and httpx packages we’d add to the multi-line comment:
“requirements: httpx, numpy”
We can remove inlet and outlet functions on the class and change class to Pipe. We’ll also include two new functions pipe and pipes on the renamed Pipe class. In the end it should be something like this.
|
1 |
"""<br>title: Example Pipe<br>author: open-webui<br>author_url: https://github.com/open-webui<br>funding_url: https://github.com/open-webui<br>version: 0.1<br><br>requirements: httpx, openai<br>"""<br><br><br>from pydantic import BaseModel, Field<br>from typing import Optional<br><br><br>class Pipe:<br> class Valves(BaseModel):<br> priority: int = Field(<br> default=0, description="Priority level for the filter operations."<br> )<br> max_turns: int = Field(<br> default=8, description="Maximum allowable conversation turns for a user."<br> )<br> pass<br><br> class UserValves(BaseModel):<br> max_turns: int = Field(<br> default=4, description="Maximum allowable conversation turns for a user."<br> )<br> pass<br><br> def __init__(self):<br> # Indicates custom file handling logic. This flag helps disengage default routines in favor of custom<br> # implementations, informing the WebUI to defer file-related operations to designated methods within this class.<br> # Alternatively, you can remove the files directly from the body in from the inlet hook<br> # self.file_handler = True<br><br> # Initialize 'valves' with specific configurations. Using 'Valves' instance helps encapsulate settings,<br> # which ensures settings are managed cohesively and not confused with operational flags like 'file_handler'.<br> self.valves = self.Valves()<br> pass<br><br> def pipes(self):<br> <br> def pipe(self, body: dict, __user__: dict) -> Union[str, Generator, Iterator]: |
Next we’re going to support multiple Private AI Agents in Openweb UI by defining them in the pipes method of the Pipe class.
|
1 2 3 4 5 6 7 8 9 10 11 12 13 14 15 16 17 18 19 20 21 |
def pipes(self): base_url = os.environ.get("OPENAI_API_BASE_URL") assistants_url = f"{base_url}/assistants" with httpx.Client(verify=True) as client: response = client.get(assistants_url) if response.status_code == 200: assistants = response.json() self.assistants = assistants.get("data") return self.assistants else: print( f"Failed to retrieve assistants. Status code: {response.status_code}" ) return [ { "id": "error", "name": "Could not fetch models from PAIS, please check your API Base URL and try again", } ] |
When the Pipe Function is activated, this will call the pipes function which makes a request to the Private AI Services proxy to get a list of assistants we have from our Private AI Services Agent Builder and save it to the assistants property of the pipe class.
By default, when chatting with models in Openweb UI they will direct requests to the /completions endpoint, but in our case we want to direct chat requests to the agent. We can do this by defining a pipe method on the Pipe class.
|
1 2 3 4 5 6 7 8 9 10 11 12 13 14 15 16 17 18 19 20 21 22 23 24 25 26 27 28 29 30 31 32 33 34 35 36 37 38 39 40 41 42 43 44 45 46 47 48 49 50 51 52 53 54 55 56 57 |
def pipe(self, body: dict, __user__: dict) -> Union[str, Generator, Iterator]: target_assistant = "" target_id = body["model"][body["model"].find(".") + 1 :] for assistant in self.assistants: if assistant.get("id") == target_id: target_assistant = assistant if not target_assistant: return f"Error: Unable to find requested assistant" http_client = httpx.Client(verify=True) base_url = os.environ.get("OPENAI_API_BASE_URL") agents_url = f"{base_url}/agents/{target_assistant['id']}" openai_client_completions = openai.OpenAI( base_url=agents_url, http_client=http_client, ) try: r = openai_client_completions.chat.completions.create( model=f"{target_assistant['model']}", messages=body.get("messages", []), stream=self.valves.ENABLE_STREAMING, temperature=body.get("temperature", 0), max_tokens=body.get("max_tokens", 256), ) if self.valves.ENABLE_STREAMING: def stream_generator(): for chunk in r: if chunk.choices: delta_content = chunk.choices[0].delta.content if delta_content: yield delta_content return stream_generator() else: return r.choices[0].message.content except openai.APIConnectionError as e: print(f"Review this error - {e}") return f"Error: API Connection Error - {e}" except openai.RateLimitError as e: return f"Error: Rate Limit Exceeded - {e}" except openai.AuthenticationError as e: return f"Error: Authentication Error - {e}. Check your PAIS_API_KEY." except openai.BadRequestError as e: return f"Error: Bad Request - {e}" except openai.APIStatusError as e: return f"Error: API Status Error - Status {e.status_code}, Response: {e.response.text if e.response else 'N/A'}" except Exception as e: return f"Error: {e}" |
You’ll see in this section of the pipe function we’re adding in our Chat Interaction Sample Code we got from the Agent Builder service, but with a few modifications.
|
1 2 3 4 5 6 7 8 9 10 11 12 13 14 15 |
openai_client_completions = openai.OpenAI( base_url=agents_url, http_client=http_client, ) try: r = openai_client_completions.chat.completions.create( model=f"{target_assistant['model']}", messages=body.get("messages", []), stream=self.valves.ENABLE_STREAMING, temperature=body.get("temperature", 0), max_tokens=body.get("max_tokens", 256), ) ... |
For the model, we will read this from the assistants list we had saved previously when the pipes function was called. For messages, we read from the Openweb UI chat window which we can access from the body parameter.
After saving the file, make sure to activate the Pipe Function by toggling it on in the Functions tab of the Admin Panel.
Once activated, you are now able to select your Agents from the models dropdown when chatting with a model in Openweb UI.
References
Discover more from VMware Cloud Foundation (VCF) Blog
Subscribe to get the latest posts sent to your email.


