

Istio is a powerful open-source service mesh that secures simplifies service-to-service communication in cloud-native applications. It provides traffic management, security, and observability features, making it easier to deploy, manage, and secure microservices at scale. In this blog, we’ll explore how to set up and use Istio on VKS, leveraging its capabilities to enhance the reliability and performance of your Kubernetes workloads.
Prerequisites
First, make sure a supervisor namespace has been created, and a VKS cluster is up and running. For details on how to setup a VKS cluster, consult the official documentation: https://techdocs.broadcom.com/us/en/vmware-cis/vsphere/vsphere-supervisor/8-0/using-tkg-service-with-vsphere-supervisor/provisioning-tkg-service-clusters/workflow-for-provisioning-tkg-clusters-using-kubectl.html
This guide uses VKS version 3.5. For simplicity, we’ll use an Ubuntu (Jammy) VM as our environment (for the VKS cluster spec, see the footnote).
Installation
To begin, we install the Istio on VKS using the bundled add-on package
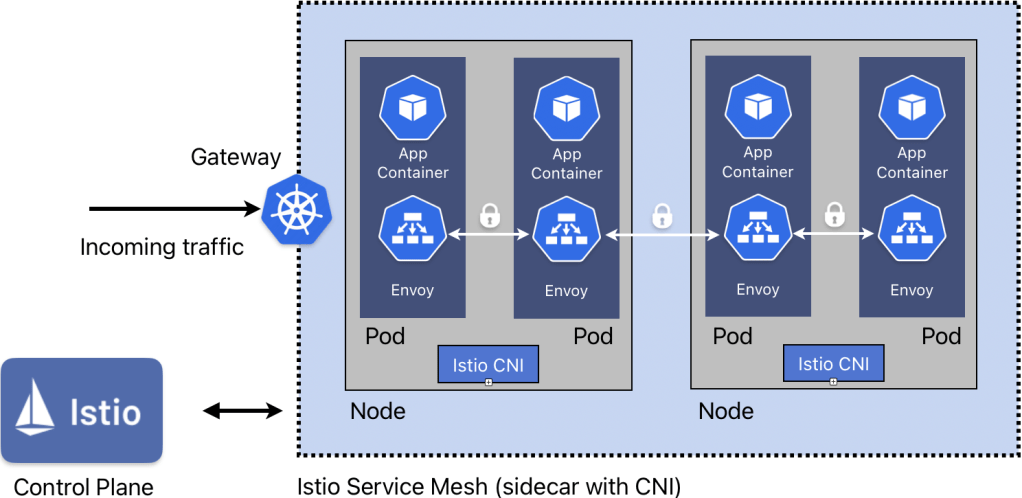
Architecturally, Istio offers two paths for the data plane: the traditional sidecar model, which injects a dedicated istio-proxy container in every workload pod, and the newer ambient data plane, which eliminates sidecars in favour of a shared, node-level ztunnel proxy waypoints. We’ll quickly summarise the differences below.
Sidecar
The sidecar architecture can be deployed using the CNI method. This approach eliminates the need for a privileged init container in every workload namespace, enhancing security and compliance. Instead, we only need one privileged namespace (istio-system) and this will be installed as a daemonset (one CNI pod per node). For each scheduled pod, the CNI configures iptables routing rules dynamically. Traffic flows via the envoy proxies between pods.
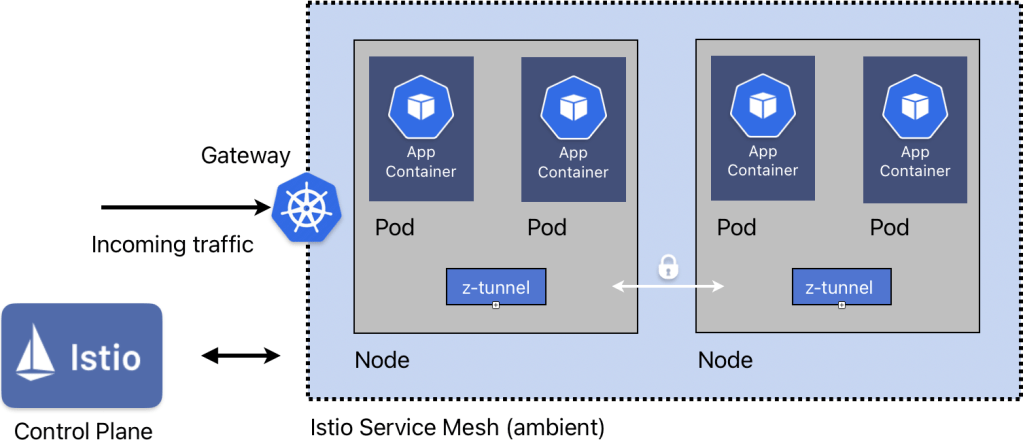
Ambient
Here, the ztunnel proxy daemonset replaces the Envoy sidecars by operating entirely at the node level. Traffic is transparently intercepted, establishing secure mTLS tunnels to other nodes without requiring any modifications or injected containers within the workloads themselves. This provides a lighter-weight solution compared with the sidecar injection.
Configuration
Now, to configure Istio to use sidecar or ambient we need to update the add-on configuration (as below). In actual fact, we can have both methods enabled simultaneously (both the CNI daemonset and z-tunnel daemonset will be present on all nodes).
We can then update the add-on package with our values
After applying the manifest, we can observe the status
This should give a status similar to below, showing that the reconcile succeeded.
Further, we can see that both daemonsets are active
The istiod controller actively watches namespace labels to determine the required data plane mode, dynamically pushing the appropriate routing configurations and proxy topologies to the workloads within. We’ll see an example of this below.
Setting up the Demo App
Now we can install the bookinfo sample app from Istio, as per https://istio.io/latest/docs/examples/bookinfo/
First, we create the bookinfo namespace and label it as ‘baseline’ for PSA. Additionally we label the namespace for either sidecar or ambient mode (note the difference in syntax between the labels).
For the purposes of this blog, we’ll use the sidecar data plane mode.
Next, we apply the demo manifest to install the ‘bookinfo’ demo from Istio
Check the app:
Configuring the Gateway for the Demo App
Next we create the Gateway and provide routing for the app. Note that there are two available APIs we can make use of:
– Istio native API ← legacy, soon to be deprecated
– K8s Gateway API ← preferred
We’ll use the latter here. Taking a look at the sample manifest (https://raw.githubusercontent.com/istio/istio/refs/heads/master/samples/bookinfo/gateway-api/bookinfo-gateway.yaml):
We notice that the first part defines our gateway using the Kubernetes gateway API, class ‘Istio’ and advertising on port 80. The next section defines the HTTP route and rules that directs traffic from this gateway to the correct endpoint (later we’ll see how we can alter this).
Verifying the App deployment
We check that the pods are running and the status of our gateway:
We can see that the pods are in a healthy state. A gateway of class ‘istio’ has been created and programmed, and an external IP address has been assigned.
Like earlier, we can see that we’re able to access the app – but this time using the gateway IP:
Opening a browser to http://<IP>:8080/productpage shows our demo app

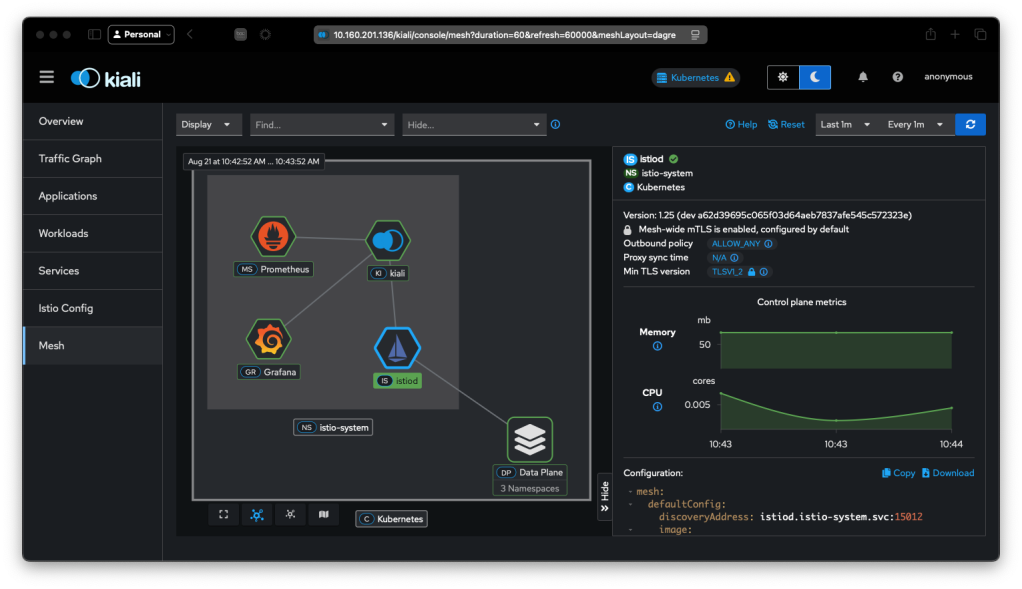
Observing via the Kiali Dashboard
The Kiali dashboard provides a nice way to visualize our service mesh. To install it, we apply the add-on manifests that come with the Istio install and wait until it’s ready
Note: the dashboard needs a persistent volume, and inherits the default storage class of the cluster, therefore ensure you have a default storage class is set in your VKS definition (see the footnote for an example)
We then create a gateway for Kiali:
And we obtain the address:
Opening this in a browser shows the UI:
To see how the data passes through the app, we’ll need to generate some traffic
Navigating to Applications and then selecting the ‘bookinfo’ namespace, then selecting ‘productpage’ (i.e. our homepage) gives us an overview of the traffic flow:

We can see that the homepage references v1 of the site, which has links to details (v1) and reviews (v1, v2, v3). The padlocks show that the traffic is encrypted using mTLS.
Selecting the reviews page we can see that only v2 and v3 flow to ratings, and v1 does not.

In fact, if we look at ratings, we can see this very clearly:

Applying Rules
If we navigate to the bookinfo app website and refresh the page a few times, you will notice that sometimes there is a change in how the stars are rendered: sometimes black, sometimes red, sometimes none. This difference is due to the the different versions, i.e. v1,v2,v3 of the reviews site. As we saw earlier on the dashboard, v1 does not flow to ‘ratings’
With Istio, we are able to declaratively apply a ruleset to affect the http routes, using the gateway api
In order to show this with the bookinfo app, first we must apply the backend service definitions that define each version:
Then we can use the gateway api to apply a rule that ensures only v1 is served:
Back on the dashboard, we can clearly see how this affects the flow. All traffic now only traverses to v1:

And if you refresh the bookinfo website, you’ll see the page without any stars

We can also apply the rules selectively per user. Let’s see this in action:
Here, we have created a rule based on ‘end-user’ with a value of ‘jason’ to point to ‘reviews-v3’. Navigating back to our website, we login as user ‘jason’ (any password). Notice now that the red review stars are always present:

Summary
In this blog we saw how we can easily install OSS Istio on VKS. We observed traffic flows and mTLS encryption on the dashboard. Finally we demonstrated how we can manipulate the gateway api to apply rules to direct traffic as needed
Footnote
Below is the spec used to create the VKS cluster
For the Istio package reference for VKS, visit:
https://techdocs.broadcom.com/us/en/vmware-cis/vcf/vsphere-supervisor-services-and-standalone-components/latest/managing-vsphere-kuberenetes-service-clusters-and-workloads/installing-standard-packages-on-tkg-service-clusters/standard-package-reference/istio-package-reference.html
Discover more from VMware Cloud Foundation (VCF) Blog
Subscribe to get the latest posts sent to your email.


