

This blog post describes the steps to replace an SSL certificate for ESXi hosts in VMware Cloud Foundation (VCF). The steps mentioned in the blog are verified against ESXi 6.7, 7.x, and VCF 4.x versions and applicable to Management domain and Workload domains.
By default, vSphere components use the VMCA-signed certificate and key that are created during installation. Replace the default ESXi SSL certificate with certificates from a trusted CA, either a commercial CA or an organizational CA, if your company policy requires it.
Self-signed certificate using OpenSSL is used in this post to demonstrate SSL certificate replacement for ESXi hosts in VMware Cloud Foundation.
Create a self-signed certificate using OpenSSL
Pre-requisites: Before we begin, ensure that the OpenSSL binaries are installed before executing OpenSSL commands mentioned below.
The following example shows the command to verify whether OpenSSL libraries are installed in a Linux system.
|
1 2 |
[root@vcf-test-linuxjumpvm /]# which openssl /usr/bin/openssl |
If your environment doesn’t have the required OpenSSL libraries, you can download and install from here
Generate a self-signed certificate using OpenSSL command. In the subsequent steps, we will be using this self-signed certificate for generating a certificate for the ESXi host.
Refer OpenSSL official documentation in case if you are looking for any additional information related to OpenSSL commands.
Step 1: Execute the below command to generate a self-signed certificate using OpenSSL
|
1 |
openssl req -x509 -newkey rsa:4096 -keyout key.pem -out cert.pem -days 365 -nodes |
After executing the above command, it will prompt the user to input the data for Country Name, State or Province Name, Locality Name, Organization Name, Organizational Unit Name, Common Name, and Email Address. Enter the details as appropriate.
For example, here is the command to generate a self-signed certificate.
|
1 2 3 4 5 6 7 8 9 10 11 12 13 14 15 16 17 18 19 20 21 22 23 |
[root@vcf-test-linuxjumpvm /]# openssl req -x509 -newkey rsa:4096 -keyout key.pem -out cert.pem -days 365 -nodes Generating a 4096 bit RSA private key ................................................................................................................++ .......................................................................................................................................................................................................................................................................................++ writing new private key to 'key.pem' ----- You are about to be asked to enter information that will be incorporated into your certificate request. What you are about to enter is what is called a Distinguished Name or a DN. There are quite a few fields but you can leave some blank For some fields there will be a default value, If you enter '.', the field will be left blank. ----- Country Name (2 letter code) [XX]:US State or Province Name (full name) []:California Locality Name (eg, city) [Default City]:PaloAlto Organization Name (eg, company) [Default Company Ltd]:VMware Inc Organizational Unit Name (eg, section) []:ISBU Common Name (eg, your name or your server's hostname) []:test-openssl-ca.vmware.com Email Address []:test@vmware.com [root@vcf-test-linuxjumpvm /]# |
Step 2: After executing the above command, it generates a self-signed certificate i.e. cert.pem and private key i.e. key.pem.
Copy cert.pem and key.pem files to all the ESXi hosts of a domain for which the certificate needs to be replaced. In the below snippet, for demonstration purpose, we will be copying cert.pem and key.pem files to only one ESXi host.
For example, here are the commands to verify the existence of cert.pem and key.pem files and to copy these files to the ESXi host.
|
1 2 3 4 |
[root@vcf-test-linuxjumpvm /]# ls cert.pem key.pem [root@vcf-test-linuxjumpvm /]# [root@vcf-test-linuxjumpvm /]# scp cert.pem key.pem root@esxi-1.vrack.vsphere.local:/ |
Publish certificate to certificate store in vCenter Server
Add the certificate to the truststore in the vCenter Server system that manages the host to ensure that the vCenter Server and the ESXi host have a trust relationship. VMware Endpoint Certificate Store (VECS) is a repository for certificates and private keys. It contains all the Machine SSL Certificates, Trusted Roots and Solution Users Certificates.
Note: Add certificate i.e. cert.pem to the respective domain’s vCenter Server. i.e. if you are replacing the certificate of ESXi hosts for the Management domain, add the certificate to the respective vCenter Server which is part of the Management domain.
Similarly, if you are replacing the certificate of ESXi hosts for any workload domain, ensure to add the certificate to vCenter Server which is part of the workload domain.
Follow these step-by-step instructions to publish a certificate to VECS in vCenter Server.
Step 1: Copy the certificate i.e. cert.pem to vCenter Server. Note that cert.pem was generated in Step 1 in ‘Create a self-signed certificate using OpenSSL’ section.
(Note: If you’re unable to copy cert.pem to vCenter Server, follow the steps mentioned in KB article and then retry to copy the file again)
Log in to vCenter Server via SSH. Type shell and press the ‘Enter’ key, and verify whether cert.pem is copied to vCenter Server.
For example, here are the commands to enable shell access and to verify the existence of cert.pem file in vCenter Server.
|
1 2 3 4 5 6 7 8 9 10 11 12 13 14 15 16 17 |
Using username "root". VMware vCenter Server 7.0.0.10100 Type: vCenter Server with an embedded Platform Services Controller root@10.0.0.6's password: Last login: Fri Apr 10 07:12:12 2020 from 10.0.0.253 Connected to service * List APIs: "help api list" * List Plugins: "help pi list" * Launch BASH: "shell" Command> shell Shell access is granted to root root@vcenter-1 [ ~ ]# ls cert.pem |
Step 2: Execute the below command to add the certificate to VMware Endpoint Certificate Store (VECS) in vCenter Server (Enter the password for administrator@vsphere.local when prompted).
|
1 |
/usr/lib/vmware-vmafd/bin/dir-cli trustedcert publish --cert <path_to_certficate_chain> |
<path_to_certficate_chain>: Mention the path of the certificate file that needs to be added to the truststore
For example, here is the command to publish cert.pem to VECS.
|
1 2 3 4 |
root@vcenter-1 [ ~ ]# /usr/lib/vmware-vmafd/bin/dir-cli trustedcert publish --cert cert.pem Enter password for administrator@vsphere.local: Certificate pubished successfully root@vcenter-1 [ ~ ]# |
Step 3: Verify whether the certificate is added to the truststore.
Ensure that the certificate that was added in the previous step is listed when the below command is executed.
(Note: This can be identified by looking at the CN (Common Name) of the certificate. CN was provided while creating a self-signed certificate in the very first step i.e. ‘Create a self-signed certificate using OpenSSL’)
Execute the below command to list all the trusted certificates (Enter the password for administrator@vsphere.local when prompted).
|
1 |
/usr/lib/vmware-vmafd/bin/dir-cli trustedcert list |
For example, here is the command to list all trusted certificates.
|
1 2 3 4 5 6 7 8 9 10 11 12 |
root@vcenter-1 [ ~ ]# /usr/lib/vmware-vmafd/bin/dir-cli trustedcert list Enter password for administrator@vsphere.local: Number of certificates: 2 #1: CN(id): 0376B8437064C7A9F7D951213237D3762D643B3E Subject DN: CN=CA, DC=vsphere, DC=local, C=US, ST=California, O=vcenter-1.vrack.vsphere.local, OU=VMware Engineering CRL present: yes #2: CN(id): 3C637EC58003C953D99B0E35779BC46EF2873B64 Subject DN: C=US, ST=California, L=PaloAlto, O=VMware Inc, OU=ISBU, CN=test-openssl-ca.vmware.com/emailAddress=test@vmware.com CRL present: no root@vcenter-1 [ ~ ]# |
Publish certificate to SDDC Manager and Common Services truststore
Follow these step-by-step instructions to import the certificate to SDDC Manager and Common Services truststore.
Step 1: Copy certificate i.e. cert.pem to /tmp directory of SDDC Manager. Note that cert.pem was generated in Step 1 in ‘Create a self-signed certificate using OpenSSL’ section.
Step 2: SSH to SDDC Manager as a vcf user. Switch to the root user, and then execute the below command to get commonsvcs truststore password.
|
1 |
cat /etc/vmware/vcf/commonsvcs/trusted_certificates.key |
For example, here are the commands to switch to the root user and to obtain the password for the common services truststore.
|
1 2 3 4 5 |
vcf@sddc-manager [ ~ ]$ su Password: root@sddc-manager [ /home/vcf ]# cat /etc/vmware/vcf/commonsvcs/trusted_certificates.key ****************** root@sddc-manager [ /home/vcf ]# |
Step 3: Execute the below command to import the certificate to the commonsvcs truststore.
|
1 |
keytool -importcert -alias <aliasname> -file <Certificate_file> -keystore /etc/vmware/vcf/commonsvcs/trusted_certificates.store |
<aliasname>: This can be any user-defined name
<Certificate_file>: Provide the correct path of the certificate file that needs to be imported to truststore
(Note: User will be prompted to provide a password while adding the certificate to the truststore. Enter the password obtained in the previous step (i.e. Step 2). Also, type ‘yes’ when prompted to confirm to trust the certificate)
For example, here is the command to import cert.pem to common services truststore.
|
1 |
root@sddc-manager [ ~ ]# keytool -importcert -alias openssl-ca-test -file /tmp/cert.pem -keystore /etc/vmware/vcf/commonsvcs/trusted_certificates.store |
Step 4: Execute the below command to verify if the new certificate is added to the common services truststore (Enter the password for the truststore key obtained in Step 2).
|
1 |
keytool -list -v -keystore /etc/vmware/vcf/commonsvcs/trusted_certificates.store |
Step 5: Execute the below command to import the certificate to the SDDC Manager truststore.
|
1 |
keytool -importcert -alias <aliasname> -file <Certificate_file> -keystore /etc/alternatives/jre/lib/security/cacerts |
<aliasname>: This can be any user-defined name
<Certificate_file>: Provide the correct path of the certificate file that needs to be imported to truststore
(Note: User will be prompted to provide a password while adding the certificate to the truststore. Enter the default password “changeit”. Also, type ‘yes’ when prompted to confirm to trust the certificate)
For example, here is the command to import cert.pem to SDDC Manager truststore.
|
1 |
root@sddc-manager [ ~ ]# keytool -importcert -alias openssl-ca-test -file /tmp/cert.pem -keystore /etc/alternatives/jre/lib/security/cacerts |
Step 6: Execute the below command to verify if the new certificate is added to the SDDC Manager truststore (Enter “changeit” when prompted for a password, note that this is a default password).
|
1 |
keytool -list -v -keystore /etc/alternatives/jre/lib/security/cacerts |
Step 7: Restart all the SDDC Manager services.
Execute the below command to restart the SDDC Manager Services. Type letter ‘y’ when it prompts the user to confirm the restart of SDDC Manager services. Wait for about 5 to 10 minutes for all the SDDC Manager services to come up and running.
|
1 |
sh /opt/vmware/vcf/operationsmanager/scripts/cli/sddcmanager_restart_services.sh |
Change certificate mode to custom in vCenter Server
Note: Change certificate mode to custom in respective domain’s vCenter Server. i.e. if you are replacing the certificate of ESXi hosts for the Management domain, you need to change the certificate mode to custom in the respective vCenter Server which is part of the Management domain.
Similarly, if you are replacing the certificate of ESXi hosts for any workload domain, ensure to change the certificate mode to custom in vCenter Server which is part of the workload domain.
Follow these step-by-step instructions to change the certificate mode to custom in vCenter Server.
- Log in to vCenter Server using the vSphere Web Client.
- In the vSphere Web Client, select the vCenter Server that manages the hosts.
- Click Configure, and under Settings, click Advanced Settings
- Click EDIT SETTINGS
- In the Filter box, enter certmgmt to display only certificate management keys.
- Change the value of vpxd.certmgmt.mode to custom
- Click SAVE
Here are the screenshots for reference which shows the navigation steps in vSphere WebClient UI to change the certificate mode in vCenter Server.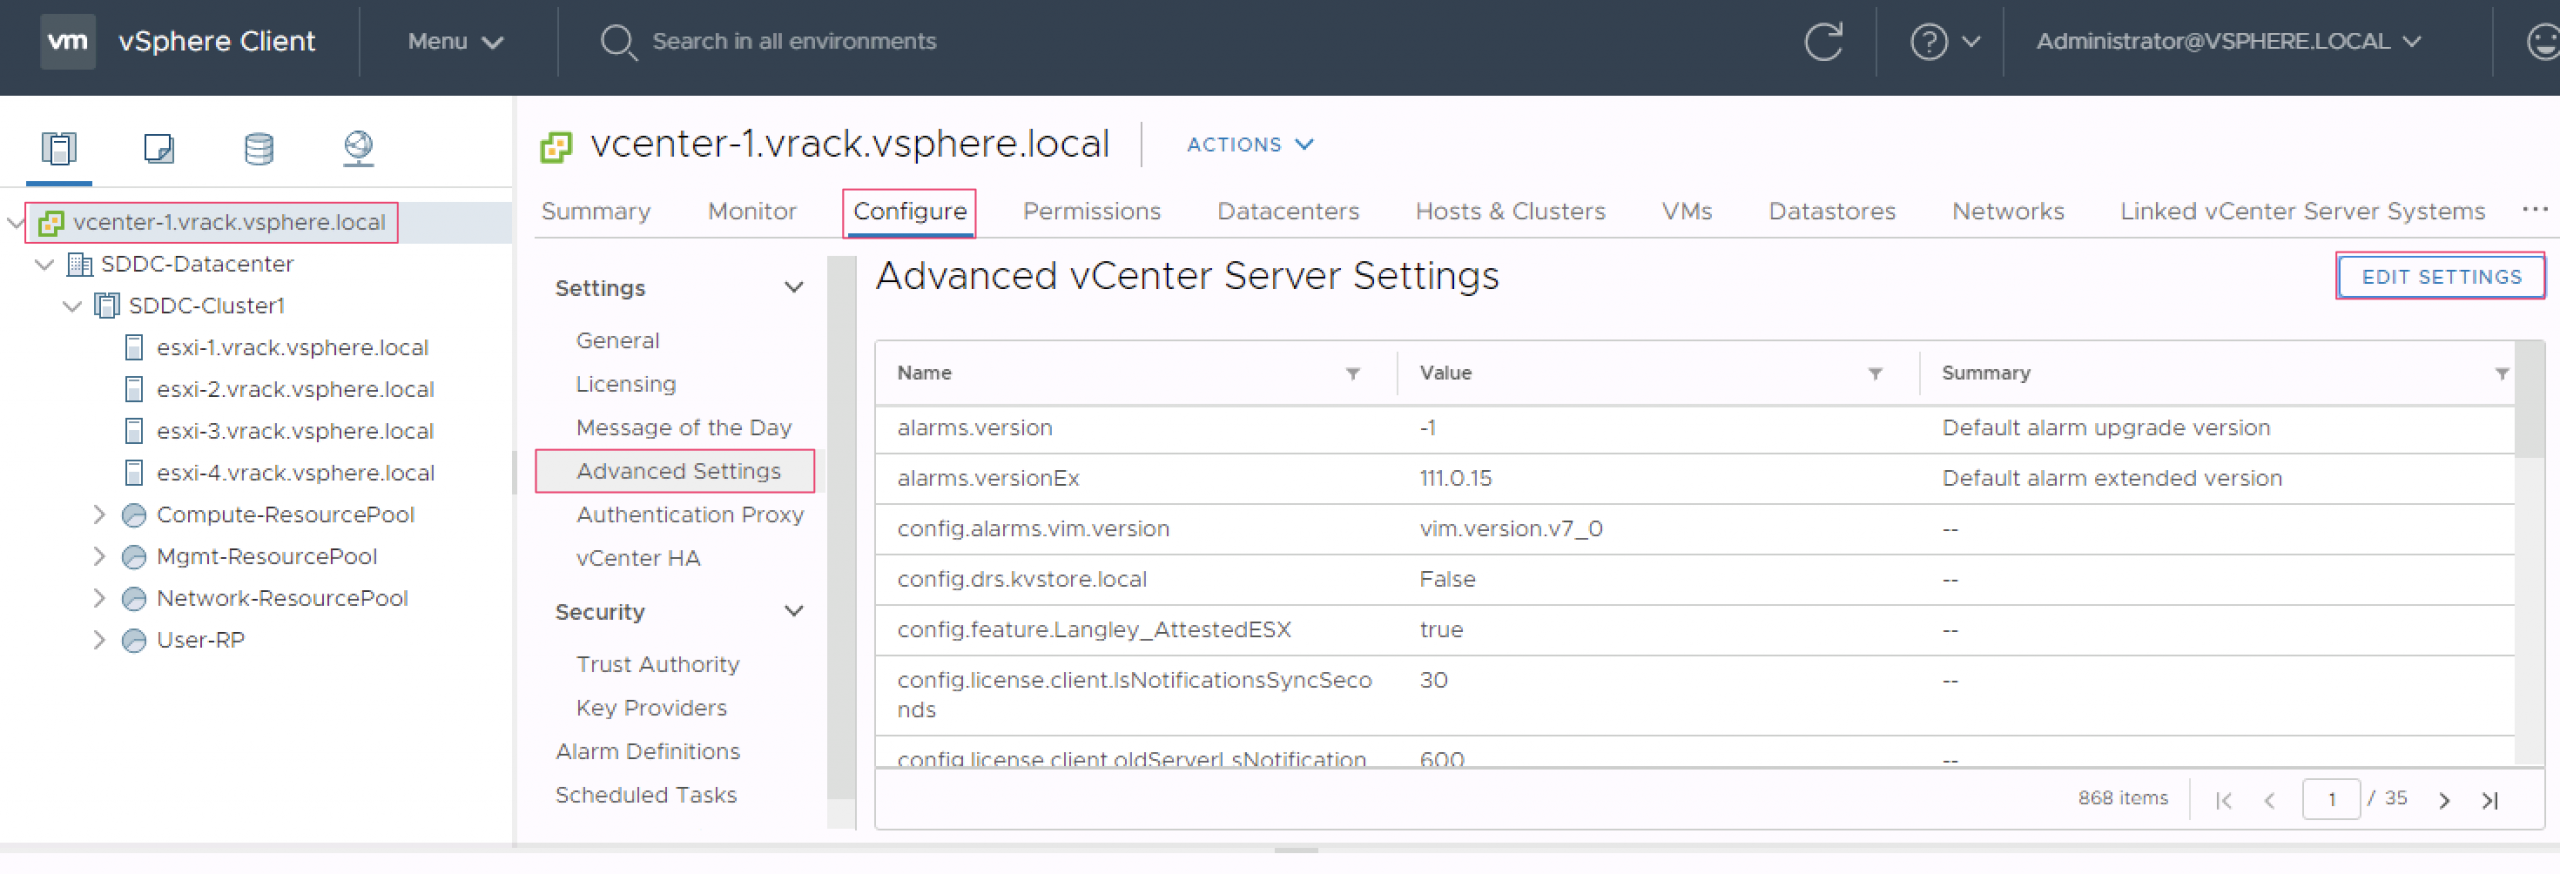

- Restart the vCenter Server services.
Log in to vCenter via SSH. Type shell and press the ‘Enter’ key. Execute the below commands to restart the vCenter Server services.
12service-control --stop --allservice-control --start --all
Note: Wait for all the vCenter Server services to come up. Roughly, it may take around 10 to 15 minutes for all the vCenter Server services to come up and running.For example, here are the commands to enable shell access and restarting vCenter Server services.
1234567891011121314151617181920212223242526272829303132333435363738394041424344454647484950515253545556Using username "root".VMware vCenter Server 7.0.0.10100Type: vCenter Server with an embedded Platform Services Controllerroot@10.0.0.6's password:Last login: Fri Apr 10 07:12:12 2020 from 10.0.0.253Connected to service* List APIs: "help api list"* List Plugins: "help pi list"* Launch BASH: "shell"Command> shellShell access is granted to rootroot@vcenter-1 [ ~ ]#root@vcenter-1 [ ~ ]# service-control --stop --allOperation not cancellable. Please wait for it to finish...Performing stop operation on service observability...Successfully stopped service observabilityPerforming stop operation on service vmware-pod...Successfully stopped service vmware-podPerforming stop operation on service vmware-vdtc...Successfully stopped service vmware-vdtcPerforming stop operation on profile: ALL...Successfully stopped service vmware-vmonSuccessfully stopped profile: ALL.Performing stop operation on service vmcad...Successfully stopped service vmcadPerforming stop operation on service vmdird...Successfully stopped service vmdirdPerforming stop operation on service vmafdd...Successfully stopped service vmafddPerforming stop operation on service lwsmd...Successfully stopped service lwsmdroot@vcenter-1 [ ~ ]# service-control --start --allOperation not cancellable. Please wait for it to finish...Performing start operation on service lwsmd...Successfully started service lwsmdPerforming start operation on service vmafdd...Successfully started service vmafddPerforming start operation on service vmdird...Successfully started service vmdirdPerforming start operation on service vmcad...Successfully started service vmcadPerforming start operation on profile: ALL...Successfully started service vmware-vmonSuccessfully started profile: ALL.Performing start operation on service observability...Successfully started service observabilityPerforming start operation on service vmware-vdtc...Successfully started service vmware-vdtcPerforming start operation on service vmware-pod...Successfully started service vmware-podroot@vcenter-1 [ ~ ]#
Steps to replace certificate for ESXi host
Generate Certificate Signing Request (CSR) for ESXi host
Step 1: Create an openssl.cfg file in ESXi host, and update CommonName and subjectAltName in openssl.cfg with appropriate FQDN of ESXi host. Here are the steps to follow.
- Log in to ESXi host via SSH as the root user for which the certificate needs to be replaced.
- Create openssl.cfg file with the content mentioned below.
12345678910111213141516171819202122[req]default_bits = 2048default_keyfile = rui.keydistinguished_name = req_distinguished_nameencrypt_key = noprompt = nostring_mask = nombstrreq_extensions = v3_req[v3_req]basicConstraints = CA:FALSEkeyUsage = digitalSignature, keyEncipherment, dataEnciphermentextendedKeyUsage = serverAuth, clientAuthsubjectAltName = DNS:<FQDN>[req_distinguished_name]countryName = USstateOrProvinceName = NYlocalityName = New York0.organizationName = VMWareorganizationalUnitName = vSpherecommonName = <FQDN> - Replace <FQDN> in the above openssl.cfg file with a fully qualified domain name (FQDN) of the ESXi host.
The commonName and subjectAltName attribute must be set to FQDN of your ESXi host.
Also, update the other attributes such as countryName, stateOrProvinceName, stateOrProvinceName, 0.organizationName and organizationalUnitName as appropriate.For example, here is the sample openssl.cfg file for reference after updating all the required attributes.
12345678910111213141516171819202122[req]default_bits = 2048default_keyfile = rui.keydistinguished_name = req_distinguished_nameencrypt_key = noprompt = nostring_mask = nombstrreq_extensions = v3_req[v3_req]basicConstraints = CA:FALSEkeyUsage = digitalSignature, keyEncipherment, dataEnciphermentextendedKeyUsage = serverAuth, clientAuthsubjectAltName = DNS:esxi-1.vrack.vsphere.local[req_distinguished_name]countryName = USstateOrProvinceName = NYlocalityName = New York0.organizationName = VMWareorganizationalUnitName = vSpherecommonName = esxi-1.vrack.vsphere.local
Step 2: Execute the below command to Generate a Certificate Signing Request (CSR) for the ESXi host.
|
1 |
openssl req -new -nodes -out rui.csr -keyout rui-orig.key -config openssl.cfg |
The above command will generate the following two files:
rui-orig.key: Private key for the host
rui.csr: Certificate signing request file
Step 3: Execute the below command to convert the key to be in RSA format.
|
1 |
openssl rsa -in rui-orig.key -out rui.key |
For example, here is the command to verify the existence of rui.csr and rui.key files in the ESXi host.
|
1 2 3 4 |
[root@esxi-1:~] ls -l rui.key rui.csr -rw-r--r-- 1 root root 1171 Apr 9 12:28 rui.csr -rw-r--r-- 1 root root 1704 Apr 9 12:36 rui.key [root@esxi-1:~] |
Generate Certificate for ESXi host
Step 1: Create an openssl.ini file in ESXi host, and update DNS in openssl.ini with appropriate FQDN of ESXi host. Here are the steps to follow.
- Log in to ESXi host via SSH as the root user for which the certificate needs to be replaced.
- Create openssl.ini file with content mentioned below.
123456789101112131415161718192021222324252627282930313233343536373839[req]default_bits = 2048default_keyfile = privkey.pemdistinguished_name = req_distinguished_namereq_extensions = v3_reqx509_extensions = v3_ca[req_distinguished_name]C = [Press Enter to Continue]C_default = USC_min = 2C_max = 2O = [Press Enter to Continue]O_default = default0.OU = [Press Enter to Continue]0.OU_default = default1.OU = [Press Enter to Continue]1.OU_default = PKI2.OU = [Press Enter to Continue]2.OU_default = ABCDcommonName = Public FQDN of servercommonName_max = 64emailAddress = [Press Enter to Continue]emailAddress_default = myEmail@email.com[v3_req]basicConstraints = CA:FALSEkeyUsage = digitalSignature, nonRepudiation, keyEnciphermentsubjectAltName = @altNamesissuerAltName = issuer:copy[v3_ca]subjectKeyIdentifier = hashauthorityKeyIdentifier = keyid:always,issuer:alwayssubjectAltName = email:copyissuerAltName = issuer:copy[altNames]DNS = <FQDN> - Replace <FQDN> in the above openssl.ini file with a fully qualified domain name (FQDN) of the ESXi host.
The DNS attribute must be set to the fully qualified domain name (FQDN) of your ESXi host.For example, here is the sample openssl.ini file for reference after updating the DNS attribute.
12345....................................[altNames]DNS = esxi-1.vrack.vsphere.local
Step 2: Ensure that the root certificate i.e. cert.pem and private key i.e. key.pem files are already copied to ESXi host which was generated in very first step i.e. ‘Create a self-signed certificate using OpenSSL’ section.
For example, here is the command to verify the existence of cert.pem and key.pem files in ESXi host. If these files are not present then ensure to copy them before proceeding to the next step.
|
1 2 3 4 |
[root@esxi-1:~] ls -l *.pem -rw-r--r-- 1 root root 1911 Apr 9 11:15 cert.pem -rw-r--r-- 1 root root 3272 Apr 9 11:15 key.pem [root@esxi-1:~] |
Step 3: Execute the below command to generate the certificate for ESXi host
|
1 |
openssl x509 -req -days 360 -in rui.csr -CA cert.pem -CAkey key.pem -CAcreateserial -out rui.crt -extfile openssl.ini -extensions v3_req |
The above command will generate the following file.
rui.crt : Certificate file
For example, here is the command to generate a new certificate for the ESXi host.
|
1 2 3 4 5 6 7 8 |
[root@esxi-1:~] openssl x509 -req -days 360 -in rui.csr -CA cert.pem -CAkey key.pem -CAcreateserial -out rui.crt -extfile openssl.ini -extensions v3_req Signature ok subject=/C=US/ST=NY/L=New York/O=VMWare/OU=vSphere/CN=esxi-1.vrack.vsphere.local Getting CA Private Key [root@esxi-1:~] [root@esxi-1:~] ls -l rui.crt -rw-r--r-- 1 root root 1631 Apr 9 12:38 rui.crt [root@esxi-1:~] |
Replace Certificate for ESXi host
Step 1: Put the ESXi host in Maintenance Mode.
- Log in to vCenter via vSphere WebClient.
- Select ESXi host for which the certificate needs to replaced, and put the host in maintenance mode.
- Disconnect the ESXi host from vCenter Server
Step 2: Log in to ESXi host via SSH as root user and navigate to directory /etc/vmware/ssl/
|
1 |
[root@esxi-1:/etc/vmware/ssl] cd /etc/vmware/ssl |
Step 3: Take a backup/rename the original certificate files such as rui.crt and rui.key which are present in ESXi host at location /etc/vmware/ssl
For example, here are the commands to take backup of rui.crt and rui.key files.
|
1 2 |
[root@esxi-1:/etc/vmware/ssl] mv rui.key orig.rui.key [root@esxi-1:/etc/vmware/ssl] mv rui.crt orig.rui.crt |
Step 4: Copy rui.crt (new certificate) and rui.key to /etc/vmware/ssl
(Note: The new certificate rui.crt was generated in Step 3 in section “Generate Certificate for ESXi host”, and rui.key was generated in Step 3 in section “Generate Certificate Signing Request (CSR) for ESXi host”)
For example, here is the command to copy the new rui.crt and rui.key files to /etc/vmware/ssl directory.
|
1 2 |
[root@esxi-1:/etc/vmware/ssl] cd [root@esxi-1:~] cp rui.key rui.crt /etc/vmware/ssl |
Step 5: Execute the below command to append the content of cert.pem to /etc/vmware/ssl/castore.pem
(Note: cert.pem was generated in very first step i.e. Create a self-signed certificate using OpenSSL, and it was already copied to ESXi host )
For example, here is the command to append the content of cert.pem to /etc/vmware/ssl/castore.pem
|
1 |
[root@esxi-1:~] cat cert.pem >> /etc/vmware/ssl/castore.pem |
Step 6: Restart the ESXi host or restart the host’s management agents. In the below step, we will be restarting the ESXi host.
(Note: Restart can take some time, roughly up to 10 minutes. Wait for the host to come up before proceeding with next step)
For example, here is the command to restart the ESXi host.
|
1 |
[root@esxi-1:~] reboot |
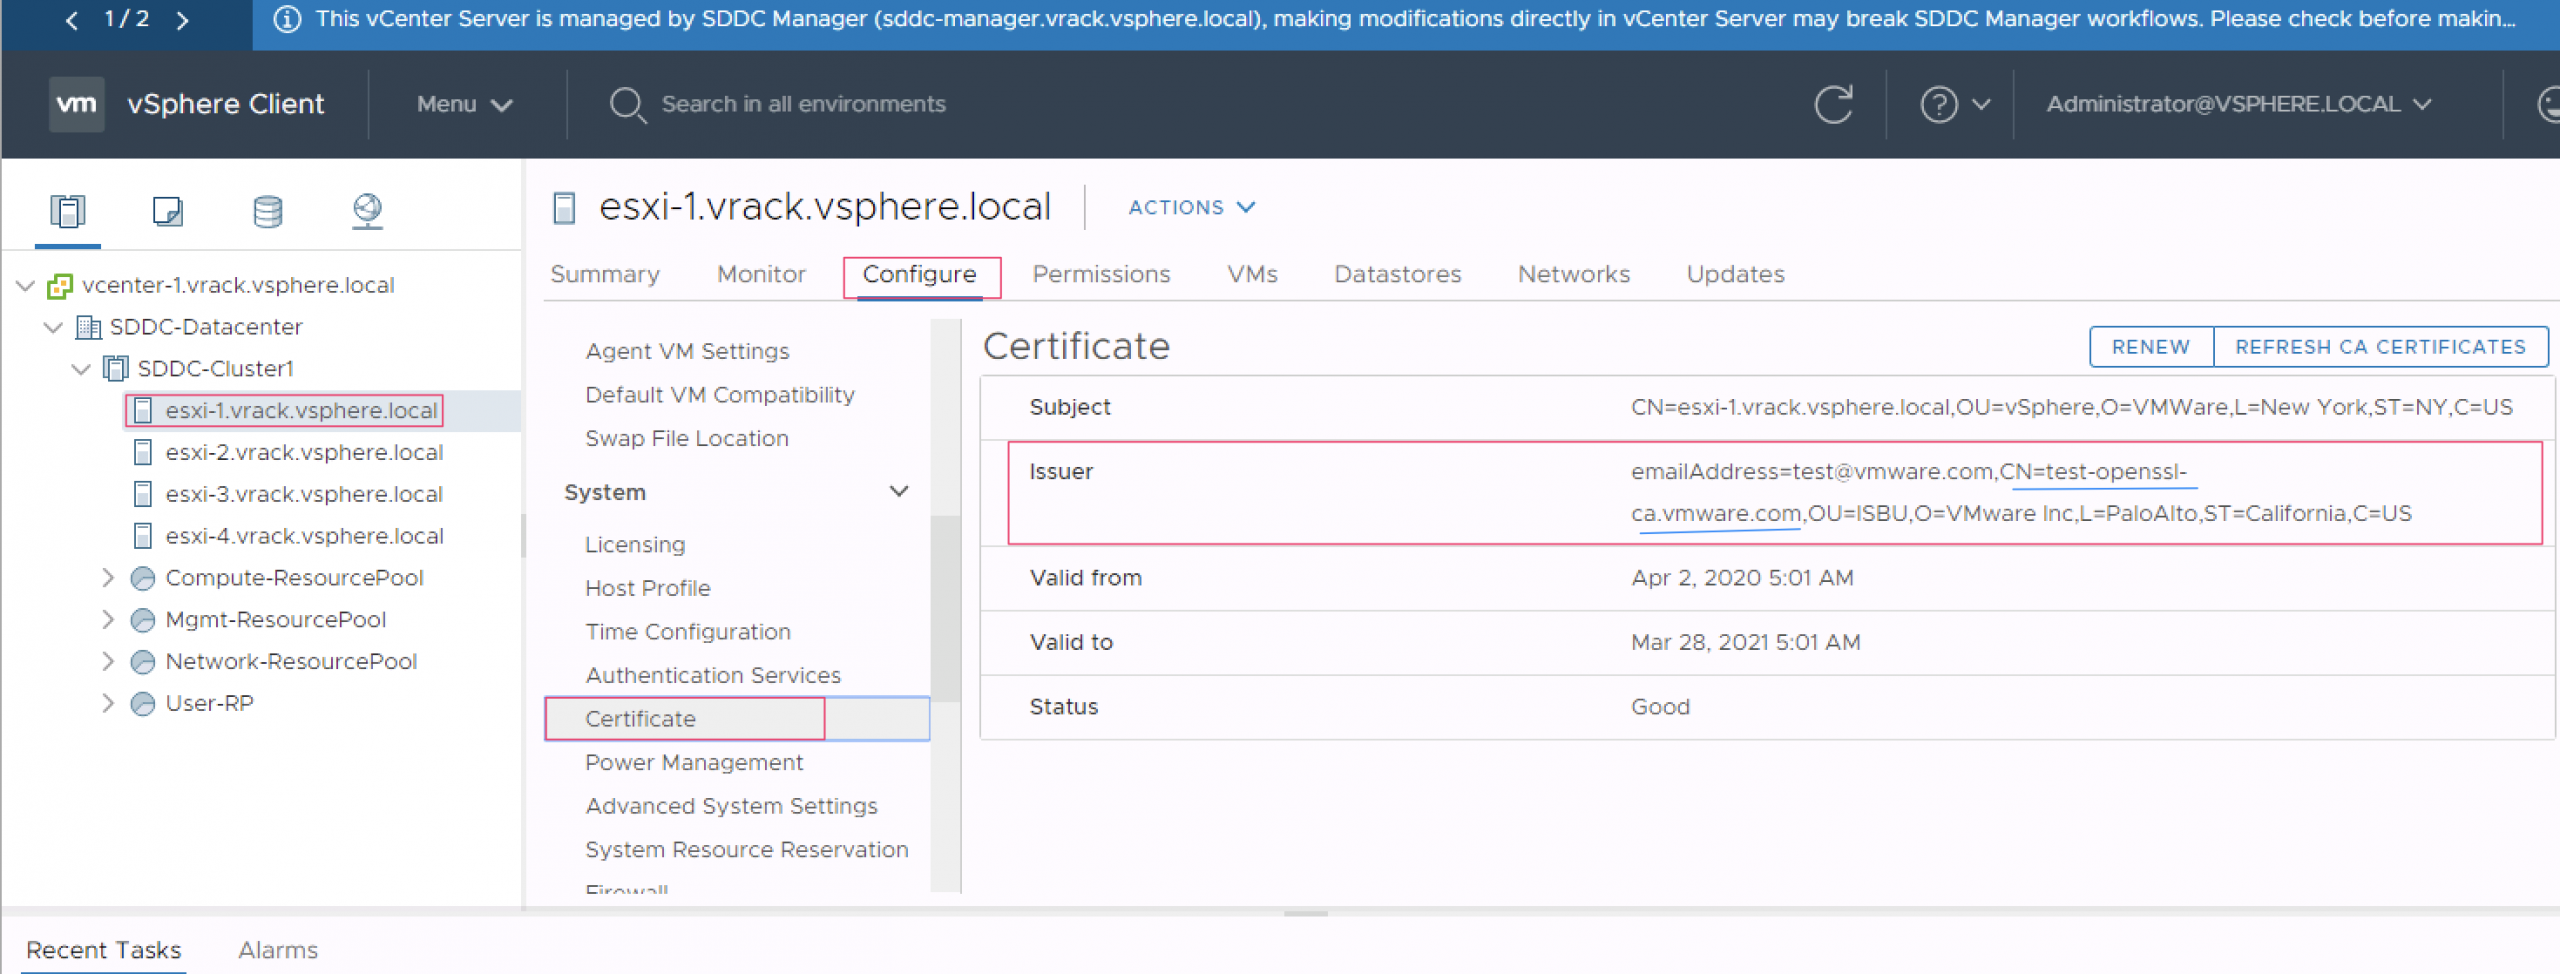
Step 7: Connect ESXi host in vCenter Server System, and verify if the new certificate is shown for ESXi host
- Log in to vCenter via vSphere WebClient.
- Reconnect the ESXi host for which the certificate is replaced (accept the new thumbprint while reconnecting the host if there is a prompt).
- Exit the host from Maintenance Mode.
- Select Host > Configure > Certificate, and verify whether the new certificate is applied or not.
(Note: In case if the new certificate is not reflected, disconnect and connect the host once again)
Here is the screenshot for reference to see the navigation steps in vSphere WebClient UI to check the new certificate details of the ESXi host.
***IMPORTANT NOTE: Repeat the above steps i.e. Generate Certificate Signing Request (CSR) for ESXi host, Generate Certificate for ESXi host and Replace Certificate for ESXi host listed under section ‘Steps to replace certificate for ESXi host‘ for all the remaining ESXi hosts of a domain.
References
For any additional information, please refer to the official VMware vSphere documentation. Here are few links for quick reference –
Configuring OpenSSL for installation and configuration of CA signed certificates in the vSphere environment
Update the vCenter Server TRUSTED_ROOTS Store
Change the Certificate Mode
Configuring CA signed certificates for ESXi 6.x/7.0 hosts
Replacing ESXi SSL Certificates and Keys
Discover more from VMware Cloud Foundation (VCF) Blog
Subscribe to get the latest posts sent to your email.


