Sizing a vSphere environment for VMware Virtual SAN is not an easy task and if this is how you look like when you approach it you should continue reading. Nevertheless, even if you already did sizing for VSAN in the past there are some nuances that you might want to pay attention to.
First, before we go into explaining how to size for VSAN, it is imperative you understand why this is important:
- If you undersize VSAN for your environment you might not get the performance you expect or won’t have the capacity you need for your virtual machines
- If you oversize VSAN you might end-up with a higher hardware bill that can be at least partially deferred until you actually need to grow VSAN to that size – remember you can grow as you-go, no need for large upfront investments
OK, so when can I get this tool you ask? It is already available, just go to VSANTCO.VMware.com – the tool was recently updated to also allow you to size VSAN with an All Flash architecture.
Step #1 – how many VMs do you want to place in the VSAN datastore and what are their profiles?
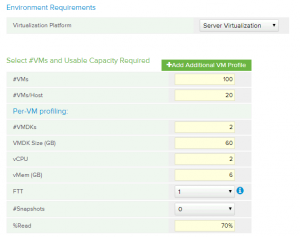
So, the first thing that is asked is are you going to use VSAN for server virtualization or desktop virtualization – once you pick one or the other a default VM profile will be populated based on known averages for our customers.
Now assuming you have one profile you need to populate the number of VMs in the first row, input your expected consolidation ratio – i.e. how many VMs/host you expect to run. If you have more than one profile you can click the “+Add Additional VM Profile” button to create a second one. So, for example you can have 100 VMs with 20 VMs/Host consolidation ratio and another 100 VMs with 25 VMs/Host, and maybe a different VMDK size.
A very important attribute to notice in the profiling process is the Failure To Tolerate (FTT) attribute. Failures to Tolerate (FTT) – Defines the # of hosts and/or disk failures a storage object can tolerate. For “n” failures tolerated, “n+1” copies of the object are created and “2n+1” hosts are required. VSAN can also tolerate a rack failure through the definition of failure domains, but this does not impact the above profiling and shouldn’t be part of your considerations at this point. See our Design & Sizing Guide p.47-48 for a detailed explanation.
Now that you understand what FTT means, you need to understand that while FTT=1 is the default, your environment requirements can vary. Remember that VSAN is using a unique Storage-Policy Based Management (SPBM) system so no two VMs have to have the same availability profile. So, even if all your VMs have the same consolidation ratio, but some of them have higher/lower availability requirements you can create another profile and change FTT to 0, 2 or 3. For example you have 20 test VMs out of the 100 you are sizing the environment for. You should reduce the first profile number of VMs from 100 to 80. Then create a second profile of 20 VMs and change FTT to 0, since there’s no need to protect the data of a test VM and you can save that space for other uses or just save the money on the unnecessary hardware to be purchased.
Other important attributes to pay attention to are VMDK size and #VMDKs – so in the example above the total VM size is 60gbx2 = 120gb – which mean we need a total of 120gbx100 = 12TB usable capacity. Don’t worry about the availability calculation, the calculator does it for you, based on your selected FTT.
Also you’d want to note the %Read of each VM profile – this will impact the performance calculation of the VSAN cluster.
At the bottom of the screen you’ll get an aggregate view of all the VM profiles you created, and you can edit your existing profiles if you had a certain cluster capacity goal in mind (like no more than 20TB usable). In that aggregate view you can also account for slack space or future growth needs.
You are now done with VM profiling, the next step is configuring your hardware based on our recommended ready nodes (but not restricted to, of course). We will cover that in second part of this blog.
Links to other blog posts in the series:


